دليل العناية بمشكلات الجهاز التنفسي
- نظام الضغط الموجب المستمر على مجرى الهواء عن طريق الانف
يعتبرنظام الضغط الموجب المستمر على مجرى الهواء عن طريق الأنف، المعروف باسم السيباب الأنفى (CPAP) هو أحد أنظمة التنفس الصناعى اللأختراقىة والآمنة حيث لا تحتاج لتركيب أنبوبة حنجرية، يقوم السيباب الأنفى على دفع حجم مناسب من غاز الأكسجين المخلوط بالهواء تحت ضغط إيجابي مستمر على المجرى الهوائى، وذلك للحفاظ على بقاء الحويصلات الهوائية مفتوحة، ومنع إنطواءها أثناء عملية الزفير، و يمكن استخدام نظام السيباب فى وحدات حديثى بطرق مختلفة، منها الماسك، و القسطرة الأنفية البلعومية، و الأنبوبة الحنجرية، و لكن يبقى السيباب الأنفى من أكثر الطرق إنتشاراً.
دواعي الإستخدام :
▘ صعوبة التنفس الناتجة عن مرض الغشاء الهياليني (Hyaline membrane disease) في المواليد ناقصي النمو، نتيجة نقص إفراز مادة السيرفاكتنت، حيث يساعد السيباب على منع إنطواء الحويصلات الهوائية، وذلك لزيادة كفاءة الرئتين، و تقليل الإحتياج إلى إستخدام التنفس الصناعي.
▘ عندما يكون الضغط الجزئي للأكسجين في الدم الشرياني (PaO2)أقل من 50 ملليمتر زئبقي؛ على الرغم من إعطاء الأكسجين بتركيز٦٠٪ أو أكثر بإحدى الطرق البسيطة الأخرى لإعطاء الأكسجين.
▘ حالات صعوبة التنفس التي يعاني فيها االطفل حديثى الولادة من أعراض صعوبة التنفس المتوسطة: إزدياد معدل التنفس عن 60 نفس/الدقيقة أو أكثر، أو نتة، أو إنجذاب أسفل الصدر مثل حالات:
– النهجان المؤقت لدى حديثي الولادة
– إستنشاق العقي
▘ نوبات توقف التنفس المتكررة للمواليد ناقصي الوزن والنمو (Apnea of prematurity).
▘ يستخدم بعد فطام الطفل من جهاز التنفس الصناعي.
موانع الاستخدام :
▘ حالات الفشل التنفسى التى تحتاج للتنفس الصناعى.
▘ نوبات توقف التنفس المتكررة والمصاحبة لأنخفاض معدل ضربات القلب ولا تتحسن مع استخدام السيباب الأنفى.
▘ العيوب الخلقية بالجهاز التنفسى العلوى مثل شق سقف الحلق و انسداد القناة الأنفية.
▘ حالات فتق الحجاب الحاجز.
▘ أمراض القلب الحادة و الغير مستقرة.
مكونات نظام السيباب الأنفى (Nasal–CPAP):
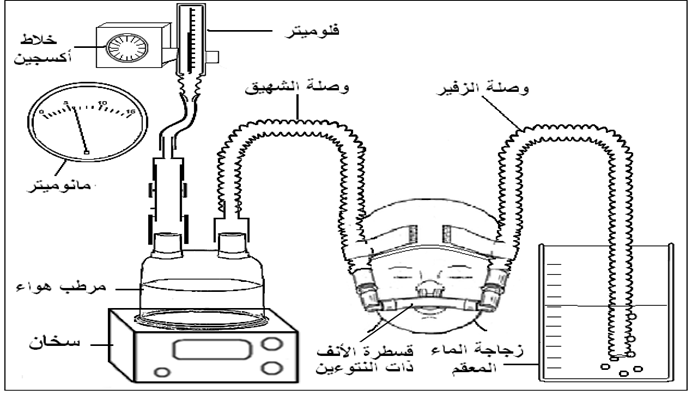
▘ مصدر للغازات المخلوطة والمرطبة (أكسجين + هواء مضغوط) والمرطبة.
▘ مولد للضغط لتكوين ضغط موجب في وصلات الجهاز.
▘ أداة (وسيط) لتوصيل وصلات الجهاز بالمجرى الهوائي للوليد.
مكونات نظام الضغط الموجب المستمر على مجرى الهواء (CPAP) :
دائرة دفع الغاز المستنشق
وتتكون من:
▘ مدخل لكلاً من وصلة الأكسجين والهواء المضغوط، لتكوين الغاز المستنشق.
▘ خلاط أكسجين blender)) لمزج الأكسجين والهواء المضغوط، بهدف توصيل الأكسجين إلى الوليد بالتركيز المطلوب، مُلحق به مقياس إندفاع الهواء (فلوميتر) للتحكم في تدفق الغاز المستنشق، يتم ضبطه على 8 – 10 لتر/الدقيقة، ومقياس التحقق من معدل الضغط المتولد (مانوميتر).
مرطب هواء Humidifier))
لتدفئة وترطيب الغاز المستنشق، مُتصل به مجس لقياس درجة حرارة الغاز المستنشق.
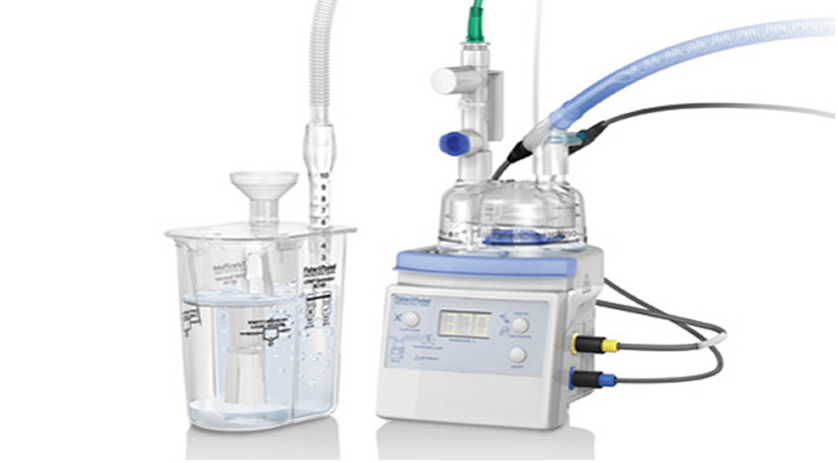
وحدة توليد الضغط الموجب (المولدGenerator – )
يتم توليد الضغط الموجب المطلوب للغاز المستنشق عن طريق المولد (شكل)، بحيث ينعكس هذا الضغط في نهاية الزفير على رئة الوليد، ويؤدي إلى المحافظة على الحويصلات الهوائية مفتوحة؛ أي يمنع إنطوائها فور إخراج الوليد لهواء الزفير.
مولد الضغط الموجب (Generator)
طرق أخرى لتوليد الضغط الموجب
▘ غمس الطرف الحر لأنبوبة الزفير تحت سطح الماء للمسافة اللازمة (5 سم)، لتوليد الضغط الموجب المطلوب داخل الحويصلات الهوائية (Bubble-CPAP) كالآتي : (شكل 20-2)
– يتم لصق مازورة قياس مدرجة على الجدار الخارجي لزجاجة الماء المعقم.
– تُملأ الزجاجة بالماء المعقم، حتى يصل مستوى الماء بالزجاجة عند الرقم 7 (تحدد على مازورة القياس).
– يُغمس الطرف الحر لأنبوبة الزفير تحت سطح الماء للمسافة المطلوبة (5 سم)، وتترك مسافة 2 سم بين طرف الأنبوبة وقاع الزجاجة (حتى لا يزداد الضغط الموجب المتولد داخل الحويصلات الهوائية عن الحد المطلوب).
– ينبغي التأكد من ظهور فقاعات الهواء بعد توصيل الوليد وبدأ تشغيل جهاز السيباب.
▘ توصيل وصلة الزفير الخاصة بالجهاز بصمام (valve).
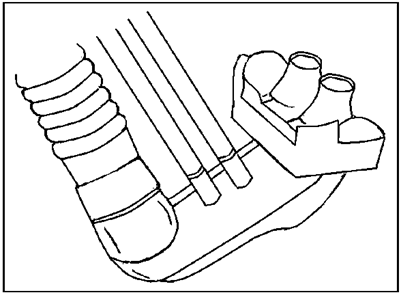
قسطرة الأنف ذات النتوءين (Nasal prongs)
تتصل بنهاية المولد لتوصيل دائرة دفع الغاز المستنشق للطفل.
وصلات الجهاز
▘ أنبوبة متعرجة قصيرة تصل مقياس إندفاع الهواء (الفلوميتر) الموجود على خلاط الأكسجين بالمرطب.
▘ وصلة الشهيق: وهي أنبوبة متعرجة طويلة تحمل الغاز المستنشق من المرطب؛ لتوصيله إلى وحدة توليد الضغط الموجب (المولد) والأنبوبة الأنفية ذات النتوءين، فيصل هواء الشهيق إلى الوليد رطب ودافئ.
وصلة الزفير: وهي أنبوبة متعرجة تتصل بالأنبوبة الأنفية ذات النتوءين، وبوحدة توليد الضغط الموجب من الخلف، ويتم توصيلها بالمانوميتر للتحقق من مقدار الضغط المتولد.
جهاز الضغط الموجب على مجرى الهواء (Bubble CPAP)
دور الممرضة :
يجب أن يكون هذا الجهاز جاهزًا على الدوام لإستخدامه في أي وقت داخل وحدات رعاية حديثي الولادة، وأن تكون الوصلات متوفرة؛ وتحوي جميع مقاسات القسطرة الأنفية ذات النتوءين، حسب وزن الطفل وعمره الرحمي.
التجهيز لتوصيل الوليد بالجهاز
▘ يجب إتباع قواعد التحكم في العدوى، وذلك لتجنب إنتشار العدوى التنفسية، وضمان كفاءة عمل الجهاز التنفسي للوليد من خلال:
– غسل الأيدي جيدًا قبل لمس الجهاز، القسطرة، أو الوليد.
– إرتداء قفازات معقمة أثناء تشفيط المجرى الهوائي للوليد.
– المحافظة على الناحية الحرة من الأنابيب بعيدة تمامًا عن الأرض، أو عن أي مصدر للتلوث.
▘ توصيل وصلة الأكسجين والهواء إلى خلاط الأكسجين، وضبط معدل تدفق الأكسجين مابين ۸–١٠لتر/ الدقيقة.
▘ ضبط مؤشر الأكسجين على النسبة المئوية المطلوبة.
▘ توصيل الأنبوبة المتعرجة القصيرة بمرطب الأكسجين، ووضع مجس قياس درجة حرارة الغاز المستنشق بالفتحة المخصصة له بالمرطب.
▘ يُملأ مرطب الأكسجين بالماء المعقم حتى العلامة المحددة، ثم يُفتح زر التشغيل ويتم ضبط درجة الحرارة عند 37°م.
▘ يتم إختيار مقاس القبعة (الطاقية) المناسب لحجم رأس الوليد.
▘ يتم إختيار مقاس القسطرة الأنفية المناسب؛ عن طريق تمرير شريط تحديد المقاس المناسب للقسطرة الأنفية على فتحتي أنف الوليد لتحديد المقاس المناسب تمامًا، والذي يختلف بإختلاف وزن الوليد وعمره الجنيني، حيث يؤدي إختيار المقاس الأصغر من القسطرة الأنفية إلى التسريب من حول القسطرة؛ بشكل يصعب معه الحفاظ على الضغط المطلوب، في حين يؤدي إختيار المقاس الأكبر إلى حدوث قروح بالأغشية المخاطية للحاجز الأنفي.
▘ يتم تركيب قسطرة الأنف على نهاية المولد وتغلق بإصبع السبابة؛ للتأكد من كفاءة عمل الجهاز من خلال إرتفاع مؤشر مقياس التحقق من معدل الضغط المتولد (مانوميتر) حول الرقم المطلوب (الرقم 5 سم/ماء).
توصيل الوليد بالجهاز
▘ يجب غسل الأيدي روتينيا او الدلك بالكحول.
▘ التأكد من أن الوليد لا يعاني من إنسداد في فتحتي الأنف الخلفيتين (عيب خلقي في بعض المواليد).
▘ يتم توصيل الوليد بجهاز المتابعة المرئية (المونيتور أو جهاز قياس نسبة تشبع الدم بالأكسجين).
▘ إرتداء قفازات.
▘ التشفيط من الأنف، الفم، والبلعوم عن طريق إدخال أكبر قسطرة تشفيط يمكن إستخدامها بدون مقاومة.
▘ وضعية الوليد: رفع السرير لأعلى بزاوية 30 درجة، ولف ملاءة ووضعها تحت كتفي الوليد؛ بحيث تكون الرقبة مفرودة قليلاً إلى الخلف، للإبقاء على المجري الهوائي مفتوحًا.
▘ تُوضع القبعة (الطاقية) المناسبة لحجم رأس الوليد، على أن يتم ثني حرفها لمسافة 2– 3 سم، بحيث يكون طرفها فوق الأذن مباشرة.
▘ يتم إدخال القسطرة ذات النتوءين في الأنف، ثم تُثبت من خلال الخيوط المتصلة بالقسطرة في الفتحات الموجودة على جانبي القبعة، ثم يعاد ضبط منحنى القسطرة الأنفية في وضعه السليم داخل الأنف، مع ملاحظة الآتي:
– قسطرة الأنف تملأ فتحتي الأنف تمامًا.
– الجلد حول أرنبة الأنف غير مشدود، ويمكن التأكد من ذلك بالنظر إلى لون الجلد، فإذا ظهر شحوب في لون الجلد، فإن ذلك يعني وجود ضغط على الجلد.
– قسطرة الأنف لا تضغط على الحاجز الأنفي.
– وجود مسافة بين طرف الحاجز الأنفي، وبين القنطرة التي تصل طرفي قسطرة الأنف.
– قسطرة الأنف لا تستند على الشفة العليا.
▘ تثبت أنبوبة الزفير المتعرجة على الجبهة، من خلال الأربطة المتصلة بقبعة الرأس.
▘ يتم إدخال أنبوبة تغذية من الفم لتشفيط محتوى المعدة، وتوصيل نهاية الأنبوبة بسرنجة للإبقاء عليها مفتوحة؛ لتفريغ الهواء الزائد من داخل المعدة.
▘ يجب تنظيف الشفة العليا للوليد ومنطقة الخدود بالماء الدافئ، ثم تترك لتجف وتدهن كريم مرطب حسب وصف الطبيب؛ للتخفيف من آثار التسلخات التي قد يُحدثها الضغط المستمر على هذه المناطق.
متابعة الوليد على الجهاز
▘ فحص الوليد كل 2– 4 ساعات لتقييم:
– التنفس: من حيث المعدل، وجود تة، وإنجذاب أسفل الصدر مع سماع أصوات التنفس بالسماعة.
– درجة حرارة الجسم: يجب أن تقاس بدقة.
– الدورة الدموية: من حيث حساب وقت إعادة إمتلاء الشعيرات الدموية، قياس ضغط الدم، والإستماع إلى ضربات القلب.
– الجهاز العصبي: من حيث النشاط، الحركة، وردود الأفعال الإنعكاسية للتنبيهات المختلفة.
– الجهاز الهضمي: من حيث وجود إنتفاخ في البطن.
– أجهزة المتابعة المرئية والتأكد من كفاءة عملها.
▘ تشفيط الأنف، الفم، البلعوم، والمعدة حسب الحاجة. وهناك بعض العلامات التي ترجح إحتياج الوليد إلى التشفيط على فترات أقل من ساعتين وهي:
– زيادة المجهود المبذول في التنفس.
– زيادة الإحتياج إلى الأكسجين.
– حدوث فترات من توقف التنفس، أو إنخفاض في عدد ضربات القلب.
▘ ملاحظة وتدوين كمية ولون الإفرازات الناتجة عن التشفيط.
▘ يتم التأكد من كفاءة عمل النظام بأكمله من خلال ملء قائمة الفحص الملحقة.
▘ يجب تغيير وضع الوليد كل 4 – 6 ساعات؛ لمساعدته على التخلص من الإفرازات التي تتجمع في الرئة.
▘ يجب صرف نواتج التكثف في وصلات الجهاز، والتخلص منها بصورة دورية.
فطام الوليد من نظام الضغط الموجب المستمر على مجرى الهواء
مؤشرات القيام بعمل محاولة الفطام
حدوث تحسن عام في حالة الوليد، بحيث يصبح قادرًا على التنفس تلقائيًا بطريقة مريحة، إنخفاض معدل التنفس، إختفاء الإنجذاب الصدري، وتحسن اللون.
خطوات الفطام
▘ حسب تعليمات الطبيب، تبدأ محاولة الفطام بتقليل مؤشر الأكسجين تدريجيًا بنسبة 2 – 5٪ من تركيز الأكسجين الحالي كل مرة، حتى تصل نسبة الأكسجين في الهواء المستنشق إلى 21٪، على أن يتم الإسترشاد بجهاز قياس نسبة تشبع الدم بالأكسجين، أو عمل تحليل الغازات بالدم؛ لمتابعة ضغط الأكسجين الجزئي بالدم.
▘ محاولة نزع القسطرة الأنفية عن الوليد بعض الوقت بشكل تدريجي، وفحص الوليد خلال هذه المحاولة من حيث:
– إزدياد سرعة التنفس
– ظهور الإنجذاب الصدري
– نقص نسبة الأكسجين في الدم
– حدوث نوبات من توقف التنفس
– حدوث زرقة
▘ عند ظهور أي من هذه الأعراض؛ تصبح محاولة الفطام فاشلة، ويتم إستخدام النظام مرة أخرى، ولا تبدأ محاولة فطام أخرى إلا بعد مرور 24 ساعة.
▘ إذا كان هناك أي شك في أن إيقاف عمل النظام سيؤدي إلى إعادة حدوث إنطواء الحويصلات الهوائية، فيجب عدم محاولة الفطام، حيث أن منع مثل هذا الانطواء أفضل من حدوثه ثم معالجته.
التغذية مع نظام الضغط الموجب المستمر على مجرى الهواء
إذا كان الوليد في حالة مستقرة، فيمكن تغذيته عن طريق الجهاز الهضمي من خلال أنبوبة التغذية، سواءً بالجاذبية أو بالتنقيط بإستخدام مضخة السرنجة، حيث أن إستخدام هذا النظام لا يمنع التغذية من خلال الجهاز الهضمي، ولكن يجب تشفيط الهواء الزائد في المعدة قبل إعطاء الرضعة.
المشاكل محتملة الحدوث مع إستخدام نظام الضغط الموجب المستمر على مجرى الهواء
▘ جروح بالحاجز الأنفي نتيجة إرتكاز القسطرة الأنفية على الحاجز الأنفي لفترة طويلة
▘ جروح بالجلد نتيجة ضغط الوصلات على الوجه
▘ إنتفاخ البطن
▘ زيادة الإفرازات
▘ الإسترواح الهوائي
قائمة الفحوصات التي يتم ملؤها عن طريق الممرضة المسئولة عن الحالة في كل مناوبة (نوبتجية) لكل وليد يستخدم نظام الضغط الموجب المستمر على مجرى الهواء (NCPAP)
التاريخ ....../ ....../ ...... | النوبتجية ( - ) | النوبتجية ( - ) | النوبتجية ( - ) | التعليق |
الفحص | (نعم – لا) | (نعم – لا) | (نعم – لا) | |
مؤشر الأكسجين مضبوطًا على النسبة المطلوبة |
|
|
|
|
سرعة إندفاع الهواء بين 8– 10 لتر/دقيقة |
|
|
|
|
مؤشر مقياس التحقق من معدل الضغط المتولد (مانوميتر) حول رقم 5 سم/ماء |
|
|
|
|
مستوى الماء في مرطب الأكسجين عند العلامة المحددة |
|
|
|
|
زر السخان على وضع التشغيل ودرجة الحرارة عند 37°م |
|
|
|
|
مقاس قسطرة الأنف مناسب |
|
|
|
|
قسطرة الأنف في وضعها السليم؛ غير مرتكزة على الحاجز الأنفي |
|
|
|
|
الحاجز الأنفي سليم |
|
|
|
|
القبعة مناسبة تمامًا لحجم رأس الوليد |
|
|
|
|
أنبوبة الزفير في مكانها الصحيح |
|
|
|
|
اللفة تحت الكتفين ذات حجم مناسب وفي مكانها الصحيح |
|
|
|
|
مستوى الرأس مرفوع بزاوية 30 درجة |
|
|
|
|
مجس نسبة الأكسجين متصل بالوليد |
|
|
|
|
الماء الزائد في الأنابيب المتعرجة يتم نزحه بإستمرار |
|
|
|
|
توقيع الممرضة |
|
|
|
|
قائمة الفحوصات الخاصة بالإستعداد لتشغيل نظام الضغط الموجب المستمر على مجرى الهواء (NCPAP) بوحدات رعاية حديثي الولادة (يتم ملؤها عن طريق رئيسة الممرضات بوحدة رعاية حديثي الولادة في كل مناوبة(
التاريخ ....../ ....../ ...... | النوبتجية ( - ) | النوبتجية ( - ) | النوبتجية ( - ) | التعليق |
الفحص | (نعم – لا) | (نعم – لا) | (نعم – لا) | |
جهازالسيباب الأنفي جاهز للعمل |
|
|
|
|
وجود عدد كافي من الوصلات ومقاسات مختلفة من قسطرة الأنف |
|
|
|
|
وجود زجاجات الماء المعقم |
|
|
|
|
مرطب الأكسجين صالح للإستخدام |
|
|
|
|
توقيع الممرضة |
|
|
|
|