Guidelines for infection control in operations
| Site: | EHC | Egyptian Health Council |
| Course: | دلائل الاجراءات التمريضية لقسم العمليات |
| Book: | Guidelines for infection control in operations |
| Printed by: | Guest user |
| Date: | Saturday, 20 June 2026, 9:37 PM |
Description
"last update: 4 March 2025" تحميل الدليل
Table of contents
- - Prepared by
- - Standard infection control procedures In the operations unit
- - Hand washing
- - Equipment Processing Cycle (Decontamination Steps)
- - Characteristics of chemical sterilization
- - Sterilization Services Department (Central Sterile Services Department – CSSD):
- - Instrument & Equipment Processing in Healthcare Facilities
- - Opening the instrument tray and wrapping towels and gowns
- - Opening a Suture Packet
- - Opening a Sterile Pack
- Prepared by
Operation Room guide
Under supervision
- Prof. Dr. Mohamed Latif, CEO of the Egyptian Health Council
Dr. Kawthar Mahmoud, Head of the Egyptian Nursing Syndicate - Member of the Senate
Prepared by
|
Title |
Name |
NO. |
|
Dean Of Faculty Nursing, Professor of Medical and Surgical Nursing, Tanta University |
Dr Afaf Abdel Aziz Abdel Aziz Basal |
1 |
|
Professor Of Critical Care Nursing |
Prof.Dr/Zeinab Hussain Ali |
2 |
|
Professor And Head of the Department of Medical Surgical Nursing. Faculty-. Benha University |
Amal Said Taha Refaie |
3 |
|
Supervisor Of the Education Sector at Port Said University |
Amal Ahmed Khalil Morsy |
4 |
|
Professor Of Medical Surgical Nursing- Faculty of Nursing- Cairo University |
Dr. Hanan Ahmed Al Sebaee |
5 |
|
Head of central administration on secondment at MOHP |
Dr Neveen ab drab al0nabi Mohamed |
6 |
|
Director Of Primary Health Care Nursing Department at MOHP. |
Maysa Hosny Ahmed Tammam |
7 |
|
Supervisor Of Technical Education- EHA |
Nancy Alaa Eldeen Abd-Elbaset Ali |
8 |
|
Supervisor Of Nursing Services Development- EHA |
Sherien Mohamed Saad |
9 |
|
Assistant Professor of Maternity and Neonatal Health Nursing - Faculty of Nursing- Ain Shams University |
Assist.Perof. Dr./Heba Mahmoud Mohammed |
10 |
|
General manager of general administration of health institutes affairs |
Dr Mai Galal Ibrahim Al-Assal |
11 |
|
Participants |
||
|
Head of nursing administration at EHA |
Mr. Adham Abdel Nasser Okasha |
12 |
|
member of the Nursing administration at EHA, luxor branch |
Mr. Gehad Akram Hussein |
13 |
- Standard infection control procedures In the operations unit
Introduction:
A surgical site infection (SSI) refers to an infection that occurs at the site of surgery in a patient's body. It is one of the most common healthcare-associated infections and can cause significant complications. Several factors contribute to the development of SSIs, and when the infection occurs deep at the surgical site, it can lead to fatal outcomes.
Pathogenic microorganisms typically enter the surgical site during the procedure in the operating room. Therefore, it is essential to implement a well-defined preventive program to minimize SSI risks. These risks are influenced by the patient’s condition at the time of surgery, the type of procedure, the surgical team, and the healthcare facility.
Sources of Surgical Site Infections:
1. Internal Sources:
Most microorganisms responsible for SSIs originate from the patient’s own skin, mucous membranes, or intestines (normal flora). When the skin or mucosal barrier is breached during surgery, bacteria can enter the tissues.
- Gram-positive aerobic cocci (e.g., Staphylococcus) are the most common pathogens.
- In gastrointestinal surgeries or procedures near the anus or groin, infections may involve Gram-negative anaerobic and aerobic bacteria from the intestines.
- Infections in abdominal surgeries often involve Gram-negative bacilli, Enterococcus species, or anaerobic bacteria such as Bacteroides fragilis.
2. External Sources:
External sources of SSI include:
- Surgical staff (especially the surgical team).
- Operating room environment (air, surfaces, and equipment).
- Surgical instruments, devices, and materials used during surgery.
- Airborne Gram-positive bacteria, which frequently cause infections.
Preventing Surgical Site Infections:
- Minimize microbial contamination of the patient’s tissues and sterile surgical instruments.
- Administer prophylactic antibiotics before surgery.
- Ensure proper surgical techniques to reduce contamination.
- Maintain appropriate ventilation in the operating room.
- Optimize patient preparation, including skin disinfection and sterile draping.
Compared to patient-related risk factors, infection control measures such as surgical site preparation, antibiotic timing, and operating room management are easier to control.
Environmental Control in the Operating Suite
Providing a Safe Environment in the Operating Room:
- Separate designated rooms for surgical interventions and other medical activities.
- Control the movement of staff and equipment to minimize contamination.
Location of the Operating Room Suite:
- The operating rooms should be located in a specialized area designed for surgical procedures.
- The suite should be easily accessible from the surgical department, emergency unit, but isolated from the hospital's main corridors.
- Walls and floors should be antistatic and antimicrobial.
- Corners between floors and walls should be rounded to prevent dust and fluid accumulation and facilitate frequent cleaning and disinfection.
- Suspended ceilings should be avoided in operating rooms to minimize gaps where dust can collect. If necessary, long panel ceilings should be used.
Temperature and Humidity Control:
- Temperature and humidity play a crucial role in ensuring the comfort of patients and staff.
- Humidity levels should be maintained at 30–60%.
- Temperature should be kept between 20–24°C, with the operating room at least 1°C lower than adjacent areas to direct airflow outward.
Optimal Ventilation in the Operating Room:
- Positive air pressure ventilation should be maintained in the OR compared to surrounding areas.
- The number of air changes per hour should follow manufacturer recommendations for the air handling units.
- Regular maintenance of air filtration systems is necessary.
- Airflow parameters (temperature, humidity, and pressure) should be recorded before each surgery.
Air Quality Standards in the OR:
- Air change rate: 15–20 air changes per hour, with at least three exchanges using fresh, filtered air.
- High-efficiency air filtration should be used, especially for bone marrow transplants, neurosurgery, and orthopedic procedures.
- Air supply direction: There should be a unidirectional airflow system with air exhaust 20–30 cm above the floor, ensuring no obstructions in front of the air vents.
- Each operating room should have pressure, temperature, and humidity monitors at the entrance.
- Operating room doors should be self-closing to maintain sterility.
- Only essential personnel should be present in the OR to minimize contamination risk.
Infection Prevention in the Operating Room
- Strict adherence to aseptic techniques is crucial.
- Proper hand hygiene based on the surgical procedure.
- Use of personal protective equipment (PPE) appropriate for the procedure.
- Isolation of the surgical site from non-sterile areas.
- Maintaining a sterile field throughout the procedure.
1. Hand Hygiene Before Surgery
Proper surgical hand scrubbing is one of the most effective ways to reduce infection risk.
2. Personal Protective Equipment (PPE) in the Operating Room
- PPE protects patients from microbial contamination from the surgical team’s skin, mucous membranes, and hair.
- It also protects surgical staff from exposure to blood and bodily fluids.
Types of PPE:
- Footwear: Surgical staff should wear closed-toe shoes or boots to protect against spills and sharp instruments.
- Head Covers: Disposable head covers should be used to reduce contamination from hair and scalp cells. Head covers must be worn before putting on clean surgical attire to prevent hair from falling onto sterile clothing.
- Surgical Masks:
- Must cover the nose and mouth completely at all times.
- Should not be reused or placed in pockets.
- Must be replaced if damp or between different procedures.
- High-efficiency masks should be used for airborne infections (e.g., tuberculosis).
- Special masks should be used for staff with beards.
- Eye and Face Protection:
- Goggles or face shields should be worn when splashes of blood or body fluids are expected.
- Surgical Gowns (Gowns):
- Should be made of fluid-resistant material to prevent contamination.
- A disposable plastic apron should be worn under the gown if the fabric is not fluid-resistant.
- Surgical Gloves:
- Must be sterile and properly fitted to prevent microbial transmission.
- Change gloves if contamination is suspected.
Maintaining a Sterile Field
- Use sterile, waterproof drapes around the surgical site.
- Only sterile instruments and equipment should be placed in the sterile field.
- Sterile tools should be handled and opened without contamination.
- Items below the sterile field (e.g., under patient drapes) are considered contaminated.
- Only personnel involved in the procedure should handle sterile instruments.
- The sterile zone of the gown extends from the chest to the waist and 5 cm above the elbows.
- Neck, shoulders, and back areas are not considered sterile.
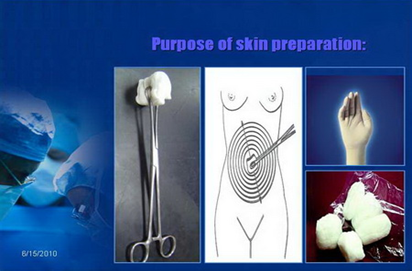
Disinfectants for Preparing the Patient’s Skin and Hands of the Surgical Team
Antiseptics are used on living tissues to inhibit or destroy microorganisms. They differ from disinfectants, which are used on non-living surfaces.
Guidelines for Using Antiseptics:
- Pour an appropriate amount into a sterile container before use.
- Do not reuse leftover antiseptic solution after patient preparation.
- If antiseptics are stored in large containers, transfer only a small amount for single-use.
- Dispose of unused antiseptics at the end of each shift and clean storage containers before reuse.
- Never leave antiseptic solutions in open containers.
- Hand washing
(Surgical hand washing)
The Purpose of Hand Washing:
The warm and humid environment inside surgical gloves promotes rapid microbial growth on the hands. Therefore, performing surgical handwashing with an antiseptic before surgery helps prevent this rapid growth for a certain period, reducing the risk of infection if the glove gets punctured or torn during the procedure.
Surgical Hand Washing:
1. Do not wear rings, bracelets, or watches in the operating unit.
2. Keep nails short and avoid nail polish.
3. Artificial nails are not allowed.
4. Handwashing is recommended between each surgery, but if multiple surgeries are performed in succession, apply 3–5 mL of alcohol hand rub and rub hands until dry to prevent skin irritation from excessive betadine use.
5. Betadine is commonly used for surgical handwashing, but the latest method involves washing hands with warm water and liquid soap, followed by alcohol hand rub.
6. Always keep hands above the elbows to allow water to flow from the least contaminated (hands) to the most contaminated (arms).
Recent studies have shown that using a soft brush does not significantly reduce microbial count. Instead, it may cause skin cracks, micro-injuries, and irritation, leading to an increased infection risk.
When to Perform Surgical Handwashing:
- Before surgical procedures.
- Before inserting a urinary catheter.
- Before placing a central venous catheter.
- Before dressing deep wounds and burns.
Steps for Alcohol Hand Rub Before Surgery:
1. Before applying alcohol rub, wash hands thoroughly with regular soap following the standard technique.
2. Dry hands completely before applying approximately 5 mL of alcohol into one palm.
3. Rub hands and forearms, ensuring the alcohol reaches under the nails and up to the forearm.
4. Repeat the process on the other hand and forearm.
Steps for Surgical Hand Washing:
1. Remove all jewelry from hands and wrists.
2. Wet hands and forearms up to the elbow.
3. Clean under each fingernail and around the nail beds. Do not use a stiff brush, as it may cause skin irritation and increase infection risk.
4. Apply antiseptic to hands and forearms, keeping hands raised above the elbows.
o Start at the fingertips, scrub between fingers, and work down to the elbows in a circular motion.
o Repeat for the other hand and forearm.
o The process should last at least 5 minutes before the first surgery of the day and 2–5 minutes before subsequent procedures.
5. Rinse each arm separately, starting from fingertips to elbows, keeping hands elevated.
6. Use a sterile towel to dry.
o Use one side of the towel for one hand and the other side for the opposite hand.
7. Keep hands above the waist and avoid touching anything before putting on a sterile gown and gloves.
Cleaning, Disinfection, and Sterilization:
Cleaning, disinfection, and sterilization are performed based on the type of instrument and its intended use.
1. Cleaning (Pre-Sterilization Process)
- The first essential step in reprocessing instruments.
- Involves using a detergent or enzymatic solution to remove dirt, organic matter, and microorganisms.
2. Disinfection:
- A chemical or physical process that reduces the microbial load to a safe level.
- It does not necessarily kill all spores but reduces the risk of infection.
3. Types of Disinfectants:
- Disinfectant (Surface & Equipment Use): A chemical or physical agent (e.g., heat, UV light, or X-rays) that eliminates most microbes, but may not kill bacterial spores.
- Antiseptic (Skin & Tissue Use): Used on living tissues to kill or inhibit microbial growth.
Types of Disinfectants Based on Their Effectiveness:
1. Low-Level Disinfectant (LLD):
- Eliminates vegetative bacteria (excluding tuberculosis bacteria), lipid viruses, and some non-lipid viruses and fungi.
2. Intermediate-Level Disinfectant (ILD):
- Kills most vegetative bacteria, including tuberculosis bacteria, lipid and some non-lipid viruses, and fungal spores.
- Does not kill bacterial spores.
3. High-Level Disinfectant (HLD):
- Capable of killing some bacterial spores when used at the right concentration, temperature, and exposure time.
- Eliminates vegetative bacteria, fungi, and most viruses, including Mycobacterium tuberculosis.
- Does not completely eliminate all bacterial spores.
Types of Viruses Based on Resistance to Disinfectants:
1. Lipid Viruses (Enveloped Viruses):
- These viruses have a lipid-protein outer layer, making them susceptible to disinfectants.
- Examples: HIV, Hepatitis B & C viruses.
- Can be inactivated using low-level disinfectants.
2. Non-Lipid Viruses (Non-Enveloped Viruses):
- Do not have a lipid envelope, making them more resistant to disinfectants.
- Examples: Coxsackie virus, Enteroviruses.
Other Infection Control Terms:
1. Pyrogens:
- Fever-inducing substances such as bacterial endotoxins from Gram-negative bacteria.
2. Spaulding Classification:
- A system developed by Dr. Earle Spaulding for instrument reprocessing.
- Medical devices are classified based on risk of infection:
- Critical: Instruments that penetrate sterile tissues (e.g., surgical instruments) → must be sterilized.
- Semi-Critical: Instruments that contact mucous membranes (e.g., endoscopes) → require high-level disinfection if heat sterilization is not possible.
- Non-Critical: Instruments that contact intact skin (e.g., blood pressure cuffs) → require low-level disinfection.
Sterilization and Sterilization Agents:
1. Sterilization:
- A physical or chemical process that eliminates all microorganisms, including spores.
- Required for all critical instruments (e.g., scalpels, surgical tools).
2. Sterilant:
- A chemical or physical agent that destroys all forms of microbial life, including prions.
3. Sterilization Methods:
- Steam Sterilization (Autoclaving): Uses pressurized steam to kill microorganisms.
- Dry Heat Sterilization: Uses high temperatures to sterilize heat-resistant instruments.
- Low-Temperature Sterilization: Used for heat-sensitive equipment, such as ethylene oxide gas sterilization.
|
Resistance to Sterilization and disinfection |
Needed level |
|
|
High resistance
Low resistance |
Protein particles such as those causing Creutzfeldt-Jakob Disease (Mad Cow Disease) |
Sterilization |
|
Bacterial spores such as Clostridium tetani, Clostridium difficile, and Cryptococcus neoformans |
||
|
Some bacterial spores |
High-level disinfection |
|
|
non-enveloped viruses such as Poliovirus (Coxsackie), and mycobacteria such as Mycobacterium tuberculosis (TB) |
Intermediate-level disinfection |
|
|
Fungi such as Candida, Aspergillus |
Low-level disinfection |
|
|
Non-spore-forming bacteria such as Pseudomonas aeruginosa and Staphylococcus aureus |
||
|
Non-enveloped viruses of medium size such as Hepatitis B virus (HBV) , Hepatitis C (HCV) and Human Immunodeficiency Virus (HIV) |
||

Table (11): Hierarchical Order of Microbial Resistance to Disinfection and Sterilization
Prions are characterized by their resistance to conventional disinfection and sterilization methods.
- Equipment Processing Cycle (Decontamination Steps)
There are two steps for processing equipment used in clinical and surgical procedures. The first and most crucial step is cleaning, followed by either disinfection or sterilization. Afterward, the sterilized items must be used immediately or stored properly.

Risks of Infection Transmission from Medical Equipment
The risk of infection transmission from medical equipment is classified into three categories. Categorizing tools and equipment into one of these categories helps determine the necessary level of cleaning, disinfection, or sterilization to protect patients and healthcare workers.
Low-Risk Instruments/Tools
Cleaning and drying are sufficient for instruments that come into contact with intact skin (e.g., stethoscopes or blood pressure cuffs). However, disinfection may be required if these items are used for immunocompromised patients, highly contagious patients, or if contaminated with blood or body fluids.
Intermediate-Risk Instruments/Tools
These are instruments/tools
that come into contact with mucous membranes or non-intact skin but do not
penetrate the skin or mucosa or reach sterile body parts. These instruments
should be cleaned and then disinfected with a high-level disinfectant.
Examples include ventilators, certain endoscopes, laryngoscopes, endotracheal
tubes, thermometers, and similar equipment.
High-Risk Instruments/Tools
These are instruments that
penetrate the skin or sterile tissues, including body cavities and the
circulatory system. These tools pose a high risk of infection transmission if
contaminated with microbes before penetrating tissue. Therefore, they must be
cleaned first and then sterilized.
Examples include surgical instruments.
The structure and design of the instrument determine the appropriate
sterilization or disinfection method (chemical or thermal).
Single-Use Instruments
These are instruments
designed for one-time use, subjected to a controlled level of disinfection or
sterilization during manufacturing. After a single use, they must be disposed
of.
Examples include gloves, needles, and syringes.
Cleaning
Cleaning is the process of removing all residual materials (organic and inorganic debris) from the surface of instruments that require reprocessing. There are two main components of cleaning: scrubbing to facilitate debris removal and thorough rinsing with running water to eliminate residual substances.
Cleaning should ideally begin immediately after use or, alternatively, instruments should be soaked in a cleaning solution (water and liquid detergent or an enzymatic agent) as an initial step until actual cleaning starts.
Since most microbes on surfaces are eliminated through cleaning, it must be performed before disinfection or sterilization. If instruments are not properly cleaned, disinfection or sterilization may be ineffective, as organic and inorganic residues can harbor microbes that survive the process.
Cleaning is typically
performed using running water with liquid detergents or enzymatic
cleaners, which are essential for removing proteins and lipids from
instruments after use.
Cleaning can be manual or automated, using ultrasonic waves or
washer-disinfectors, which enhance cleaning and disinfection efficiency,
especially for complex instruments with lumens, hinges, joints, or
intricate structures, ensuring they are safe to handle or ready for
sterilization.
In many cases, the cleaning solution used is pre-saturated with enzymatic agents that dissolve organic materials. Alternatively, surfactant-based detergents may be used to reduce surface tension, facilitating the removal of debris and oils from instrument surfaces.
Pre-soaking instruments before cleaning may improve cleaning efficiency. A deep container filled with water and a cleaning or enzymatic solution can be used for soaking, containing a wire-mesh basket to hold instruments. The entire container can then be transferred to the central sterilization department, where instruments are separated, inspected, and prepared for further processing.
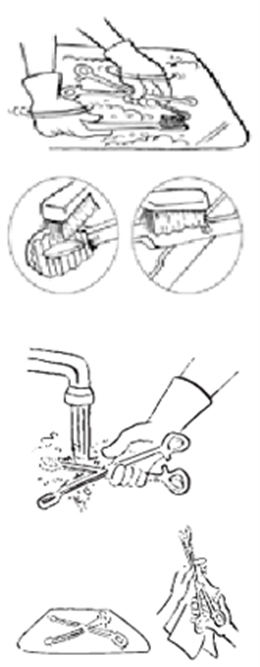
Manual Cleaning
- Disassemble all instruments (if applicable) before cleaning.
- Use lukewarm water as it helps remove most protein-based contaminants (e.g., blood, mucus), preventing coagulation, which can make removal more difficult.
- The most effective technique involves scrubbing the instrument with a soft brush while keeping it submerged in water to prevent aerosolization.
- Finally, rinse instruments under running water and dry them. Brushes used for cleaning must be cleaned, disinfected, and dried after use.
After cleaning:
- Low-risk instruments are ready for use.
- Intermediate-risk instruments are ready for disinfection.
- High-risk instruments are ready for sterilization.
Cleaning Tools
- Use non-abrasive cleaning tools to prevent scratching instruments, as scratches and crevices can harbor microbes and contribute to instrument degradation.
- Utilize various brushes of different shapes and sizes to suit all instrument types.
- Preferably use pressurized water, detergent, and air guns to assist in cleaning instruments with lumens or complex structures.
Advantages of Manual Cleaning
- Lower cost.
- Ability to access complex areas (e.g., hinges and cavities).
- Possibility of inspecting instruments during the cleaning process.
Steps for Manual Instrument Cleaning
1. Wear heavy-duty rubber gloves, a plastic apron, eye protection, a surgical mask, and foot protection during the cleaning process.
2. Immerse the instruments in lukewarm water containing a foaming detergent.
3. Scrub the instruments thoroughly using a soft brush, water, and detergent while keeping them submerged to prevent aerosolization. Ensure the removal of organic residues from crevices, tips, and hinges. Flush water and detergent into internal cavities using specialized tools (e.g., pressure gun).
4. Rinse inside the cavities with irrigation water.
5. Thoroughly rinse the instruments under clean running water to remove any detergent residues (as residual detergents may interfere with disinfection or sterilization). Place the instruments on a tray.
6. Inspect instruments carefully to ensure cleanliness.
7. Dry the instruments with a clean cloth to avoid dilution of disinfection or sterilization solutions.
Automated Cleaning
Most modern cleaning units operate automatically, minimizing direct handling of equipment by staff.
Types of Automated Cleaning Machines:
- Washer Machines: These follow a cycle where instruments are first washed with lukewarm water, then cleaned with hot water at 71°C for a few minutes, followed by a hot rinse at 80-90°C for 10-20 seconds. Drying is achieved using a fan-assisted heater at 50-75°C.
- Washer-Disinfectors: These specialized machines clean and disinfect certain medical instruments. They operate for 45 minutes, followed by a two-minute cleaning cycle using water heated to 80-100°C and a detergent solution.
Advantages of Automated Cleaning:
- Fully automated process.
- Use of stronger detergents that are not suitable for manual cleaning.
- Capability for thermal disinfection and drying of medical instruments.
- Effective in reprocessing respiratory circuit connectors, anesthesia masks, and endotracheal tubes.
Disadvantages of Automated Cleaning:
- High cost.
- Requires regular maintenance to ensure cleaning and thermal disinfection efficiency.
- If protein residues are not removed during washing, they can become fixed onto the surface of medical instruments during thermal disinfection.
Ultrasonic Cleaning Device
This device consists of a water tank connected to an ultrasonic generator operating at 45,000 Hz. The high-frequency vibrations generate microscopic air bubbles that expand and collapse in the liquid, effectively removing organic contaminants from instrument surfaces.
Advantages:
- Provides a high level of cleanliness.
- Can be used alongside other cleaning methods (either before or after them).
Disadvantages:
- Expensive.
- Requires costly regular maintenance to ensure optimal cleaning performance.
Cleaning Indicators
- Use cleaning indicators such as Residual Protein Detection Kits to test for protein contaminants on instrument surfaces.
- Use cleaning indicators for ultrasonic washers, such as the aluminum foil test (Foil Test) to evaluate cleaning efficiency.
Important Notes:
- Do not use bar soap for cleaning instruments as it leaves residues on surfaces.
- Always wear gloves, a surgical mask, and eye protection when handling contaminated instruments.
- Automated washers with rinsing and drying cycles are preferable to manual cleaning.
Disinfection
Disinfection can be achieved through heat or chemical agents. Whenever possible, thermal disinfection is preferred because it:
- Is more reliable than chemical methods.
- Saves time and costs.
- Leaves no residues.
- Is easier to control and non-toxic.
For heat-sensitive
instruments, chemical disinfection is necessary.
Organic residues (e.g., blood and body fluids) reduce
the effectiveness of disinfection. Additionally, higher
microbial loads require longer disinfection times, making thorough pre-cleaning
essential before disinfection.
High-Level Disinfection (For Intermediate-Risk Instruments)
- Boiling.
- Chemical disinfection.
Note:
High-level disinfection is the
only acceptable alternative to sterilization for intermediate-risk
instruments when sterilization is not feasible.
Boiling and flame exposure are high-level disinfection methods but do
not achieve sterilization.
High-Level Disinfection by Boiling
Boiling is a high-level disinfection method used for heat-resistant intermediate-risk instruments. It effectively eliminates microorganisms except for spores.
- Instruments must be submerged for at least 10 minutes from the start of boiling.
High-Level Disinfection Using Chemical Disinfectants
Before using a chemical
disinfectant, it is essential to consider alternative disinfection
methods if available.
Chemical disinfection is primarily used for heat-sensitive equipment,
such as endoscopes.
A limited number of disinfectants can be used for this purpose, including:
- Glutaraldehyde (≥2%) for 20-90 minutes.
- Hydrogen peroxide (7.5%) for 30 minutes.
- Peracetic acid and hydrogen peroxide (0.23-3.5%) for 15 minutes.
- Ortho-phthalaldehyde (OPA) for 5 minutes (automated use) or 12 minutes (manual use).
Post-Disinfection Rinse:
- Instruments must be thoroughly rinsed with sterile water after disinfection.
- If sterile water is unavailable, freshly boiled water can be used for 5-10 minutes.
Steps for Disinfection Using Glutaraldehyde
Glutaraldehyde solution does not corrode metals and is resistant to organic matter contamination.
- Activated glutaraldehyde solutions remain effective for up to two weeks.
- Once activated, the solution should be stored in a clean, sealed container.
- The disinfectant must be discarded after 28 disinfection cycles or two weeks—whichever comes first—or immediately if its properties change.
- A test strip must be used daily to verify the solution's effectiveness before use.
Preparation and Labeling:
- If using a pre-prepared solution, confirm its efficacy using a test strip.
- If preparing a new solution, store it in a clean, sealed container and clearly label it with:
- Date of preparation
- Expiration date
Procedure for Disinfecting Instruments with Glutaraldehyde
1. Disassemble all hinged or sliding instruments to ensure the disinfectant reaches all surfaces.
2. Fully immerse the instruments in the solution. Containers should be placed upright, not inverted, to ensure complete exposure to the disinfectant.
3. Seal the container and let the instruments soak for 20-90 minutes.
o No instruments should be added or removed during this period.
o The soaking time must be carefully monitored.
4. Remove the instruments using sterilized forceps or forceps disinfected with a high-level disinfectant.
5. Thoroughly rinse instruments with sterile water or freshly boiled water for 5-10 minutes to remove all traces of the chemical disinfectant.
o Residual chemicals can be toxic to skin and tissues.
6. Use disinfected instruments immediately or store them and re-disinfect before use (as required for flexible endoscopes).
|
Disinfectant |
Hydrogen Peroxide (7.5%) |
Peracetic Acid (0.2%) |
Glutaraldehyde (≥2%) |
Orthophthaldehyde (0.55%) |
Hydrogen Peroxide & Peracetic Acid (0.23 - 7.35%) |
|
High-Level Disinfection Time |
30 min |
NA |
20-90 min |
5 min for machine – 12 min for manual use |
15 min |
|
Effectiveness Against Bacterial Spores (Mycobacteria/Tuberculosis Bacilli) |
6 hrs |
12 min |
10-12 hrs |
- |
3 hrs |
|
Activation Required |
No |
On |
According to product type |
No |
No |
|
Reuse Period |
21 days |
24 after preparation and used for only one cycle |
14 days for basic preparation, 30 days for acidic preparation and is used for 28 cyles |
14 days |
14 days |
|
Shelf Life |
2 yrs |
6 months |
2 yrs |
2 yrs |
2 yrs |
|
Regulations for Disposal of Used Chemical Solutions |
No precautions |
No precautions |
Determined at the local level |
Determined at the local level |
No precautions |
|
Compatibility with Materials to be Disinfected |
Good |
Suitable |
Excellent |
Excellent |
No enough data |
|
Minimum Effective Concentration |
6% |
No |
1.5% or more |
0.3% |
No |
|
Hazards to Handlers & Users |
Eye hazards |
Eye and skin hazards |
Eye, skin and respiratory hazards |
Eye hazards and skin discoloration |
Eye hazards |
|
Handling Requirements |
Manual or Auto |
Auto |
Manual or Auto |
Manual or Auto |
Manual |
|
Compatibility with Instrument Materials |
Yes |
Yes |
Yes |
Yes |
Yes |
It is essential to confirm the concentration of the disinfectants used for chemical disinfection and sterilization, as well as the required contact times, since these may vary depending on the manufacturer. Therefore, always follow the manufacturer's instructions before using a disinfectant.
Sterilization
Sterilization is the process of eliminating all forms of microbial life, including bacterial spores. The main sterilization methods can be categorized as follows:
First: Heat Sterilization
- Moist Heat Sterilization: Using pressurized steam in an autoclave.
- Dry Heat Sterilization: Using dry heat in an electric sterilization oven.
Second: Low-Temperature Sterilization
- Using ethylene oxide gas sterilizers, plasma gas sterilization with hydrogen peroxide, or formaldehyde vapor sterilization, while ensuring safety precautions for each method.
- Chemical liquid sterilization (chemical sterilization): Using solutions such as activated glutaraldehyde (≥2%) or hydrogen peroxide & peracetic acid (0.23% - 7.35%), ensuring proper contact time.
Third: Other Sterilization Methods
- Gamma Radiation Sterilization: One of the most important methods for sterilizing medical supplies such as syringes and gloves.
- Filtration (Sterilization by Filtration): Used for purifying pharmaceutical preparations from bacteria that cannot be removed by other means except through fine-pore filters (e.g., 0.22-micrometer filters, which are smaller than bacteria).
First: Heat Sterilization
A. Steam Sterilization (Autoclave)
Steam sterilization is one of the best methods for sterilizing instruments that penetrate the skin or mucous membranes, provided they can withstand heat.
Advantages of Steam Sterilization:
- Highly reliable in eliminating microorganisms.
- Eco-friendly and safe for public health.
- Can rapidly reach high temperatures.
- Effectively penetrates porous materials.
Types of Steam Sterilizers:
1. Gravity Displacement Steam Sterilizers
- Steam is introduced into the sterilizer, forcing air downward and out through a drain valve using gravity.
- Small table-top sterilizers:
- Used in medical and dental clinics.
- Similar in operation to pressure cookers.
- Recommended sterilization times for unwrapped instruments:
- 121°C (20 minutes)
- 132°C (4 minutes)
- Large steam sterilizers:
- Larger than small models.
- Fully automatic operation available.
2. Pre-Vacuum Sterilizers (High-Speed Sterilization by Air Removal)
- Uses a vacuum pump to remove air before introducing steam, creating a negative pressure inside the sterilization chamber.
- Advantages:
- Shortens the time needed for steam to penetrate wrapped instruments, fabrics, and porous materials.
- Ideal for sterilizing wrapped instruments and porous materials (e.g., surgical tools with cavities).
3. Immediate-Use (Flash) Autoclaves
- These sterilizers operate either by gravity displacement or pre-vacuum methods.
- Not used routinely but placed in operating rooms for the rapid sterilization of unwrapped instruments.
- Biological indicators with fast results (1 to 3 hours) can be used to confirm sterilization.
- Sterilization cycle:
- 132°C for 4 minutes.
Table No. (13): Required Steam Sterilization Times
|
Type of Autoclave |
Instruments & Supplies |
Sterilization Time at 121°C |
Sterilization Time at 132°C |
Drying Time |
|
Gravity Displacement |
Wrapped instruments |
30 minutes |
15 minutes |
15-30 minutes |
|
Textiles |
30 minutes |
25 minutes |
15 minutes |
|
|
Pre-Vacuum (Pressure Reduction) |
Wrapped instruments |
— |
4 minutes |
20-30 minutes |
|
Textiles |
— |
4 minutes |
5-20 minutes |
Important Note:
- The sterilization time does not include the time required to reach the necessary temperature or pressure levels, nor does it include the time for venting or drying. Therefore, the sterilization time is shorter than the total cycle time.
Key Considerations for Steam Sterilization Under Pressure
1. Ensure that all instruments are cleaned and dried before sterilization. New surgical instruments must be cleaned and dried before their first sterilization to remove wax coatings.
2. Do not sterilize rusted surgical instruments—they should be discarded.
3. Open and disassemble all hinged or multi-component instruments before sterilization.
4. Wrap instruments before steam sterilization to maintain sterility until use.
5. Use sterilization rolls (paper-plastic pouches) or double-layered crepe paper wraps for packaging. In resource-limited settings, double-layered cotton fabric may be used, but thick cotton or linen fabrics should be avoided as they hinder steam penetration.
6. Arrange items in the autoclave properly to ensure adequate steam circulation. Do not stack packages on top of each other.
7. Label sterilized containers with contents, processing date, and expiration date, and store them in a designated storage area.
8. Follow the manufacturer's instructions for operating the autoclave.
Manual Autoclave Operation Guidelines:
- Use a timer to ensure proper sterilization duration. The countdown should begin only after the autoclave reaches the required temperature and pressure. If the timer was not started at the correct time, restart the cycle.
- Turn off the power after the sterilization time is complete, release steam using the vent valve, and only open the autoclave once the pressure gauge reads zero.
Storage of Sterilized Instruments
Storage Area Conditions:
- Store sterilized instruments in a clean, dry, well-ventilated area.
- Keep items on shelves, away from the floor and walls.
Factors Affecting Sterile Shelf Life:
- Type of packaging material.
- Integrity of the packaging (no tears, moisture exposure).
- Frequency of handling before use.
- Open or closed storage cabinets.
- Storage environment conditions (humidity, ventilation).
Storage Duration Based on Packaging Type:
|
Packaging Type |
Storage Duration |
|
Sterilization rolls (pouches) |
1 month |
|
Crepe paper (double layer) |
1 month |
|
Crepe paper (single layer) |
1 week |
|
Fabric wraps (cotton) |
3 days |
|
Sterilization containers |
24 hours |
Note:
- Unwrapped instruments must be used immediately after removal from the autoclave or stored in a sterile, dry, sealed container for up to 8 hours.
- A package is considered sterile as long as the wrapping is intact and dry. If sterility is in doubt, treat the package as contaminated and reprocess it from the cleaning step.
Advantages and Disadvantages of Steam Sterilization
✅ Advantages:
- Highly effective in eliminating microbes.
- Rapid heating and deep penetration into instruments.
- Non-toxic and environmentally friendly.
❌ Disadvantages:
- Instruments must be heat and moisture-resistant.
- Not suitable for powders, ointments, or oils.
Dry Heat Sterilization (Hot Air Oven)
Key Considerations for Dry Heat Sterilization:
- Requires a continuous power supply.
- Ideal for glassware, solid metal instruments, oils, ointments, and powders.
- Not suitable for materials prone to burning or melting, such as surgical sutures or textiles.
- Fan-equipped ovens are preferred to ensure even heat distribution.
Procedure for Dry Heat Sterilization:
1. Clean and dry all equipment before sterilization.
2. Wrap equipment in aluminum foil or place it on trays/metal containers, ensuring air circulation.
3. Heat the oven to the required temperature.
4. Allow the equipment to cool to room temperature before removal—do not use running water to cool items.
5. Use sterile forceps to remove items if they are unwrapped. Wrapped items can be stored for up to 8 hours in a sealed, sterile, dry container.
Storage of Dry Heat Sterilized Equipment:
- Use items immediately after removal from the oven or store them in a sealed, sterile container for up to 8 hours.
- Store in a closed, dry, and temperature-controlled cabinet to minimize contamination.
Additional Notes:
- The oven must have a temperature gauge to verify the required heat level.
- Sterilization time should begin only after reaching the target temperature.
- Do not use the oven as a storage space for sterile instruments.
Advantages and Disadvantages of Dry Heat Sterilization
✅ Advantages:
- Suitable for glassware, powders, and anhydrous oils.
- Can sterilize non-disassemblable instruments.
- Prevents rusting or corrosion of metal instruments.
- Low-cost method.
❌ Disadvantages:
- Requires longer exposure times to high heat.
- Can damage rubber materials and some fibers.
- Limited to a narrow range of materials.
Maintenance of Dry Heat Sterilization Ovens
Dry heat sterilization ovens must be inspected to ensure proper performance. The working staff should adhere to the following:
- Maintain the cleanliness of the ovens.
- Ensure that the temperature gauge is functioning correctly through regular checks, preferably every few weeks. This is done by inserting a thermal probe inside the oven and comparing its recorded temperature with the reading from the oven’s built-in gauge.
Sterilization at Low Temperatures
A. Sterilization Using Ethylene Oxide Gas
This method is used to sterilize instruments and tools that cannot withstand high temperatures and humidity. The following conditions and requirements must be met:
- The gas concentration should be between 450-1200 mg/L.
- The temperature range should be between 37-63°C.
- The humidity level should be between 40%-80%.
- The exposure time to the gas should be between 1 to 6 hours.
Preparation for Ethylene Oxide Sterilization
1. Ensure the cleanliness of the instruments and tools to be sterilized.
2. Disassemble, clean, and dry the instruments before packaging.
3. Open any instruments with cavities on both ends.
4. Ensure all instruments and tools are free of water droplets.
5. Maintain humidity levels between 35%-70%, and temperatures between 18-22°C during the sterilization process.
6. Do not overcrowd the instruments inside the sterilization chamber.
Factors Affecting Ethylene Oxide Sterilization
1. Temperature
2. Humidity
3. Packaging
4. Exposure time (1-6 hours)
Aeration Process
1. Post-sterilization aeration is required to remove ethylene oxide gas to a safe level.
2. This can be done either passively, using ventilation pipes in the sterilization chamber, or mechanically, by actively displacing the gas.
Side Effects of Ethylene Oxide Sterilization
1. Formation of toxic ethylene glycol when combined with water.
2. Repeated exposure to the gas may affect some instrument properties.
3. Liquid ethylene oxide can cause burns.
4. Health risks for staff exposed to the gas (acute exposure):
o Respiratory complications
o Eye irritation
o Nausea, vomiting, and diarrhea
o Drowsiness and general weakness
o Agitation and respiratory paralysis
o Seizures
Long-term exposure risks to Ethylene Oxide:
- Corneal burns
- Neuropathy
- Cataracts (clouding of the eye lens)
- Anemia
Advantages of Ethylene Oxide Sterilization
1. Effective against all microorganisms.
2. Minimal damage to instruments and tools.
3. Allows sterilization of packaged instruments, unlike some other sterilization methods.
Disadvantages of Ethylene Oxide Sterilization
1. Risk of fire or explosion.
2. Long sterilization cycle (up to 14 hours).
3. High cost.
4. Requires biological indicators for monitoring.
Ethylene Oxide Sterilization Cycle (Five Steps)
1. Preparation & Humidification
2. Gas Introduction
3. Exposure (1-6 hours)
4. Evacuation
5. Aeration
Types of Ethylene Oxide Gas
1. 100% Ethylene Oxide
2. Mixtures with other gases:
o 96.4% Hydrochlorofluorocarbon - 8.6% Ethylene Oxide
o 90% Hydrochlorofluorocarbon - 10% Ethylene Oxide
o 91.5% Carbon Dioxide - 8.5% Ethylene Oxide
B. Sterilization Using Plasma Technology
Plasma is the fourth state of matter, distinct from solid, liquid, and gas. It is generated in a sealed chamber under vacuum conditions using short-wave electromagnetic energy to excite gas molecules, producing charged free radicals.
How Plasma Sterilization Works
Plasma sterilization works by generating free radicals within the plasma field. These radicals interact with essential microbial components, such as enzymes and nucleic acids, disrupting their metabolism and rendering the microorganisms inactive.
Advantages of Plasma Sterilization
1. Safe and non-toxic
2. Time-efficient (about 1 hour)
3. Produces only water and oxygen as byproducts, eliminating the need for ventilation since these are harmless substances.
Disadvantages of Plasma Sterilization
- Not suitable for cellulose-based products (e.g., cotton, paper).
- Ineffective for instruments with blocked cavities, powders, or liquids.
Biological Indicators for Quality Control
The biological indicator used is Bacillus atrophaeus spores.
C. Sterilization Using Formaldehyde Gas
Hospital Applications of Formaldehyde
Formaldehyde solution is widely used in anatomy labs, pathology departments, and surgeries. It is also used in limited cases in dermatology and radiology and primarily for tissue fixation in hospitals.
Low-Temperature Steam Formaldehyde (LTSF) Sterilization
- LTSF replaces dry heat with a mixture of steam and formaldehyde gas.
- The process operates at temperatures of 50, 55, 60, or 65°C.
- The presence of steam allows formaldehyde to penetrate and kill microorganisms effectively.
LTSF Process (Four Stages)
1. Pre-Treatment
o Repeated vacuuming and steam injection.
2. Formaldehyde Injection
o Formalin solution is injected from a sealed bottle.
o The formalin evaporates and enters the chamber as a gas.
o Vacuuming helps the gas spread.
o Steam is added to maintain a predefined temperature level.
o The process is repeated multiple times for deep penetration.
3. Sterilization Phase
o The chamber is maintained at a constant temperature, gas concentration, pressure, and humidity.
4. Post-Sterilization Treatment
o After the exposure period, formaldehyde is effectively removed from sterilized instruments through multiple vacuum cycles.
o The process ends with pressure evacuation, followed by multiple air purges using HEPA-filtered air to remove any residual formaldehyde.
Validation of LTSF Sterilization
- Chemical Indicators: Color change indicates sufficient exposure to formaldehyde gas.
- Biological Indicators: The Geobacillus stearothermophilus spores are used as a biological indicator.
- Characteristics of chemical sterilization
Since chemical sterilization requires complete immersion of instruments for long periods, it is recommended to avoid this method whenever possible, especially when other sterilization options exist.
Considerations Before Using Chemical Sterilization
- Chemical sterilization should be a last resort when no heat-based sterilization is available.
- It is used for heat-sensitive instruments when alternative low-temperature sterilization methods (such as gas sterilization) are not available.
- Instruments are immersed in a chemical solution for a specific period to ensure complete bacterial spore destruction.
- A major challenge is keeping the instruments sterile after chemical immersion, as they cannot be packaged like steam-sterilized instruments.
- Unlike steam sterilization, biological indicators are not suitable for most chemical sterilants.
Considering these limitations, chemical sterilization should be restricted to high-level disinfection purposes only.
Types of Chemical Agents Used in Sterilization
Glutaraldehydes are among the most common sterilization solutions. Some chemical agents can be obtained locally, such as peracetic acid (0.2% - 0.35%), hydrogen peroxide (7.5%), or a mixture of hydrogen peroxide and peracetic acid (7.35% - 0.23%). Formaldehyde solution is not used for sterilizing or disinfecting tools and instruments due to its toxicity.
1. Glutaraldehyde
Uses:
- A glutaraldehyde solution (above 2%) can be used for sterilizing heat-sensitive instruments by immersing them for 10-12 hours.
- Glutaraldehydes are known irritants that can affect the skin, eyes, and respiratory system.
- They are available in an inactive acidic form and require an alkaline activator. Once activated, they remain effective for up to two weeks.
Precautions:
- As previously mentioned, glutaraldehydes can irritate the eyes, nose, and respiratory system, potentially causing allergic reactions.
- Avoid using them in closed or poorly ventilated areas.
- When preparing or disposing of glutaraldehyde solutions, or during sterilization, wear protective gear including:
- Eye protection
- Disposable plastic aprons
- Gloves (Latex gloves for short contact periods, i.e., under 5 minutes, and nitrile gloves for prolonged exposure).
- Storage:
- Store in sealed containers in well-ventilated areas, away from heat sources.
- Replace solutions immediately if they become cloudy or show any changes in properties.
2. Peracetic Acid
Uses:
- Peracetic acid (0.2% - 0.35%) can sterilize heat-sensitive tools (e.g., flexible endoscopes) within 15 minutes.
- It is highly effective even in the presence of organic material and can eliminate bacterial spores at low temperatures.
- Byproducts are non-toxic and leave minimal residues.
Disadvantages:
- Corrosive to red and yellow copper, bronze, standard steel, and galvanized metal.
- Unstable when diluted, though certain additives can reduce its corrosive effects.
Comparison with Glutaraldehyde:
- Peracetic acid has superior penetration through organic material.
- However, its corrosive nature limits its use unless corrosion inhibitors are added.
NeocideX:
- A peracetic acid solution with an added corrosion inhibitor.
- Manufacturers recommend discarding the solution within 24 hours of use.
Sterilization Using Peracetic Acid:
- Often performed using an automatic reprocessing machine, which dilutes the acid from 0.35% to 0.2%, making it safe for use.
- This method is suitable only for instruments that can be fully immersed in liquid.
Chemical Sterilization Requirements:
✔ Wear appropriate personal
protective equipment (PPE).
✔ Thoroughly clean and dry
instruments before sterilization.
✔ Follow manufacturer
recommendations when preparing chemical sterilants.
✔ Use a test strip (indicator)
to verify solution effectiveness if reusing a prepared solution.
✔ Prepare fresh solutions in
clean, sealed containers, labeling them with the preparation
and expiration dates.
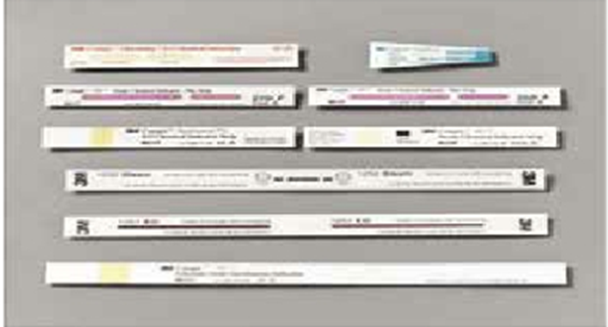
Chemical Indicators:
- Easy-to-use and fast-reacting test strips are used alongside biological indicators to confirm sterilization effectiveness, especially at low temperatures.
Chemical Indicators Classification (6 Categories):
Category 1:
- External indicators placed outside the sterilization package.
- A color change confirms exposure to certain sterilization conditions.
- External indicators are not a substitute for internal indicators.
Category 2:
- Indicators used only to test the efficiency of air removal in pressure filtration systems, such as:
1. Bowie-Dick Test
2. Helix Test
Bowie-Dick Test:
- Conducted at the start of the day before loading the sterilizer in a dedicated cycle.

- Also performed when testing a sterilizer for the first time or after maintenance.
- Test placement:
- The test pack is placed in the center of a stack of towels.
- This stack is then positioned on the lower shelf of the sterilizer, directly above the air extraction port.
Sterilization Guidelines:
✔ Ensure all hinged instruments
are fully opened.
✔ Disassemble sliding or
multi-part instruments to allow the sterilant to reach all components.
✔ Completely submerge
instruments in the solution.
✔ Containers should remain
upright (not inverted) to fill properly with the sterilant.
✔ Seal the container properly
and follow the manufacturer’s instructions regarding sterilization duration.
✔ Do not add or remove
instruments during the sterilization process.
✔ Record the sterilization time
in a logbook for tracking and review.
✔ Use opaque, large covers when
removing sterilized instruments from the container.
✔ Rinse sterilized instruments
thoroughly with sterile water to remove chemical residues.
✔ Use the sterilized
instruments immediately after reprocessing—storage is not
permitted.
Sterilization Effectiveness Monitoring:
1. Mechanical Indicators:
- These are built-in recorders within sterilization devices (autoclaves or hot air ovens).
- They monitor and record sterilization parameters:
- Time
- Temperature
- Pressure
2. Chemical Indicators:
Helix Test:
- Used to ensure steam penetration into hollow instruments and devices.
Chemical Indicator Categories:
Category 3:
- Internal indicators placed inside each sterilization package.
- Measure a single variable (e.g., temperature) as per the manufacturer's instructions.
- Commonly used in low-temperature sterilization methods.
Category 4:
- Internal indicators placed inside each sterilization package.
- Measure two or more parameters simultaneously (e.g., temperature, steam saturation, time) according to manufacturer instructions.
Category 5:
- Internal indicators placed in each sterilization cycle or package.
- Measure all critical sterilization parameters simultaneously (temperature, steam saturation, time).
- Designed to simulate biological indicators, but they do not replace them.
Category 6:
- Internal indicators used in specific sterilization cycles.
- Measure all parameters simultaneously and are classified based on the temperature and duration of the sterilization cycle.
- These are the most advanced indicators, but they do not replace biological indicators.
Note:
- Categories 4, 5, and 6 are called integrating indicators because they measure multiple parameters at the same time.
Biological Indicators:
- Utilize highly resistant bacterial spores to verify sterilization effectiveness.
Process:
1. The biological test is placed on the lower shelf of the sterilization chamber, near the air extraction port.
2. Successful sterilization is confirmed when all bacterial spores are eradicated in the test capsules.
3. Test capsules are placed inside the sterilizer during operation.
4. After sterilization, test strips are incubated in a bacterial culture medium at the following temperatures:
- Geobacillus stearothermophilus → 55-60°C
- Bacillus atrophaeus → 35-37°C
5. Incubation period: 48 hours
- No bacterial growth indicates successful sterilization.
- Bacterial growth indicates sterilization failure.
Advantages & Limitations:
✅ Provides direct confirmation
of sterilization efficacy.
❌ Not an immediate result—requires
bacterial culture incubation, unlike mechanical and chemical indicators.
Figure 27
Biological indicators
- • If the biological test result is positive (bacterial growth detected) while the chemical and physical indicators show acceptable results, the biological test should be repeated.
- If the biological test remains positive, the sterilizer should be taken out of service, and the engineering/maintenance department must be informed for necessary repairs.
- Sterilized packages containing implantable devices should be recalled.
Biological Indicator Testing Requirements:
Biological indicator tests should be conducted:
- Upon initial operation of the sterilizer for the first time.
- Weekly as part of routine monitoring.
- After any sterilizer malfunction or maintenance service.
- For cycles containing implantable medical devices (implants).
Monitoring & Documentation System:
The following documentation procedures must be followed:
- The autoclave's recording chart (if available) should be reviewed after every sterilization cycle.
- If a recording chart is unavailable, temperature, time, and pressure readings should be manually recorded in a logbook for future reference.
- For dry heat sterilization, temperature and time readings must be logged after each cycle.
- A temperature probe should be placed in the most thermally resistant area of the load to ensure proper heat penetration.
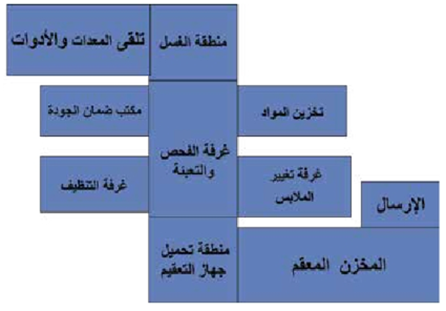
- Sterilization Services Department (Central Sterile Services Department – CSSD):
The Central Sterile
Services Department (CSSD) is a critical component of infection
control programs, ensuring effective sterilization and
disinfection of medical instruments.
It also optimizes costs in the long run by maintaining high
standards of equipment processing and reuse.
Designing a Dedicated Area for Reprocessing Medical Devices & Instruments:
· Sterilization and high-level disinfection areas must be kept clean, as these are considered "clean zones."
· Contaminated instrument processing should be performed in separate rooms, distinct from clean areas.
· Ideally, there should be at least three separate rooms:
1. Receiving & decontamination area (for contaminated instruments).
2. Inspection, packaging, and final processing area (for sterilization or disinfection).
3. Storage area (for sterile instruments).
· If only one room is available (as in primary healthcare units), it should be designed to ensure a workflow from "dirty" to "clean" areas.
· At a minimum, the room should have:
1. A sink for instrument decontamination.
2. A separate sink for handwashing.
3. A counter for receiving contaminated items.
4. A designated area for drying and packaging instruments.
5. Storage space (preferably closed cabinets).
· Clear separation should be maintained between contaminated areas and clean zones where sterile instruments are handled.
- Instrument & Equipment Processing in Healthcare Facilities
- Contaminated instruments from various hospital or clinic departments should be collected and transported to the CSSD for proper cleaning, disinfection, and sterilization.
- After processing, sterilized instruments should be returned to their respective departments for reuse.
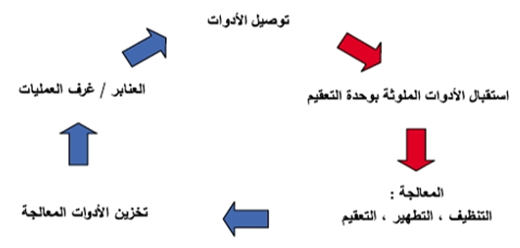
Figure 28
Workflow Diagram for Instrument Reprocessing
Collection and Transportation of Contaminated Instruments:
- Contaminated reusable instruments from hospital departments should be collected in a sealed container filled with water and liquid detergent, labeled with a detailed tag specifying its contents.
- Instruments must be safely transported to the Central Sterile Services Department (CSSD).
- Cleaning contaminated instruments in hospital departments is strictly prohibited.
Handling of Instruments in the CSSD:
- Place contaminated instruments in the designated area within the CSSD.
- Clean all instruments using water and liquid detergent or an enzymatic solution, either manually or using automated systems, while ensuring proper personal protective equipment (PPE) is worn.
- Thoroughly dry all instruments.
- Inspect all equipment to verify cleanliness and detect any damage.
- Send damaged instruments to the maintenance department after high-level disinfection or sterilization.
- Pack clean critical instruments properly before sterilization.
- Sterilize or disinfect instruments as required.
- Verify sterilization effectiveness by checking biological and chemical indicators.
- After reprocessing, return sterilized instruments to hospital departments or store them in a clean, well-ventilated area.
- Strict separation between contaminated and sterile instruments must be maintained within the CSSD.
- Dedicated carts or containers must be used for transporting contaminated instruments—they must not be mixed with those used for sterile instruments.
Design of the Central Sterile Services Department (CSSD):
- Physical barriers (easy to clean and disinfect) must separate clean and contaminated areas in the CSSD.
- Airflow direction must move from clean areas to contaminated areas.
- The workflow must be structured to prevent cross-contamination between dirty, clean, disinfected, or sterilized instruments.
- Doors should remain closed to prevent contamination from dust, airborne particles, and insects, while ensuring proper ventilation.
- Adequate hand hygiene facilities must be available.
- A dedicated staff team should be assigned to each processing area.
- If this is not feasible, strict adherence to standard precautions must be maintained for each work zone.
- Separate supplies and storage areas must be allocated for each processing stage.
Important Note:
- All CSSD staff must be vaccinated against Hepatitis B.
- Refer to the Occupational Health and Safety section for further details.
Operations Department General Plan
- Opening the instrument tray and wrapping towels and gowns
Required Supplies:
- Required gowns or a pack of towels
- Instrument tray
- Clean table or trolley
- Cleaning cloths and disinfectant solution
Steps:
1. Clean the trolley or table surface with diluted chlorine or another disinfectant to eliminate germs.
2. Dry the surface thoroughly (to prevent moisture from affecting paper or towels).
3. Inspect the required pack or instrument tray:
o Expiration date
o Outer packaging to ensure there are no tears or damages and that the autoclave tape is intact.
o If the expiration date has passed, the packaging is damaged, or the autoclave tape is unclear, the pack or tray must be discarded.
4. Open the towel and gown pack following the standard protocol for opening sterile packs.
5. Place the contents on the trolley or table with the edges facing upward (if placed with edges facing downward, opening may be difficult).
6. The scrub nurse opens the towels by pulling the first edge toward them, ensuring the gloves remain uncontaminated.
7. For opening an instrument tray, the circulating nurse places the tray on the clean table.
8. Cut the autoclave tape and hold the non-sterile outer edge of the wrapper.
9. Unfold the wrapper carefully (avoiding contact between the edges and the sterile tray contents).
10. Walk around the table and open the remaining wraps in the same manner:
o Avoid touching the inner part of the packaging.
o Ensure the tray remains level and does not touch the table surface.
- Opening a Suture Packet
Required Supplies:
- Required suture packet
Steps:
1. Only open the sutures that will be used.
o If unsure, confirm the preferred type with the surgeon.
2. The circulating nurse should inspect the packet to ensure:
o The outer packaging is intact without any tears or damages.
o If the packaging is damaged, discard the suture as it is no longer sterile.
3. Hold the packet with one hand, and with the other, separate the thin outer layer from the plastic layer using the thumb edge.
4. Firmly pull apart the thin layer using the thumb and index finger.
5. Pull the plastic layer using the thumb and index finger of the other hand.
o Secure the packet between both hands.
6. Push the thumbs outward to peel back all layers together, exposing the sterile inner layer.
o Ensure the fingers do not touch the inner sterile layer to prevent contamination.
7. The circulating nurse should stand next to the sterile trolley, holding the suture for the scrub nurse to take.
o Do not lean over the trolley or allow any part of the body to come in contact with the sterile field.
o Do not discard the inner sterile layer onto the trolley.
8. The scrub nurse uses sterile forceps or sponge-holding forceps to retrieve the sterile suture.
9. This method should be used for all suture packets.
- Opening a Sterile Pack
Required Supplies:
- Sterile pack
Steps:
1. Do not open the sterile pack until it is ready for use.
2. The circulating nurse inspects the pack for:
o Expiration date
o Any tears in the outer packaging
o Autoclave tape color change
o If expired, damaged, or if the autoclave tape does not confirm sterilization, do not use the pack.
3. Cut the autoclave tape and place the thumbs at the top fold of the pack to straighten the upper portion.
4. Hold the pack from the bottom and keep it away from clothing.
o Expose the contents at the top portion of the pack for the scrub nurse to see.
5. Stand next to the sterile table while opening the pack.
o Allow the scrub nurse to remove the contents.
o Avoid leaning over the sterile trolley to prevent contamination.
o Do not shake or drop the sterile contents onto the table to avoid dust or debris falling onto the sterile field.
6. The scrub nurse uses sterile forceps or sponge-holding forceps to retrieve the sterile contents.
7. If a sterile pack is opened incorrectly, or if it is not the required pack, it must not be used and should be returned to the central sterilization unit for reprocessing.
o Do not reclose the pack for later use.
8. The circulating nurse should stand at the side of the trolley, holding the suture packet for the scrub nurse to take.
o Avoid leaning over the trolley.
o Ensure the sterile inner layer is not discarded onto the trolley.
9. The scrub nurse uses sterile forceps or sponge-holding forceps to retrieve the sterile layer from the pack.
10. This method should be followed for all sterile packs.