Respiratory System Disorders Care Guide
| Site: | EHC | Egyptian Health Council |
| Course: | دلائل الاجراءات التمريضية لقسم حديث الولاده |
| Book: | Respiratory System Disorders Care Guide |
| Printed by: | Guest user |
| Date: | Saturday, 20 June 2026, 10:58 PM |
Description
"last update: 9 February 2025" تحميل الدليل
- Prepared by
NICU guide
Under supervision
- Prof. Dr. Mohamed Latif, CEO of the Egyptian Health Council
Dr. Kawthar Mahmoud, Head of the Egyptian Nursing Syndicate - Member of the Senate
Prepared by
|
Title |
Name |
NO. |
|
Dean Of Faculty Nursing, Professor of Medical and Surgical Nursing, Tanta University |
Dr Afaf Abdel Aziz Abdel Aziz Basal |
1 |
|
Professor Of Critical Care Nursing |
Prof.Dr/Zeinab Hussain Ali |
2 |
|
Professor And Head of the Department of Medical Surgical Nursing. Faculty-. Benha University |
Amal Said Taha Refaie |
3 |
|
Supervisor Of the Education Sector at Port Said University |
Amal Ahmed Khalil Morsy |
4 |
|
Professor Of Medical Surgical Nursing- Faculty of Nursing- Cairo University |
Dr. Hanan Ahmed Al Sebaee |
5 |
|
Head of central administration on secondment at MOHP |
Dr Neveen ab drab al0nabi Mohamed |
6 |
|
Director Of Primary Health Care Nursing Department at MOHP. |
Maysa Hosny Ahmed Tammam |
7 |
|
Supervisor Of Technical Education- EHA |
Nancy Alaa Eldeen Abd-Elbaset Ali |
8 |
|
Supervisor Of Nursing Services Development- EHA |
Sherien Mohamed Saad |
9 |
|
Assistant Professor of Maternity and Neonatal Health Nursing - Faculty of Nursing- Ain Shams University |
Assist.Perof. Dr./Heba Mahmoud Mohammed |
10 |
|
General manager of general administration of health institutes affairs |
Dr Mai Galal Ibrahim Al-Assal |
11 |
|
Participants |
||
|
Professor of Obstetrics and Gynecology Nursing |
Dr. Nagat Salah Shalabi Salama |
12 |
|
member of the Nursing administration at EHA, port said branch |
Mrs. Shaima Abdel Basset Ibrahim Salim |
13 |
|
member of the Nursing administration at EHA, port said branch |
Mrs. Hoda Al-Sayd Muhammad |
14 |
|
member of the Nursing administration at EHA, port said branch |
Mrs. Walaa Ahmed Ali |
15 |
|
member of the Nursing administration at EHA, port said branch |
Mrs. Omnia Abdel Qader Muhammad |
16 |
|
member of the Nursing administration at EHA- South Sinai branch |
Mrs. Yasser Abdel Karim Omar Abdel Jawad |
17 |
- Oxygen Therapy
Oxygen is used as an essential treatment for acute respiratory problems and to prevent the harmful effects that may result from inadequate oxygen delivery to the infant’s tissues, particularly the brain. Oxygen is considered a medical therapy for neonates suffering from respiratory distress; therefore, the oxygen flow rate and concentration must be administered strictly according to the physician’s orders. The nurse is responsible for continuous monitoring to prevent complications resulting from either insufficient or excessive oxygen therapy.
Indications for Use:
- Documented hypoxemia based on arterial blood gas (ABG) results.
- Postnatal resuscitation and cardiopulmonary resuscitation.
- Respiratory distress associated with cyanosis.
- Management of functional impairments of body systems resulting from reduced tissue oxygenation (shock).
- Recurrent episodes of apnea.
Signs of Hypoxemia:
- Increased respiratory rate
- Chest retractions
- Grunting during expiration
- Rapid, shallow breathing
- Recurrent episodes of apnea
- Cyanosis (bluish discoloration of the skin)
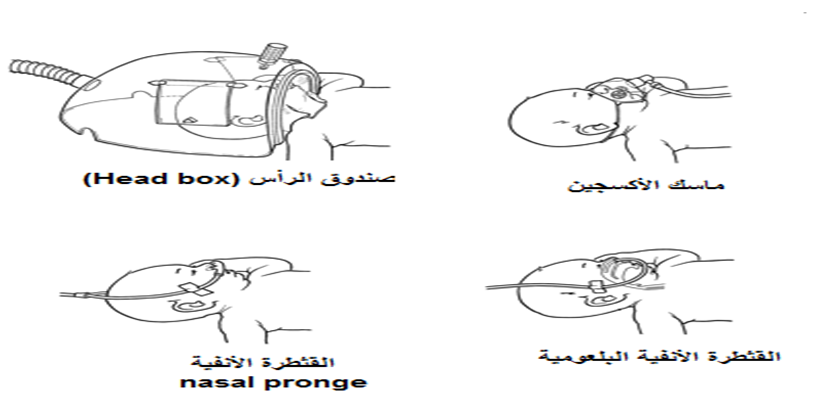
Methods of Oxygen Administration in Neonatal Care Units:
Oxygen may be administered to neonates using one of the following methods:
- Oxygen incubator
- Head box
- Face mask
- Nasal catheter / nasal prongs
- Nasopharyngeal catheter
- Nasal Continuous Positive Airway Pressure (NCPAP)
- Mechanical Ventilation via an Endotracheal Tube
• Different Methods of Oxygen Administration in Neonatal Intensive Care Units (NICUs), Oxygen Flow Rates (L/min), and the Advantages and Disadvantages of Each Method:
|
Method |
Oxygen Flow Rate (L/min) |
Advantages |
Disadvantages |
|
Oxygen Incubator |
6–10 L/min |
- Non-invasive and cost-effective method- Used during oxygen weaning |
- Ineffective in critically ill neonates |
|
Head Box |
4–7 L/min |
- Non-invasive method- Used during oxygen weaning |
- Poor seal with possible oxygen leakage- Difficult to provide adequate nursing care |
|
Face Mask |
3–6 L/min |
- Non-invasive- Simple and inexpensive- Used during postnatal recovery |
- Abdominal distension- Pressure on the face and eyes- Carbon dioxide retention |
|
Nasal Catheter (Nasal Prongs) |
0.5–2 L/min |
- Non-invasive- Effective in some cases of respiratory distress |
- Abdominal distension- Nasal injury |
|
Nasal Continuous Positive Airway Pressure (NCPAP) |
8–10 L/min (oxygen + compressed air) |
- Non-invasive- Effective in severe respiratory distress |
- Abdominal distension- Severe nasal septum injury- High cost |
|
Mechanical Ventilation via Endotracheal Tube |
As prescribed by the physician |
- Effective in severe respiratory distress associated with respiratory failure |
- Invasive method- Risk of respiratory tract infection- Requires advanced nursing care and high-level medical skills- Requires advanced technology (Level III neonatal care facilities)- High cost |
Nursing Care for Neonates on Oxygen Therapy
- Observe and record skin color, respiratory effort, and vital signs, and notify the physician immediately if any abnormalities occur.
- Continuous monitoring of oxygen saturation (SpO₂) using a pulse oximeter, maintaining levels between 89–93%, or as prescribed by the physician.
- Administer humidified oxygen to prevent drying of the airway mucosa, which can increase secretion viscosity and accumulation.
- Observe and record the oxygen flow rate, the method of oxygen delivery, and the oxygen saturation level.
- Suction the airway as needed, documenting the amount and characteristics of secretions removed.
- Perform arterial blood gas (ABG) analysis to assess oxygenation and acid-base status.
- Monitor oxygen concentration using an oxygen analyzer if available, to prevent complications from excessive oxygen delivery.
Complications Due to Hypoxia (Low Oxygen):
- Increased pulmonary artery pressure
- Seizures
- Hypoxic encephalopathy
- Cerebral palsy
- Long-term cognitive and behavioral impairments
Complications Due to Hyperoxia (Excess Oxygen):
- Retinopathy of prematurity and potential vision loss, especially in preterm or low-birth-weight neonates
- Oxygen dependency of the lungs and difficulty weaning from oxygen (chronic lung disease)
- Pneumothorax, particularly with NCPAP or mechanical ventilation
- Chest Physiotherapy
Objectives:
- Remove accumulated airway secretions
- Increase airway and lung capacity
- Improve respiratory function through better gas exchange
- Prevent endotracheal tube obstruction
- Reduce the risk of respiratory infections
Techniques and Positions for Chest Physiotherapy:
- Postural Drainage: Positioning the neonate to facilitate drainage of secretions from specific lung segments.
- Percussion: Gentle tapping on the chest wall to loosen secretions.
- Vibration: Manual vibration of the chest to mobilize mucus.
- Airway Suctioning: Removal of secretions from the trachea as needed.
These methods are applied according to the neonate’s condition, with continuous monitoring to ensure safety and effectiveness.
|
Technique |
Advantages |
Contraindications / Precautions |
|
Postural Drainage |
- Involves positioning the neonate according to the location of accumulated secretions in the lungs for a set period, using gravity to move secretions toward the center of the chest or carina for suctioning.- Prevents secretion buildup due to immobility or infection spread.- Reduces adhesions in the lungs after extubating from mechanical ventilation. |
- Avoid head-down tilt in cases of: • Preterm infants <1250 g • Intracranial hemorrhage • Untreated hydrocephalus • Immediately after feeding • Birth-related eye hemorrhage • Hypertension- Avoid prone positioning if: • Recent abdominal surgery • Abdominal distension |
|
Percussion |
- Loosens accumulated secretions, moving them from small to large airways for suctioning or cough reflex stimulation.- Gentle tapping on both sides of the chest using a padded mask or soft artificial nipple.- One hand supports the neonate’s head during percussion. |
- Same contraindications as postural drainage- Pneumothorax or emphysema- Bleeding disorders or risk of hemorrhage- Pulmonary hemorrhage- Rib fractures- Skin infections, bruises, or wounds |
|
Vibration |
- Massage over areas of secretion accumulation using the hand or a vibration device to mobilize mucus from small to large airways for suctioning or cough reflex stimulation.- One hand supports the neonate’s head, monitoring tolerance throughout. |
- Same as percussion and postural drainage |
Role of the Nurse in Chest Physiotherapy
1. Assessment and Preparation Before Chest Physiotherapy
The nurse is responsible for evaluating the neonate’s condition and preparing all necessary equipment prior to performing chest physiotherapy:
- Assess the need for chest physiotherapy and select the appropriate technique based on the neonate’s condition.
- Ensure vital signs are stable: temperature, heart rate, respiratory rate, blood pressure, and oxygen saturation.
- Connect the neonate to a monitor.
- Auscultate the chest to identify areas of secretion accumulation.
- Perform a chest X-ray if needed to locate areas of pulmonary secretions.
- Prepare all required equipment depending on the chosen technique, including:
- Padded masks in various sizes suitable for the neonate
- Suction machine
- Vibration device with specifications:
- Battery operated
- Electrically safe
- Smooth surface
- Easy to disinfect between patients
- Suction catheters of different sizes (6, 8, 10 Fr)
- Sterile gloves
- Saline solution
- Sterile dressings
- Small towel
- Oxygen source
- Pulse oximeter or monitor
- Ambu bag
- Stethoscope
2. Steps for Postural Drainage
- Identify the area of secretion accumulation in the lungs and choose the optimal positions to mobilize the secretions.
- Apply postural drainage positions, maintaining the neonate’s posture using a small towel for support, for 10–15 minutes per position or as instructed by the physician.
- Maintain a schedule for changing the neonate’s positions.
- Perform airway suctioning after drainage.
Potential Risks and Complications of Postural Drainage
- Dislodgement of endotracheal tube, umbilical catheter, or chest tube
- Increased intracranial pressure
- Pressure on the diaphragm
- Aspiration of stomach contents into the airway
- Apnea caused by airway obstruction
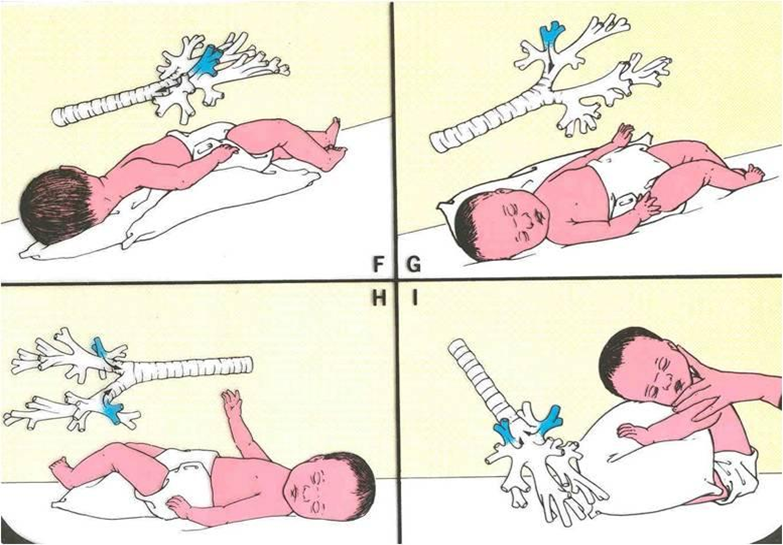
Examples of Chest Physiotherapy Positions
Chest Physiotherapy Techniques: Vibration and Percussion
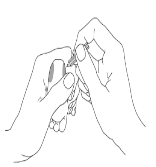
Vibration Technique (Vibration)
Steps:
- Identify the area of secretion accumulation in the lungs.
- Place the neonate on one side.
- Place a soft barrier (e.g., cloth) between the skin and the vibration device (electric brush).
- Apply the device to the back of the neonate, moving in an upward circular motion from bottom to top.
- Coordinate vibrations with the neonate’s exhalation for effectiveness.
- Duration: 2–3 minutes per area or as prescribed by the physician.
- Perform airway suctioning after the session.
Potential Complications:
- Hypoxemia (low blood oxygen)
- Skin abrasions
Percussion Technique (Percussion / Clapping)
Steps:
- Identify the area of secretion accumulation in the lungs.
- Place the neonate on one side.
- Perform gentle percussion using a padded mask, tapping the affected chest area from bottom to top.
- Duration: 5–10 minutes per area depending on tolerance.
- Perform airway suctioning after percussion.
Notes for Both Techniques:
- Monitor vital signs and oxygen saturation throughout the session.
- Adjust technique according to the neonate’s tolerance and physician instructions.
- Always have suction equipment ready to clear secretions immediately.
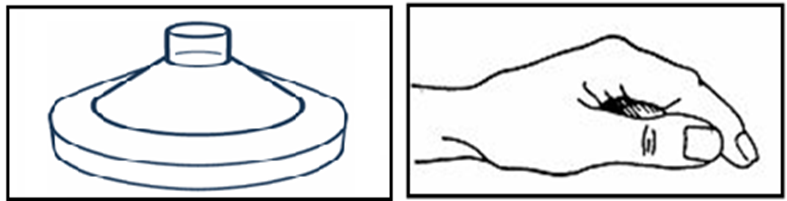
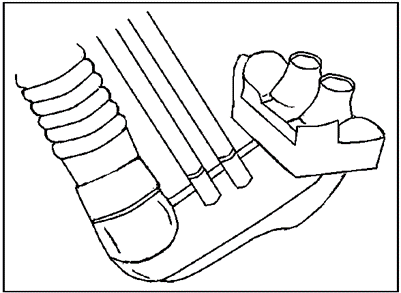
Tools for Performing the Percussion (Clapping) Technique
Potential Complications of the Percussion Technique
- Hypoxemia (low blood oxygen)
- Skin abrasions
- Rib fractures
- Liver or spleen tissue injury
- Pain or discomfort for the neonate
3. Post-Therapy Assessment
After completing chest physiotherapy, the nurse should:
- Check vital signs:
- Temperature, heart rate, respiratory rate, blood pressure, and oxygen saturation to ensure stability.
- Auscultate the chest:
- Listen for improved air entry and reduced crackles or wheezes.
- Palpate the chest:
- Assess for abnormal vibrations or narrowing of airways (tactile fremitus).
- Chest X-ray:
- If necessary, to confirm clearance of pulmonary secretions.
- Evaluate response to therapy:
- Determine if the neonate tolerated the session well and if secretions have been effectively mobilized.
- Document improvements or any complications.
Neonate’s Response to Chest Physiotherapy
|
Positive Response |
Negative Response |
|
Improved respiratory effort |
Signs of fatigue or stress |
|
Improved respiratory rate |
Increased respiratory effort and rate |
|
Improved oxygen saturation |
Decreased oxygen saturation |
|
Improved arterial blood gas results |
Recurrent apnea episodes |
|
Overall improvement in general condition |
Deterioration of general condition |
- Nursing Care for Neonates on Mechanical Ventilation
|
Mechanical ventilation involves connecting the neonate to a ventilator via an endotracheal tube. The ventilator delivers a mixture of oxygen and compressed air at controlled flow rates and pressures for a specified duration to ensure effective gas exchange. Indications for Mechanical Ventilation in Neonates
Mechanical Ventilation Systems
Nurse’s Role in Mechanical Ventilation 1. Monitoring and Recording Ventilator Settings and Readings
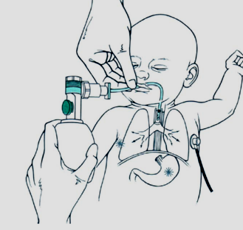
2Assisting with Endotracheal Tube (ET Tube) Insertion – Nursing RoleThe nurse plays a crucial role in assisting the physician during endotracheal intubation and monitoring the tube after placement. This includes knowing how to select the appropriate tube size, determining the insertion depth, and ensuring proper care. Nurse’s Responsibilities Before ET Tube Insertion 1. Determining the Appropriate ET Tube Size:
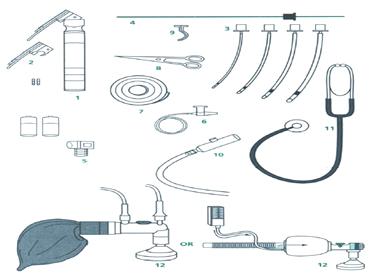
2Preparation of Equipment for Endotracheal Tube (ET Tube) Insertion1. Required Equipment:
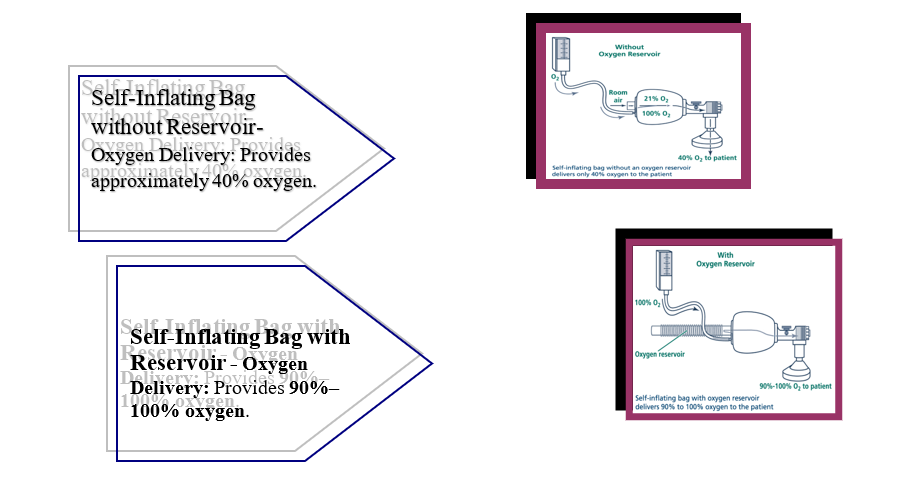
2. Types of Resuscitation Bags (Ambu Bags) and Masks for Neonates: General Characteristics:
 3. Determining the Endotracheal Tube Insertion Depth
Appropriate Depth (cm)=6+Infant’s weight (kg)\text{Appropriate Depth (cm)} = 6 + \text{Infant's weight (kg)}Appropriate Depth (cm)=6+Infant’s weight (kg)
Appropriate Depth (cm)=8+Infant’s weight (kg)\text{Appropriate Depth (cm)} = 8 + \text{Infant's weight (kg)}Appropriate Depth (cm)=8+Infant’s weight (kg)
Nurse’s Role During Endotracheal Tube Placement
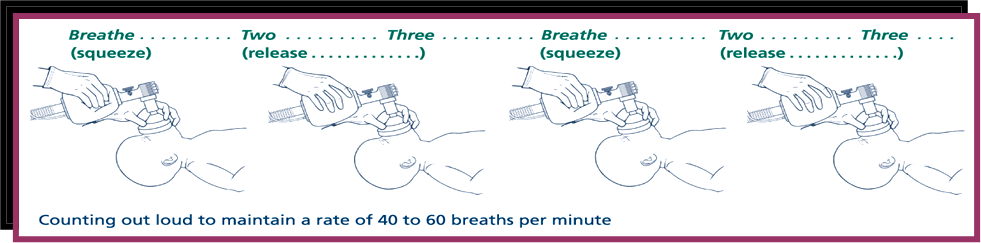 Ventilation Rate During Endotracheal Tube Placement
Steps for Endotracheal Tube Insertion
Nurse’s Role After Tube Placement
Complications of Endotracheal Tube Insertion and Prevention Strategies
Routine Nursing Care for a Neonate on Mechanical Ventilation 1. Ventilator Monitoring:
Types of Ventilator Alarms and Actions:
1. Arterial Blood Gas (ABG) Sampling Neonates on mechanical ventilation require continuous monitoring of their overall condition and respiratory function. This is achieved by analyzing arterial blood gases (ABG), which provide information about:
These results are compared with normal reference values to guide adjustments in ventilator settings according to the neonate’s needs. Normal Blood Gas Values in Neonates
Blood Gas Sampling in Neonates on Mechanical Ventilation
Method for Obtaining a Blood Gas Sample from the Heel Heel sampling can be used as an alternative to arterial blood gas. The following precautions must be observed to ensure accurate results:
Care for Neonates on Mechanical Ventilation and Nasal CPAP 1. Endotracheal Tube (ETT) Care
2. Monitoring Vital Signs
3. Chest Physiotherapy and Suctioning
4. Nutrition
5. Repositioning
Weaning from Mechanical Ventilation
Extubation Procedure
Potential Complications of Mechanical Ventilation
|
- Nasal Continuous Positive Airway Pressure (Nasal CPAP)
Nasal CPAP is a non-invasive, safe ventilatory support system that does not require an endotracheal tube. It delivers a continuous positive pressure of oxygen-enriched air to keep alveoli open and prevent collapse during exhalation. It can be delivered via mask, nasopharyngeal catheter, or endotracheal tube, though nasal CPAP is the most commonly used.
Indications
- Respiratory distress from Hyaline Membrane Disease in preterm neonates due to surfactant deficiency, to improve lung efficiency and reduce the need for invasive ventilation.
- PaO₂ < 50 mmHg despite oxygen therapy ≥60% using simpler methods.
- Moderate respiratory distress: tachypnea (>60 breaths/min), grunting, or subcostal retractions, such as:
- Transient neonatal tachypnea
- Meconium aspiration
- Apnea of prematurity in low birth weight infants.
- Post-weaning from mechanical ventilation.
Contraindications
- Respiratory failure requiring invasive ventilation.
- Persistent apnea with bradycardia unresponsive to CPAP.
- Upper airway malformations (cleft palate, nasal obstruction).
- Diaphragmatic hernia.
- Severe, unstable cardiac disease.
Nasal CPAP Components
- Gas Source: Provides a humidified mixture of oxygen and compressed air.
- Pressure Generator: Creates continuous positive airway pressure.
- Interface: Connects the circuit to the neonate’s airway (nasal prongs or mask).
Circuit Components
- Gas Delivery Circuit:
- Oxygen and compressed air inlets.
- Oxygen blender to mix oxygen and air to the required FiO₂.
- Flowmeter (8–10 L/min) and manometer to monitor pressure.
- Humidifier: Heats and humidifies the inspired gas with a temperature sensor.
- Pressure Generator: Maintains continuous positive pressure at the end of exhalation to keep alveoli open.
Positive Pressure Generator (CPAP Generator)
Other Methods to Generate Positive Pressure (Bubble–CPAP)
- Immerse the free end of the exhalation tube under the water surface to a depth of 5 cm to generate the desired positive pressure in the alveoli.
- Attach a graduated measuring tube to the outer wall of the sterile water bottle.
- Fill the bottle with sterile water until the water level reaches 7 on the measuring tube.
- Immerse the tube end under the water to 5 cm, leaving a 2 cm gap between the tube end and the bottom of the bottle to prevent excessive alveolar pressure.
- Ensure the appearance of air bubbles after connecting the neonate and starting the CPAP device.
- Connect the device’s exhalation tube to a valve.
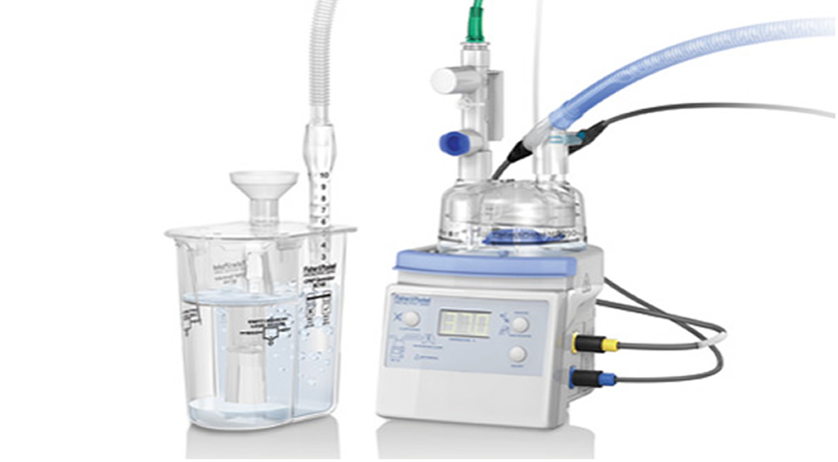
Nasal Prongs (Double-Prong Catheter)
- Connection: Attaches to the end of the generator to deliver the inhaled gas circuit to the infant.
Device Connections
- Short Corrugated Tube: Connects the flow meter (on the oxygen blender) to the humidifier.
- Inhalation Tube: A long corrugated tube carrying the humidified inhaled gas from the humidifier to the positive pressure generator and the double-prong nasal tube, delivering warm, moist air to the infant.
- Exhalation Tube: A corrugated tube connecting the double-prong nasal tube to the positive pressure generator at the back, connected to a manometer to monitor the generated pressure.
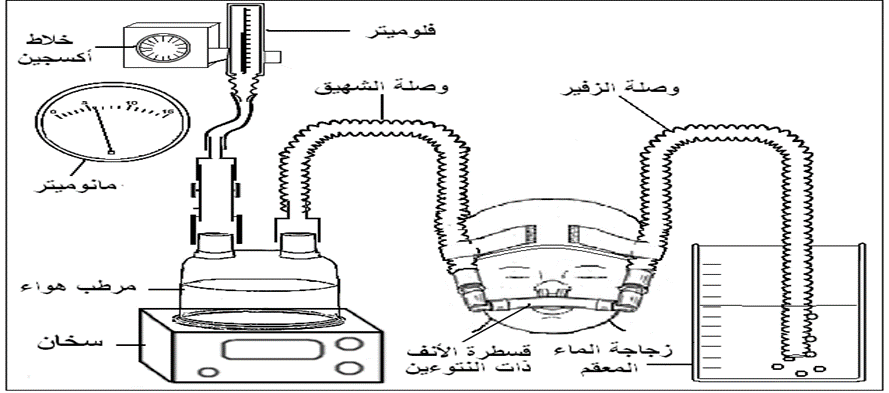
(Bubble CPAP)
Nurse’s Role:
The device must always be ready for use at any time in the neonatal care units, with all necessary connections available, including all sizes of double-prong nasal catheters according to the infant’s weight and gestational age.
Preparing the Infant for Connection to the Device
- Infection Control: Follow strict infection control measures to prevent respiratory infections and ensure the device functions efficiently:
- Wash hands thoroughly before handling the device, catheter, or infant.
- Wear sterile gloves during airway suctioning.
- Keep all tubing off the floor or away from contamination sources.
- Device Setup:
- Connect the oxygen and air supply to the oxygen blender, adjusting the oxygen flow rate to 8–10 L/min.
- Set the oxygen concentration to the required percentage.
- Connect the short corrugated tube to the oxygen humidifier and insert the temperature probe into the designated port.
- Fill the humidifier with sterile water to the marked level, turn on the device, and set the temperature to 37°C.
- Select the appropriate cap size for the infant’s head.
- Select the correct nasal catheter size by measuring the infant’s nostrils; proper fit is crucial:
- Too small → leakage, difficult to maintain pressure.
- Too large → nasal mucosal injury.
- Attach the nasal catheter to the generator and temporarily cover with a finger to check that the manometer shows the correct pressure (5 cm H₂O).
Connecting the Infant to the Device
- Wash hands or use alcohol rub.
- Ensure no obstruction in the infant’s posterior nasal passages (congenital defect in some cases).
- Connect the infant to the monitoring system (oxygen saturation and vital signs).
- Wear gloves.
- Suction the nose, mouth, and pharynx using the largest catheter that can pass without resistance.
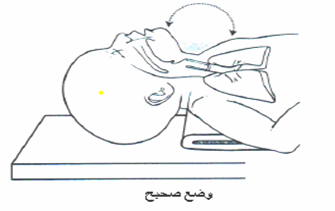
- Positioning: Raise the bed 30°, place a folded sheet under the infant’s shoulders, slightly extend the neck to keep the airway open.
- Place the appropriately sized cap, bending its edge 2–3 cm above the ears.
- Insert the double-prong nasal catheter and secure with the cap’s attached strings, ensuring:
- Catheter fills both nostrils completely.
- Skin around the nose is not under tension.
- Catheter does not press on the nasal septum.
- Space between the septum tip and the catheter bridge.
- Catheter does not rest on the upper lip.
- Secure the exhalation corrugated tube to the forehead via cap straps.
- Insert a gastric feeding tube for stomach suction, connecting it to a syringe to release excess air.
- Clean the upper lip and cheeks with warm water, dry, and apply prescribed moisturizer to prevent pressure sores.
Monitoring the Infant on the Device
- Check every 2–4 hours:
- Respiratory status: rate, nasal flaring, chest retractions, breath sounds.
- Body temperature.
- Circulation: capillary refill, blood pressure, heart rate.
- Neurological status: activity, movement, reflexes.
- Gastrointestinal: abdominal distention.
- Monitor devices for proper function.
- Suction as needed (nose, mouth, pharynx, stomach). Shorter suction intervals (<2 hours) may be needed if:
- Increased respiratory effort.
- Higher oxygen requirements.
- Apnea or bradycardia episodes.
- Record volume and color of secretions.
- Verify device function via checklist.
- Reposition infant every 4–6 hours to prevent secretion accumulation.
- Drain and dispose of condensation in tubing regularly.
Weaning from Nasal CPAP
Indicators for weaning:
- Overall improvement in the infant’s condition.
- Spontaneous, comfortable breathing.
- Reduced respiratory rate, absence of chest retractions, improved color.
Weaning Steps:
- Gradually reduce oxygen concentration by 2–5% at a time until reaching 21%, guided by pulse oximetry or arterial blood gas analysis.
- Temporarily remove the nasal catheter and observe:
- Increased breathing rate.
- Chest retractions.
- Decreased oxygen saturation.
- Apnea episodes.
- Cyanosis.
- If any signs appear → weaning fails; resume CPAP and attempt again after 24 hours.
- Do not attempt weaning if alveolar collapse is likely, as prevention is better than treatment.
Feeding During Nasal CPAP
- If stable, feed via the gastrointestinal tract using gravity or syringe pump.
- Suction excess stomach air before feeding.
Potential Complications of Nasal CPAP
- Nasal septum injuries from prolonged catheter pressure.
- Skin injuries from device straps.
- Abdominal distention.
- Increased secretions.
- Pneumothorax.
Checklist for Neonatal NCPAP Monitoring (Filled by Responsible Nurse Each Shift)
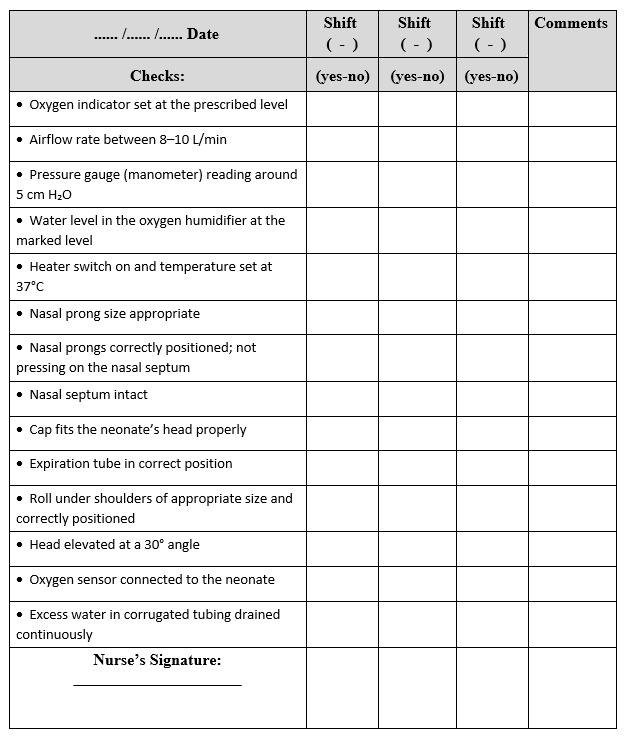
Checklist for Preparing the Neonatal Continuous Positive Airway Pressure (NCPAP) System
|
Date ....../ ....../ ...... |
Shift ------ |
Shift ------ |
Shift ------ |
Comments |
|
Check |
Yes / No |
Yes / No |
Yes / No |
|
|
Nasal CPAP device ready for use |
||||
|
Sufficient number of connections and various sizes of nasal prongs available |
||||
|
Sterile water bottles available |
||||
|
Oxygen humidifier ready for use |
||||
|
Nurse’s signature: |