Guidelines for Obstetrics and Gynecology Nursing Procedures
| Site: | EHC | Egyptian Health Council |
| Course: | دلائل الاجراءات التمريضية لقسم العمليات |
| Book: | Guidelines for Obstetrics and Gynecology Nursing Procedures |
| Printed by: | Guest user |
| Date: | Saturday, 20 June 2026, 10:58 PM |
Description
"last update: 9 March 2025" تحميل الدليل
- Prepared by
Operation Room guide
Under supervision
- Prof. Dr. Mohamed Latif, CEO of the Egyptian Health Council
Dr. Kawthar Mahmoud, Head of the Egyptian Nursing Syndicate - Member of the Senate
Prepared by
|
Title |
Name |
NO. |
|
Dean Of Faculty Nursing, Professor of Medical and Surgical Nursing, Tanta University |
Dr Afaf Abdel Aziz Abdel Aziz Basal |
1 |
|
Professor Of Critical Care Nursing |
Prof.Dr/Zeinab Hussain Ali |
2 |
|
Professor And Head of the Department of Medical Surgical Nursing. Faculty-. Benha University |
Amal Said Taha Refaie |
3 |
|
Supervisor Of the Education Sector at Port Said University |
Amal Ahmed Khalil Morsy |
4 |
|
Professor Of Medical Surgical Nursing- Faculty of Nursing- Cairo University |
Dr. Hanan Ahmed Al Sebaee |
5 |
|
Head of central administration on secondment at MOHP |
Dr Neveen ab drab al0nabi Mohamed |
6 |
|
Director Of Primary Health Care Nursing Department at MOHP. |
Maysa Hosny Ahmed Tammam |
7 |
|
Supervisor Of Technical Education- EHA |
Nancy Alaa Eldeen Abd-Elbaset Ali |
8 |
|
Supervisor Of Nursing Services Development- EHA |
Sherien Mohamed Saad |
9 |
|
Assistant Professor of Maternity and Neonatal Health Nursing - Faculty of Nursing- Ain Shams University |
Assist.Perof. Dr./Heba Mahmoud Mohammed |
10 |
|
General manager of general administration of health institutes affairs |
Dr Mai Galal Ibrahim Al-Assal |
11 |
|
Participants |
||
|
Head of nursing administration at EHA |
Mr. Adham Abdel Nasser Okasha |
12 |
|
member of the Nursing administration at EHA, luxor branch |
Mr. Gehad Akram Hussein |
13 |
- Anatomy of the Reproductive System
Introduction
The reproductive system differs from other body systems because it remains inactive until puberty. The primary reproductive glands, or gonads, in females are the ovaries. These glands produce gametes (reproductive cells) as well as sex hormones.
The sex hormones—estrogen and progesterone—play a crucial role in both the development and function of the reproductive organs, as well as in sexual behavior. These hormones also influence the growth and development of various other organs and tissues in the body.
The Female Reproductive System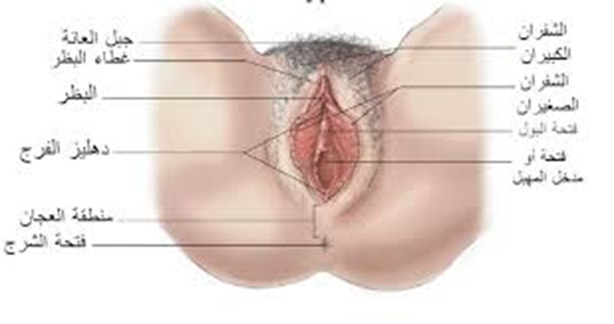
Anatomy of the External Reproductive System
1. Mons Pubis (Mons Veneris):
- A layer of fat covering the pubic area, covered with skin and hair.
- Provides protection to the pubic region.
2. Labia Majora:
- The outer folds of the vulva.
- Two fatty skin folds extending from the mons pubis to the posterior commissure.
- The outer surface is covered with hair, while the inner surface is smooth, hairless, and contains sebaceous and sweat glands.
3. Labia Minora:
- The inner folds of the vulva.
- Two thin folds of modified skin containing the external openings of the urethra and vagina.
- Protects the vagina, urethra, and clitoris.
4. Clitoris:
- A small, highly sensitive organ located beneath the pubic area.
- The external tip is covered by a fold of skin known as the clitoral hood, similar to the foreskin of the penis.
- The labia minora meet at the clitoris, which is analogous to the male penis.
5. Vestibule of the Vulva:
- The area between the inner surfaces of the labia minora and the vaginal opening.
6. Hymen:
- A thin membrane located approximately 2 cm from the vaginal entrance, partially covering the vaginal opening.
- Serves as a boundary between the external and internal reproductive organs.
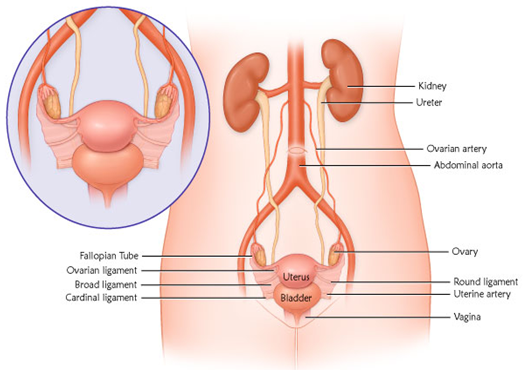
The Internal Reproductive System
The internal reproductive system consists of:
- Vagina
- Cervix
- Uterus
- Fallopian Tubes
- Ovaries
Vagina
- A muscular tube extending from the clitoris to the uterus, positioned at a 60-degree angle to the horizontal plane.
- It connects the cervix to the external reproductive organs and is located between the bladder and the intestines.
Functions:
- Serves as a passage for menstrual flow and uterine secretions.
- Acts as the birth canal during labor.
- Becomes lubricated during sexual intercourse with the help of Bartholin’s glands.
Length:
- Anterior wall: 8–9 cm
- Posterior wall: 10–11 cm
Cervix
- The cervix connects the uterus to the vagina.
- It is the lower elongated part of the uterus, measuring 2.5–3 cm.
- The cervical canal communicates with the uterine cavity superiorly and with the vagina inferiorly.
Anatomical Relations of the Cervix:
- Anteriorly: Bladder and vesicovaginal pouch.
- Posteriorly: Douglas’ pouch.
- Laterally: Broad ligament.
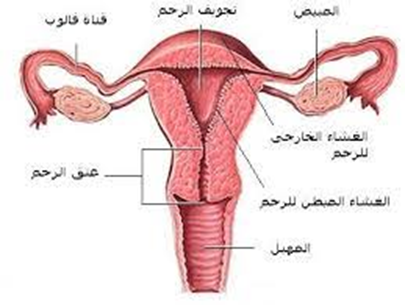
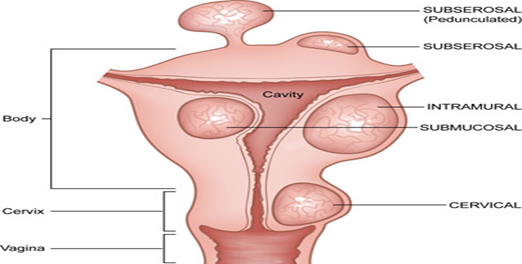
Uterus Anatomy
- The uterus is pear-shaped and about the size of a clenched fist. It consists of three layers: the inner endometrium, the middle myometrium, and the outer perimetrium. The endometrial layer contains highly vascularized tissue that sheds during menstruation. The strong uterine muscles expand to accommodate the growing fetus and contract during childbirth.
Measurements:
- Dimensions: 7.5 × 5.0 × 2.5 cm (length × width × depth).
- Weight: 50–60 grams (slightly larger in multiparous women).
Parts of the Uterus:
- Fundus: The rounded upper portion above the entrance of the fallopian tubes.
- Body: The main part of the uterus.
- Isthmus: The narrow region between the body and the cervix.
- Cervix: The lower elongated part of the uterus.
Position of the Uterus:
- The uterus is normally in an anteverted position (AVF), with the external os at the level of the iliac spines.
- Anteversion: The uterus tilts forward relative to the vaginal axis.
- Anteflexion: The body of the uterus bends forward over the cervix.
Anatomical Relations of the Uterus:
- Anteriorly: Bladder and vesicovaginal pouch.
- Posteriorly: Douglas’ pouch.
- Laterally: Broad ligament.
Histology of the Uterus
- Endometrium: The inner lining, containing tubular glands that undergo cyclic changes during the menstrual cycle under ovarian hormone influence.
- Myometrium: Composed of three muscle layers:
- Outer longitudinal muscle fibers.
- Middle interwoven fibers surrounding blood vessels.
- Inner circular muscle fibers.
- Perimetrium: The outermost layer, which extends anteriorly from the fundus to the isthmus, then reflects over the bladder to form the vesicovaginal pouch.
Uterine Support Structures (Ligaments)
- Broad ligament
- Round ligament
- Ovarian ligament
Fallopian Tubes
- Paired tubes measuring 10 cm in length, located in the free upper margin of the broad ligament.
- They connect the uterine horns to the peritoneal cavity, with the outer free end curving toward the ovary.
- The fallopian tubes serve as the passage for the ovum and are the site of fertilization.
- Also known as uterine tubes or oviducts.
Fertilization and Transport:
- The fallopian tube is the site of sperm-egg fertilization.
- The fertilized egg takes approximately 6–10 days to travel through the tube and implant in the uterine lining.
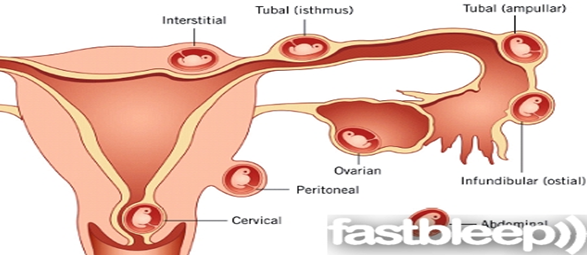
Parts of the Fallopian Tube:
- Interstitial part:
- Pierces the uterine wall.
- Very narrow, lacks peritoneal covering, and has a thick muscular layer.
- Isthmus:
- A straight, narrow segment with thick walls, connecting to the uterus.
- Ampulla:
- The widest segment, where fertilization usually occurs.
- Infundibulum:
- The funnel-shaped distal end, opening into the peritoneal cavity.
- Surrounded by fimbriae, with one long fimbria directed toward the ovary.
Functions of the Fallopian Tubes:
- Captures the ovum during ovulation using fimbriae.
- Transports the ovum via peristaltic movements and ciliary action.
- Produces secretions necessary for sperm activation and ovum nourishment.
Anatomical Relations:
- Superiorly: Intestinal structures.
- Inferiorly: Broad ligament and its contents.
- Medially: Uterine horns.
- Laterally: Pelvic walls.
- The ovaries are positioned posterior and inferior to the fallopian tubes.
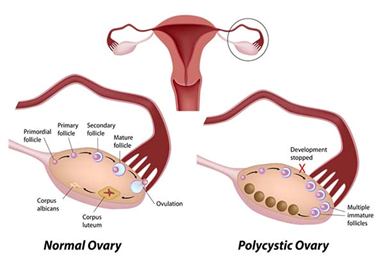
Ovaries
- The female gonads, responsible for producing and releasing eggs (ova) monthly.
- A female is born with approximately 400,000 immature eggs (follicles).
- Over her lifetime, she will ovulate about 400–500 mature eggs.
- Ovarian follicles produce estrogen and progesterone, which regulate the menstrual cycle and prepare the uterus for implantation.
Anatomy of the Ovaries:
- Almond-shaped, located in the ovarian fossa on the pelvic wall.
- Dimensions: 3 × 2 × 1 cm.
- Surface: Whitish-pink, wrinkled due to ovulatory activity.
Anatomical Relations:
- Medially: Fallopian tubes.
- Laterally: Pelvic wall.
- Superiorly & Anteriorly: Small intestine.
- Inferiorly: Ovarian fossa, where the ureter and internal iliac vessels pass.
Pelvic Floor Muscles
- Comprises all tissues between the pelvic cavity and the external genital region.
Components:
- Pelvic peritoneum
- Extraperitoneal fat and connective tissue
- Levator ani and coccygeus muscles
- Triangular ligament (urogenital diaphragm)
- Perineal muscles
- Subcutaneous fat and fascia
- Cesarean Section (C-Section)
- Introduction
- Definition
- Reasons for Performing a Cesarean Section
- Types of Cesarean Delivery
- Risks
- Risks for the Mother
- Risks for the Baby
- Procedure
- Prevention of Complications
- Post-Cesarean Nursing Care
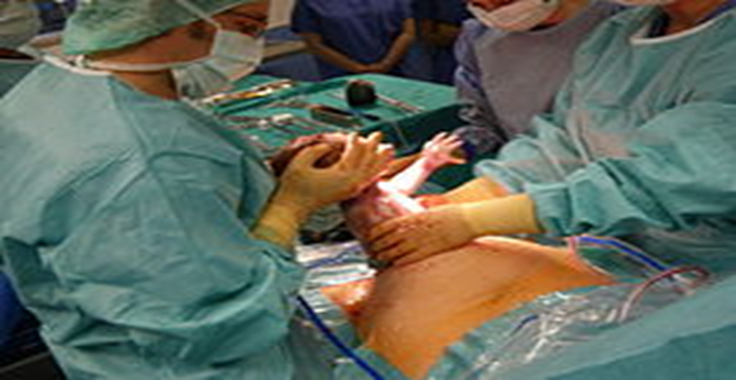
Introduction
Cesarean section (C-section) is a major surgical procedure. While it can be life-saving for both the mother and the baby, it is also associated with some side effects that may take a long time to recover from. Physicians estimate that complete recovery from a C-section takes about 4 to 6 weeks, but many studies suggest that the total recovery time may be longer. It is important to note that the duration of recovery varies from one woman to another. However, a mother can recover more quickly by focusing on self-care, taking care of her baby, allowing her body the necessary rest, and receiving proper medical care.
Definition
A Cesarean section is a surgical procedure in which the doctor makes an incision in the abdomen and uterus to extract the baby. In some cases, the procedure is planned in advance, while in others, it becomes necessary during labor.
A Cesarean section is a type of non-vaginal birth, in which the surgeon performs a surgical incision in the abdomen and uterus to deliver the baby when vaginal delivery is not possible.
Reasons for Performing a Cesarean Section
Not all of the following conditions require a C-section, but the procedure is performed when vaginal delivery is not possible or carries risks for the mother or baby. The primary reasons for a Cesarean section include:
Maternal Reasons:
- Post-term pregnancy: If the pregnancy exceeds 40 weeks without the onset of labor.
- Prolonged labor (failure to progress): One of the most common reasons for a Cesarean section. The cervix may fail to dilate adequately despite strong contractions lasting several hours.
- Presence of maternal health conditions, such as:
- Severe heart disease
- HIV infection
- Preeclampsia or severe hypertension, which poses a risk to the mother’s health
- Sexually transmitted infections (e.g., herpes), which could be transmitted to the baby during vaginal delivery
- Mechanical obstruction in the birth canal, such as:
- Large fibroid tumors blocking the birth canal
- Severe pelvic fractures, leading to a narrow birth canal
- Uterine rupture
- Failure of assisted vaginal delivery (forceps or vacuum extraction). If these methods fail, a Cesarean section is required.
- Previous uterine rupture
- Previous classical (vertical) Cesarean section
- Poor perineal healing from previous childbirth or Crohn’s disease
- Bicornuate uterus
- Rare cases of postmortem childbirth
- Maternal exhaustion and inability to actively participate in labor
Fetal Reasons:
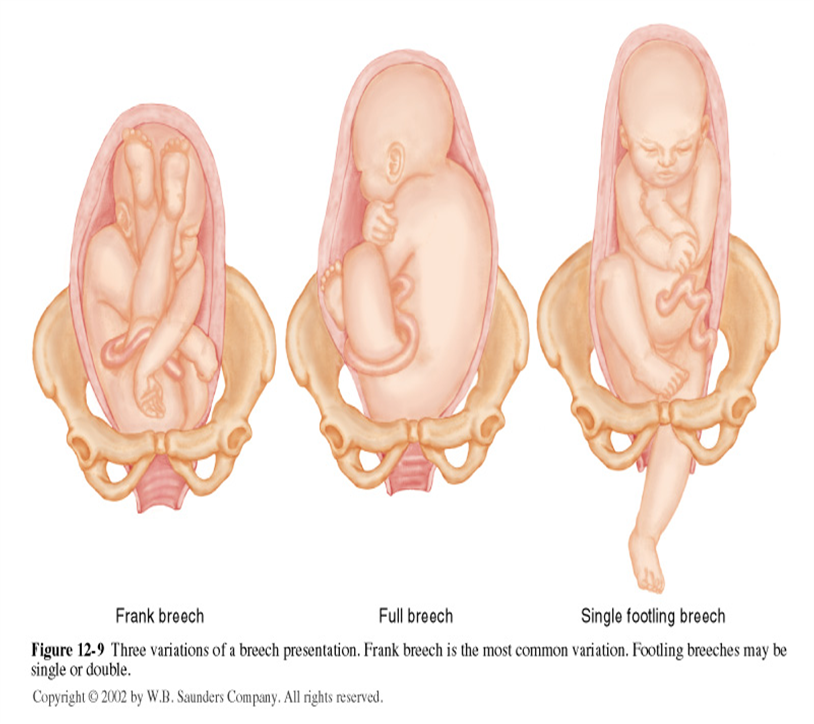
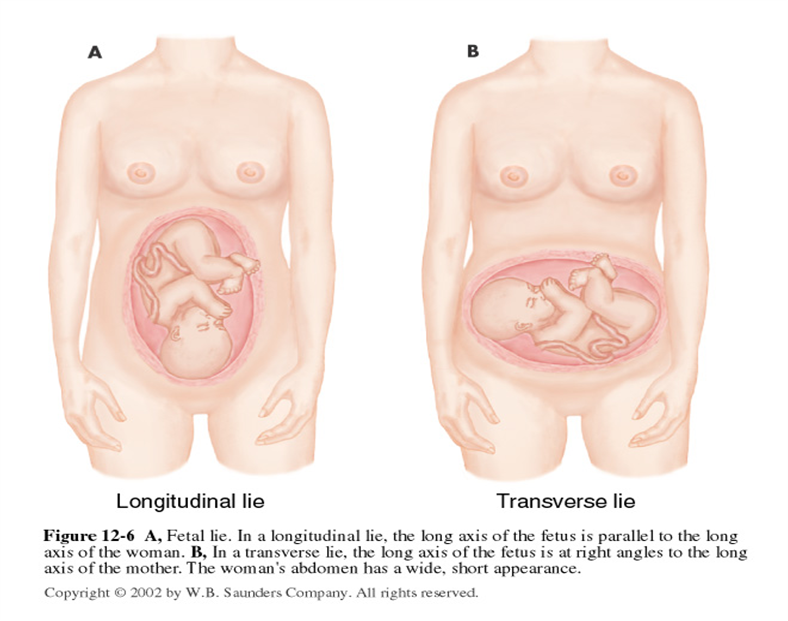
- Abnormal fetal positioning: If the baby or babies are in an abnormal position, making vaginal delivery impossible. These include:
- Breech presentation (buttocks or feet first)
- Transverse lie (baby positioned sideways)
- Shoulder presentation (shoulder enters the birth canal first)
- Fetal Macrosomia: If the baby is large and weighs more than 4 kg, making it disproportionate to the mother’s pelvis.
- Umbilical Cord Issues: Such as vasa previa (abnormal fetal blood vessels crossing the cervix) or umbilical cord prolapse.
- Multiple Pregnancies: If the pregnancy involves more than one baby and the first fetus is in an abnormal position, or if the pregnancy involves three or more fetuses.
- Fetal Oxygen Deficiency: If the baby is not receiving enough oxygen, indicated by abnormal fetal heart rate patterns.
- Severe Hydrocephalus: A condition in which the baby’s head becomes abnormally large due to fluid accumulation.
- Umbilical Cord Prolapse: If a loop of the umbilical cord slips through the cervix before the baby.
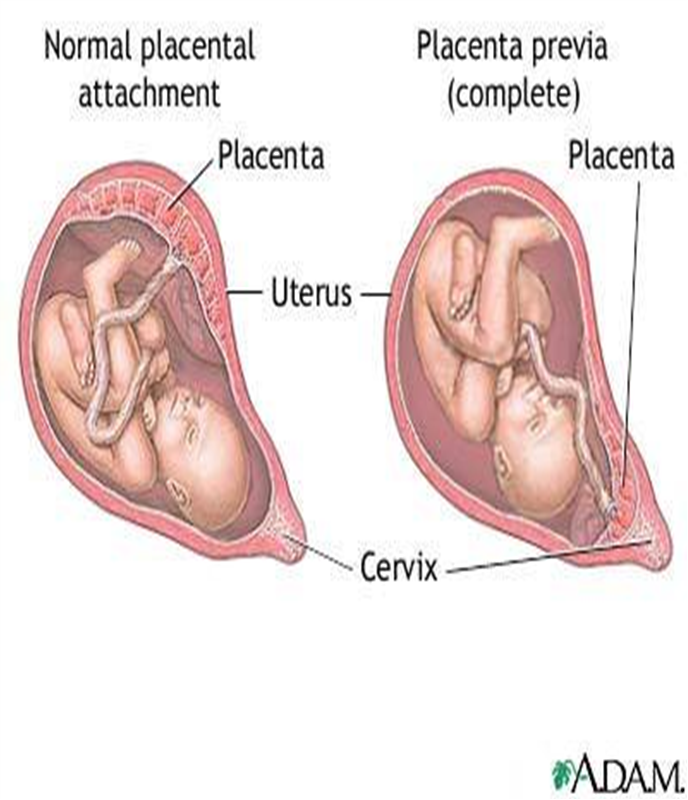
Placental Causes:
- Placental Problems:
- Placenta previa: When the placenta covers the cervical opening.
- Placenta accreta: When the placenta abnormally attaches to the uterine wall.
Other Reasons:
- Lack of obstetric skills: In some cases, obstetricians may lack the skills to perform breech deliveries or manage multiple births. While most women can still deliver vaginally under these conditions, a planned Cesarean section carries a lower risk of infant mortality in breech deliveries compared to vaginal birth.
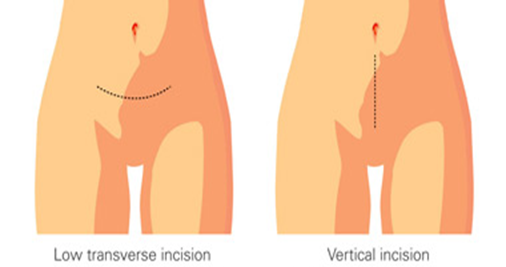
Types of Cesarean Delivery
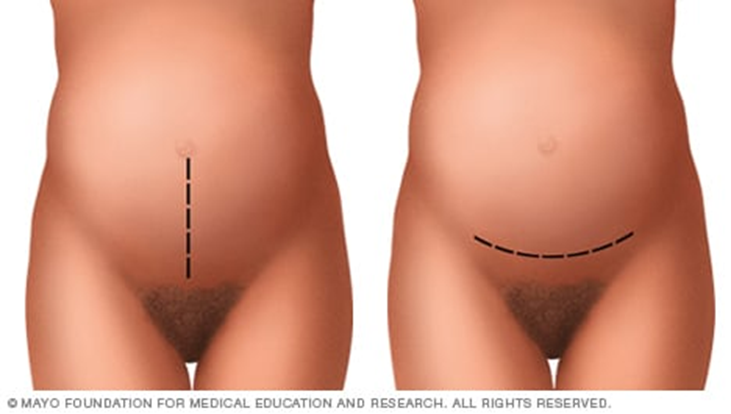
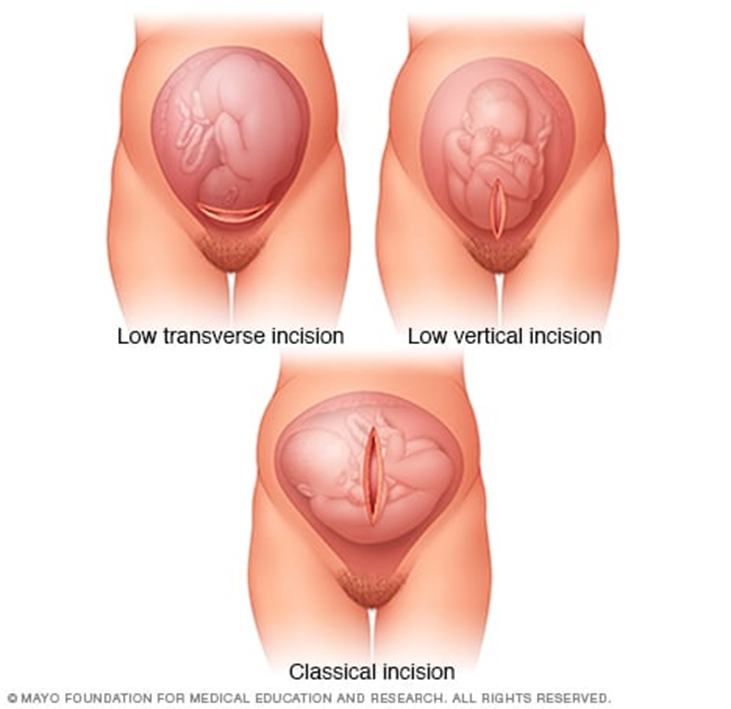
1. Classic Cesarean Section:
- Involves a long, vertical incision in the middle of the abdomen, with both the skin and uterus being cut vertically to extract the baby.
- This method is rarely used today due to the larger incision size and higher risk of complications, such as:
- Increased risk of hernia years after surgery due to weakened abdominal wall muscles.
- Unsafe for vaginal delivery in future pregnancies.
2. Low Transverse Incision (Horizontal Incision):
- The most common type of Cesarean section.
- A horizontal incision is made along the pubic hairline, just above the bladder, reaching the uterus.
- The doctor then inserts their hand to pull the baby out.
- This method allows for faster recovery and has a lower risk of complications.
- Future vaginal delivery remains possible with this type of incision.
3. Low Vertical Incision:
- Similar to the classic Cesarean section, but the incision is made lower than in the classic method.
- This technique is used in cases where the fetus is positioned abnormally in the uterus.
Procedure
This surgery typically takes 30–40 minutes and is performed by an obstetrician immediately after the anesthesia takes effect, as follows:
- Under general or regional anesthesia, depending on the woman's health condition, a surgical incision is made in the lower abdomen, just above the pubic area. The surgeon then cuts through the skin layers, subcutaneous tissues, abdominal muscles, and uterine wall to reach the uterus.
- The baby is quickly delivered, followed by clamping and cutting of the umbilical cord, and the removal of the placenta.
- The surgeon stitches the uterine wall with strong, long-lasting sutures, then proceeds to suture the abdominal wall, muscles, and skin layers.
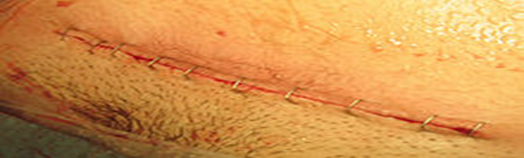
- The skin incision is closed using surgical staples, and a dressing is applied to the wound.
Risks of Cesarean Section
Risks for the Mother
- Since most women undergoing a C-section have severe health conditions, it is often difficult to determine whether the cause of maternal mortality is the surgery itself or the underlying condition. However, the risks of serious complications such as cardiac arrest, hematomas, and organ removal are present, as with all major abdominal surgeries.
- Higher risk of complications in future pregnancies compared to women who have had only vaginal deliveries.
- Adhesions: Formation of scar tissue between the uterus, ovaries, small intestine, or any other abdominal or pelvic tissues, which may cause:
- Infertility: Adhesions can block the fallopian tubes, preventing the egg from reaching the uterus.
- Chronic pelvic pain: Adhesions in the pelvic area can lead to long-term discomfort.
- Small bowel obstruction: Adhesions can disrupt normal intestinal movement, leading to complications in approximately 50% of cases.
- Infections: A C-section increases the risk of endometritis (infection of the uterine lining).
- Postpartum hemorrhage: Severe bleeding can occur during or after surgery.
- Anesthesia complications: Adverse reactions to general or regional anesthesia.
- Blood clots: Increased risk of deep vein thrombosis (DVT), particularly in the legs or pelvic area. If a clot travels to the lungs, it can cause a pulmonary embolism, a life-threatening condition.
- Surgical site infections: The risk of wound infection depends on individual risk factors and whether the C-section was an emergency.
- Surgical injuries: Although rare, bladder or bowel injuries can occur during the procedure, potentially requiring additional surgery.
- Increased risk in future pregnancies: Women with previous C-sections have a higher risk of placenta previa (placenta covering the cervix) and placenta accreta (abnormal placenta attachment), which may necessitate hysterectomy.
- Uterine rupture: The risk of uterine rupture along the previous C-section scar increases if a woman attempts vaginal birth after Cesarean (VBAC).
Risks for the Baby
- Preterm birth risks: Delivering before 39 weeks of gestation for non-medical reasons poses serious risks to the baby, including:
- Increased fetal mortality rates.
- Respiratory problems: Babies born via scheduled C-sections are at higher risk of transient tachypnea of the newborn (TTN) or respiratory distress syndrome, requiring respiratory support and admission to neonatal intensive care.
- Low oxygen levels if there is a delay in performing the C-section.
- Surgical injury: Accidental scratches or cuts to the baby’s skin during surgery, though rare.
- Higher infant mortality rate in early childhood due to complications from preterm birth.
Prevention of Complications
- Antibiotic prophylaxis is effective in reducing the risk of endometritis, urinary tract infections, and surgical site infections, preventing 3 out of 4 cases of post-C-section infections.
- Some physicians believe that manually or instrumentally dilating the cervix during a C-section helps prevent lochia (postpartum fluid) retention, reducing the risk of maternal morbidity and mortality.
Post-Cesarean Nursing Care
After a Cesarean section, the patient is transferred from the operating room to a recovery unit, where healthcare providers monitor her condition as follows:
1. Vital Signs Monitoring:
- Blood pressure, respiratory rate, and pulse are assessed periodically every 4 to 6 hours postpartum.
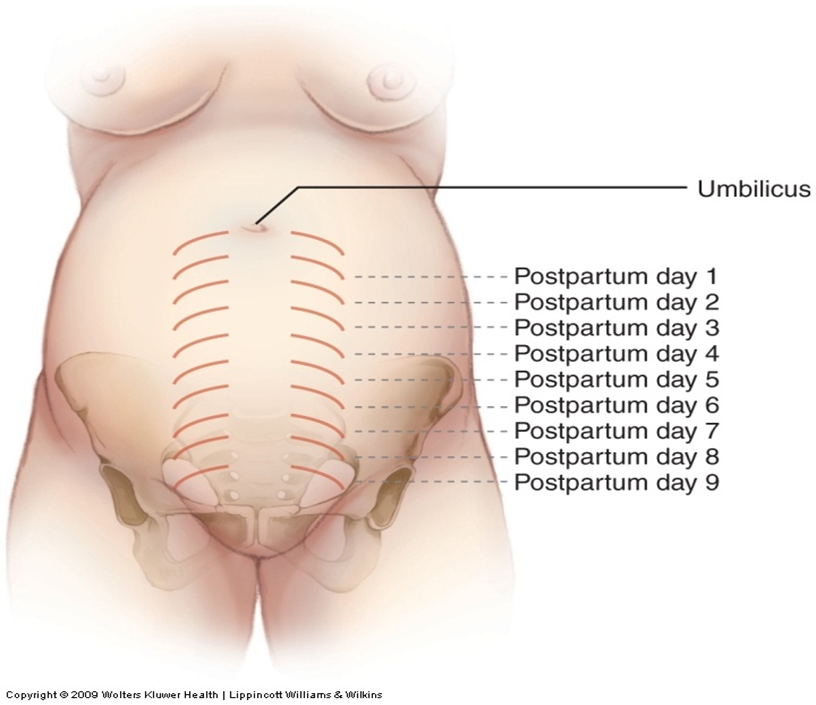
2. Uterine Assessment:
- Consistency: The uterus should be firm, contracted, and spherical.
- Size:
- At the end of the first week, the uterus weighs 500 grams.
- By the end of the second week, it decreases to 350 grams.
- Between weeks two and six, it returns to its normal size of 50–60 grams.
- Position: To be evaluated during postpartum care.
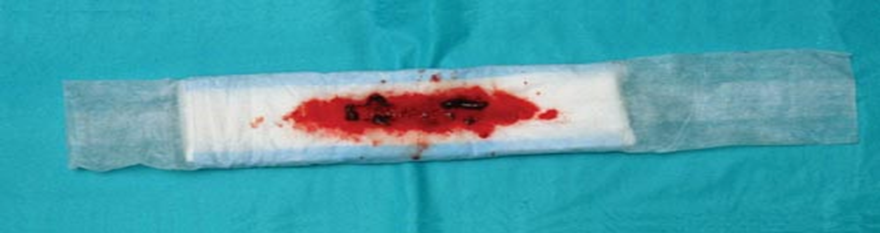
▶️ Lochia (Postpartum Bleeding) Monitoring:
- Assess the amount to detect any postpartum hemorrhage.
1.Very light bleeding: Less than 10 mL per hour.
2. Mild bleeding: Between 10 to 25 mL per hour.
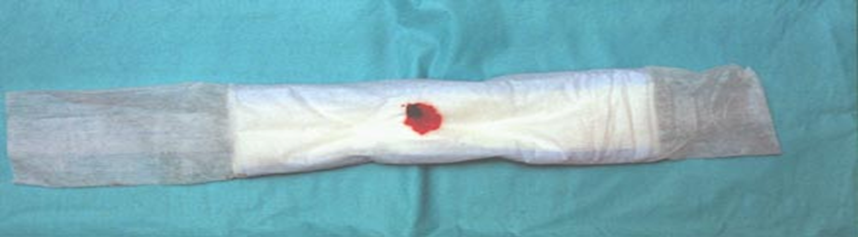
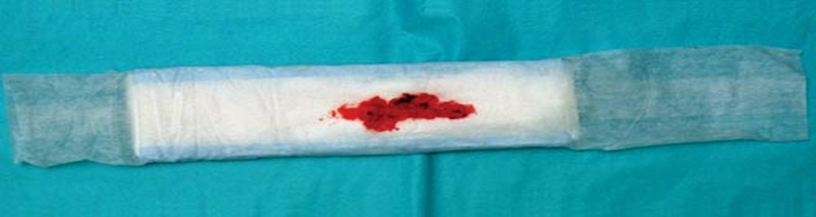
- Moderate bleeding: 25 to 50 mL per hour.
- Heavy bleeding: More than 50 mL per hour.
- Observe the type and color of lochia.


Postpartum Observations
3. Pain Monitoring:
- The woman may experience abdominal cramps similar to menstrual pain due to uterine contractions, which help the uterus return to its normal size and position.
4. Bowel Movement Monitoring:
- Postpartum women often experience constipation due to fasting before surgery, anesthesia, and abdominal muscle relaxation after childbirth.
5. Urination Monitoring:
- After delivery, women lose stored body fluids through excessive sweating (especially at night) and urination.
- 2500–3000 mL of urine should be excreted in the first few hours after birth.
- Monitoring fluid intake and output is essential to prevent fluid retention.
6. Lower Limb Monitoring (Legs):
- Watch for signs of deep vein thrombosis (DVT), such as swelling, redness, and warmth, as postpartum women are at higher risk of blood clots.
7. Breast Examination:
- Assess breast size and condition for successful breastfeeding and milk production.
8. Incision Site Assessment:
- Check the wound dressing for bleeding or signs of infection.
- Observe for surgical drains (e.g., Redivac drain) if present.
Emotional Well-Being
Postpartum Emotional Changes:
- Difficult emotional experience.
- Anxiety, sadness, frustration, and fatigue.
- Postpartum blues (baby blues).
- Postpartum depression.
Symptoms:
- Negative emotions lasting beyond two weeks.
- Impact on infant care.
- Need for emotional support from family and friends.
- Seeking professional psychological help.
- Openly expressing feelings.
Early Treatment:
- Observation.
- Postpartum depression is not a weakness.
- It is treatable.
- Emotional support aids recovery.
Postpartum Care for Women
1. Early Mobilization:
- The woman should get out of bed and walk within 24 hours of surgery, once anesthesia wears off.
- This helps reduce pain, prevent blood clots, stimulate bowel movement, and relieve gas pain.
- Painkillers may be given for post-surgical pain.
- Fatigue or nausea may occur due to anesthesia.
- Sufficient fluid intake is recommended to prevent deep vein thrombosis (DVT) and constipation.
2. Urinary Catheter Removal:
- If a urinary catheter was used, it should be removed as soon as possible.
- Typically, the catheter remains for about 24 hours post-surgery since it may be difficult for the woman to use the bathroom immediately due to anesthesia effects.
3. Incision Monitoring:
- The surgical wound should be regularly checked for infection or bleeding.
- The incision should remain covered with a dressing for at least 24 hours.
4. Eating and Drinking:
- The woman can eat and drink as soon as she feels hungry or thirsty.
- In some cases, she may need to wait a few hours until gas or bowel movement occurs, ensuring proper intestinal function.
5. Personal Hygiene:
- Perineal care should be performed using antiseptic solutions as instructed.
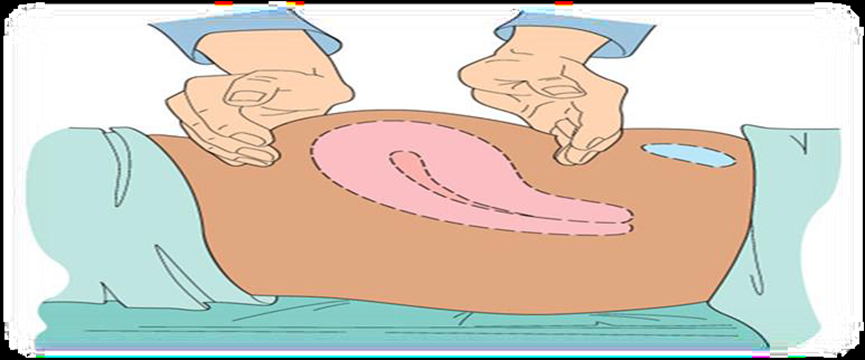
1. Uterine Condition Monitoring and Fundal Massage:
Perform fundal massage every 15 minutes during the first hour after delivery.
Then, perform fundal massage every 2 hours thereafter.
1.الرضاعة الطبيعية

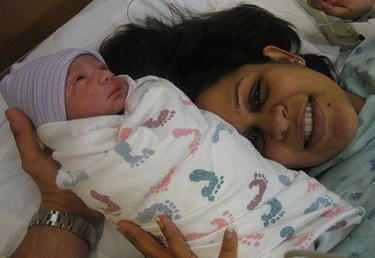
Direct Mother-Baby Contact During Hospital Stay
A mother can begin breastfeeding almost immediately after a Cesarean section. The body produces breast milk as quickly as it does after a vaginal birth. However, certain factors should be considered when breastfeeding, including:
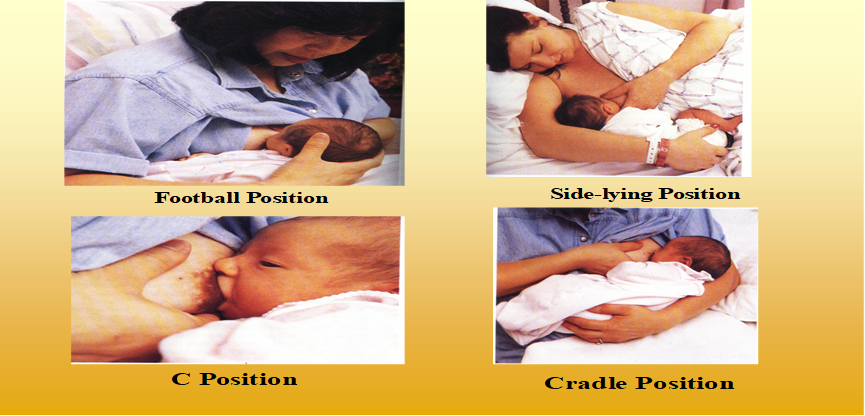
· Breastfeeding Positioning: Finding a comfortable position may be challenging due to the surgical incision site. Using a pillow placed over the abdomen can help reduce the pressure from the baby’s weight. The following positions are recommended:
- Football Hold: The baby’s neck is supported by the mother’s hand, with the rest of the body positioned along her arm. The baby’s legs and feet tuck under the mother's arm, while the baby is lifted to chest level for feeding.
- Side-Lying Position: The mother lies on her side, facing the baby, and uses her hand to guide the breast toward the baby’s mouth. A pillow can be placed behind the baby’s back to prevent rolling over.
- Newborn Care After Birth
- Eye Cleaning:
- Use a moistened cotton pad to clean the baby’s eyes, wiping from the inner corner to the outer corner.

- Apply Antiseptic Eye Drops:
- Administer antiseptic eye drops three times daily for seven days.
1. Daily nose cleaning


1. Daily mouth cleaning with wet cotton

3. Gentle ear and head cleaning
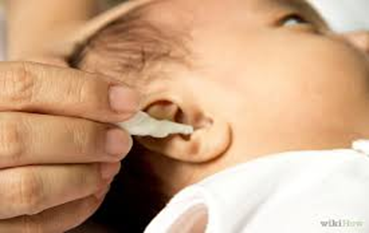

4. Face cleaning
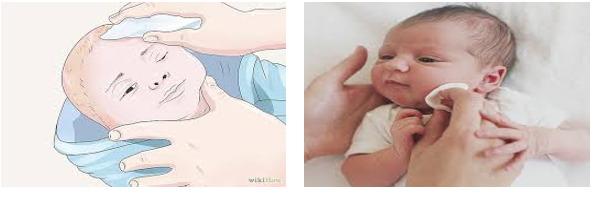
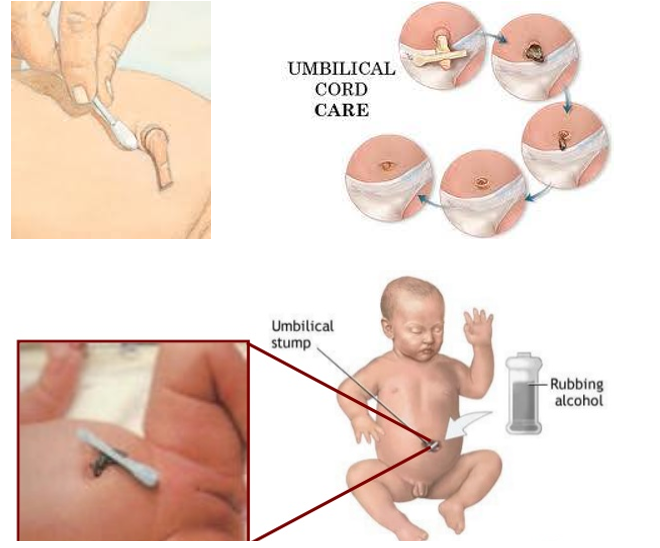
- Umbilical Cord Care:
- Clean the umbilical cord using a cotton pad moistened with alcohol.
- Wipe in a circular motion from the base upwards three times daily until the cord falls off.
- Diaper Area Cleaning:
- Gently clean the diaper area to maintain hygiene and prevent irritation.
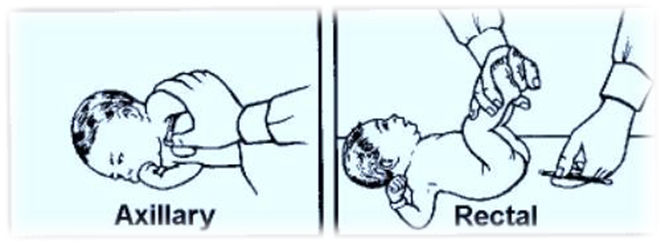
- Monitoring the Newborn’s Vital Signs:
- Measure the temperature, pulse, and respiration regularly.
- Measuring the Baby’s Length:
- Assess the newborn’s length as part of routine postnatal care.

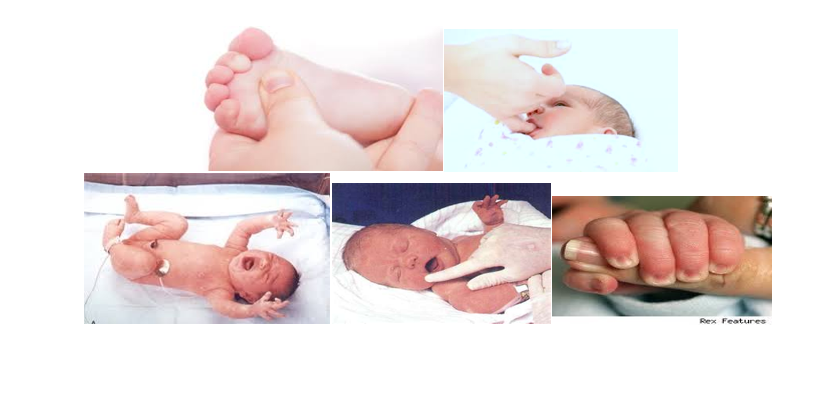
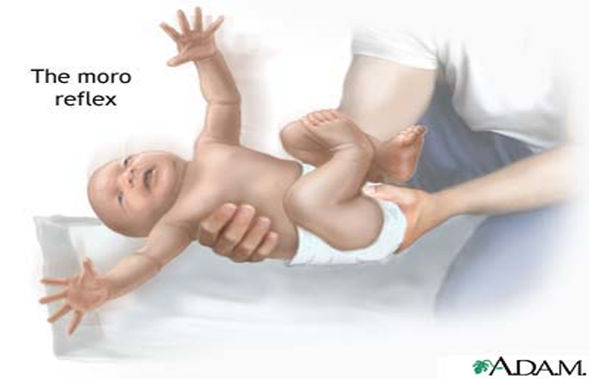
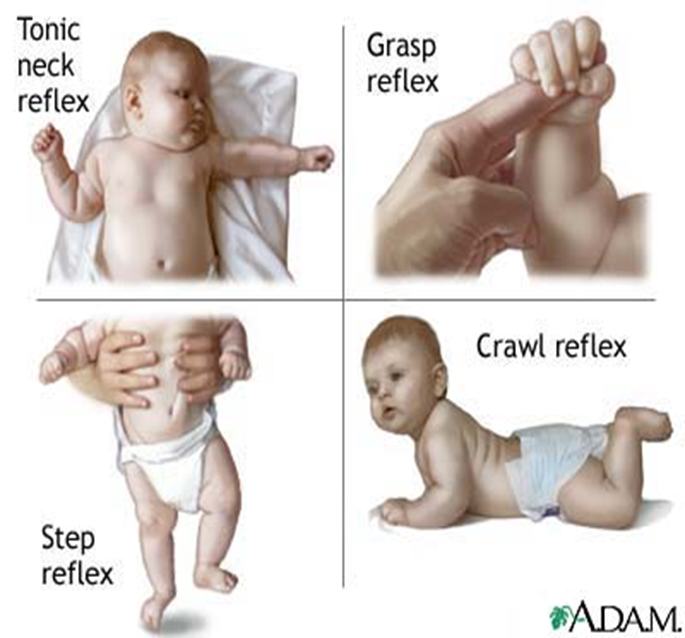
Monitoring the Newborn’s Nervous System:
- Assess the baby’s neurological health by observing reflex responses
Post-Discharge Health Education for Women
3. Recovery Time & Healing After a Cesarean Section:
- Full recovery from a C-section usually takes 6 to 8 weeks.
- In the first few days, the woman may experience pain and swelling around the incision.
- Tips to aid recovery:
- Apply a warm compress or heating pad to the incision area (after consulting a doctor).
- Use pain relievers like ibuprofen or other safe medications during breastfeeding.
- Rest the body, avoid heavy lifting (more than the baby’s weight), and keep essential items within easy reach.
- Support the abdomen when sneezing, coughing, or laughing.
- Drink plenty of fluids to replenish lost fluids during delivery and breastfeeding.
- Avoid sexual intercourse for up to six weeks to prevent infections.
- Avoid driving until fully able to control the steering wheel, brakes, and body movements without painkillers (usually after two weeks).
4. Avoid Lifting and Bending:
- The mother should not lift or carry anything heavier than her baby.
- Seek assistance with household tasks that require stretching or lifting.
5. Exercise:
- Start with light exercises after a few days.
- Avoid strenuous activities, heavy lifting, and intense exercise for 6–8 weeks.
- Consult a doctor before resuming workouts.
- Listen to your body and stop if experiencing pain.
- Recommended exercises:
- Deep breathing exercises: Take 2-3 slow, deep breaths every 30 minutes to prevent lung congestion due to prolonged bed rest.
- Gentle stretching: Stand against a wall and slowly raise both arms above the head, feeling a stretch in the abdominal muscles near the incision. Hold for 5 seconds and relax. Repeat up to 10 times daily to improve flexibility.
6. Proper Nutrition:
- Drink plenty of fluids to maintain hydration and support breast milk production.
- Eat nutritious foods to restore energy and overall health.
- Include fiber-rich foods (whole grains, fruits, vegetables) to prevent constipation.
7. Adequate Sleep:
- Ensure enough rest by sleeping when the baby sleeps or taking short breaks.
8. Personal Hygiene:
- Perineal care: Change sanitary pads every 6 to 8 hours.
- Breast care: Clean breasts before and after breastfeeding.
- Showering: Use warm water and thoroughly dry the incision area after bathing.
9. Pain Management:
- Take prescribed painkillers after consulting a doctor.
10. Bleeding Control:
- Heavy vaginal bleeding may occur in the first week.
- Exercise may increase bleeding, so use high-absorbency sanitary pads.
- Passing small blood clots after breastfeeding or waking up is normal.
- Seek medical attention if:
- Heavy bleeding continues, requiring a new pad every hour.
- Large or excessive clots appear.
- Bleeding persists beyond six weeks.
- Incision Care:
- Staples are removed within 3-7 days post-surgery.
- Dissolvable stitches do not require removal.
- Follow the doctor’s instructions for wound care, including:
- Gently clean and disinfect the incision daily or as directed.
- Change the dressing regularly.
- Wear loose, comfortable clothing.
- Use soft, breathable underwear that does not press on the wound.
- Monitor for infection signs: redness, swelling, pain, pus discharge, or fever.
- Newborn Care:
- Follow the vaccination schedule.
- Watch for danger signs in the baby, such as:
- Fever
- Refusal to feed
- Changes in daily patterns (bowel movements, sleep)
- Bleeding or foul odor from the umbilical cord
- Jaundice (yellowing of the skin)
When to See a Doctor:
- Signs of infection at the incision site, such as:
- Fever, increased pain, swelling, redness, or pus discharge.
- Symptoms of postpartum depression, such as:
- Loss of appetite, mood swings, fatigue, or lack of interest in daily activities.
- Thoughts of self-harm or harming the baby.
- Danger signs in the newborn, including:
- High fever, refusal to feed, unusual sleepiness, or umbilical cord infection.
- Gynecological Surgeries
Dilation and Curettage (D&C) Procedure
Definition:
Dilation and Curettage (D&C) is a minor surgical procedure in which the cervix is dilated (opened) to carefully remove tissue from the inside of the uterus. The tissue may be removed using suction or a metal instrument called a curette.
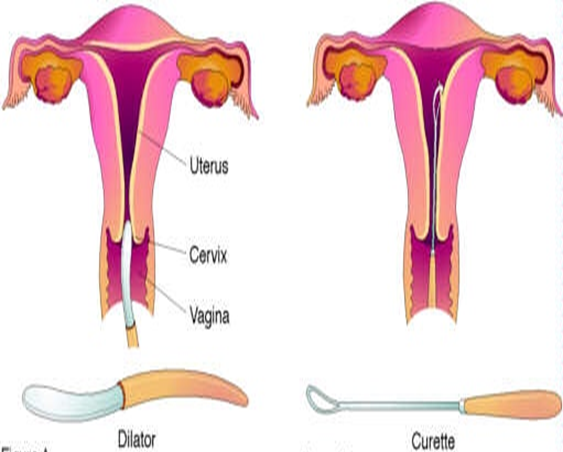
Body Parts Involved
- Vagina
- Cervix
- Uterus
Where is D&C Performed?
Dilation and curettage (D&C) can be performed in a doctor’s office, surgical center, or hospital.
Indications for D&C
D&C is a common gynecological procedure used for both diagnostic and therapeutic purposes.
Diagnostic Indications:
- Cervical canal obstruction.
- Intrauterine adhesions.
- Endometrial biopsy to detect conditions like tuberculosis or malignancies of the cervix.
- Initial step before procedures such as uterine evacuation.
- Determining ovulation timing in cases of infertility.
- Investigating amenorrhea (absence of menstruation).
Therapeutic Indications:
- Removal of polyps or large tissue masses.
- Emptying the uterus in pregnancy-related cases.
- Incomplete miscarriage management.
- Removal of pregnancy remnants.
- Evacuation of a molar pregnancy.
- Treatment of severe menstrual pain.
- Infertility due to cervical stenosis.
- Drainage of accumulated blood.
- Removal of an intrauterine contraceptive device (IUD).
Absolute Contraindications
- Desired intrauterine pregnancy.
- Inability to visualize the cervical opening.
- Obstructed vagina.
Permanent Contraindications
- Severe cervical stenosis.
- Cervical or uterine malformations.
- Previous endometrial destruction.
- Bleeding disorders.
- Acute pelvic infection (except for removing infected endometrial contents).
- Obstructive cervical tumor.
D&C Procedure
Preparation for D&C – Required Supplies:
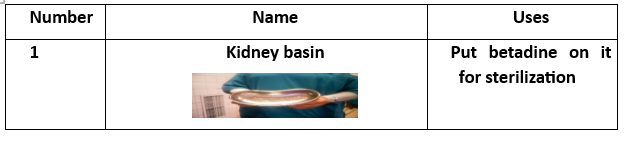
- Betadine solution.
- Sterile gauze.
- Formalin container for biopsy samples.
- Sterile gloves (various sizes).
- Sterile pack for draping and surgical gowns.
- Sterile instrument tray.
- Nelaton catheter.
Surgical Instruments (16 Tools):
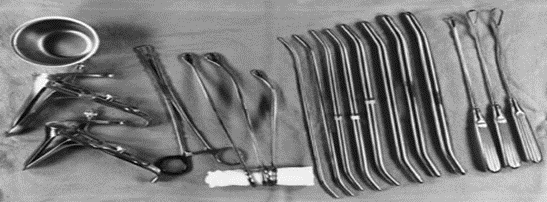
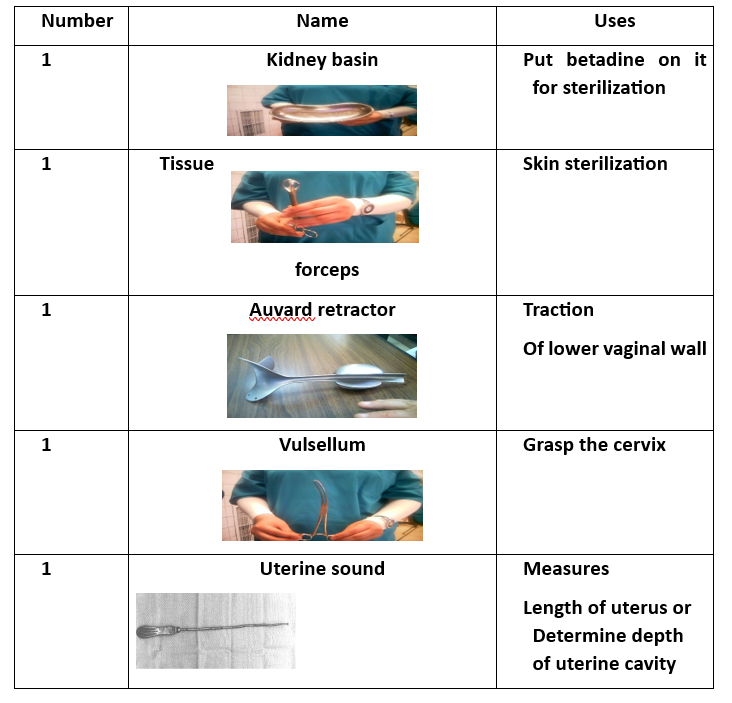
- Instrument Tray (for collecting tools).
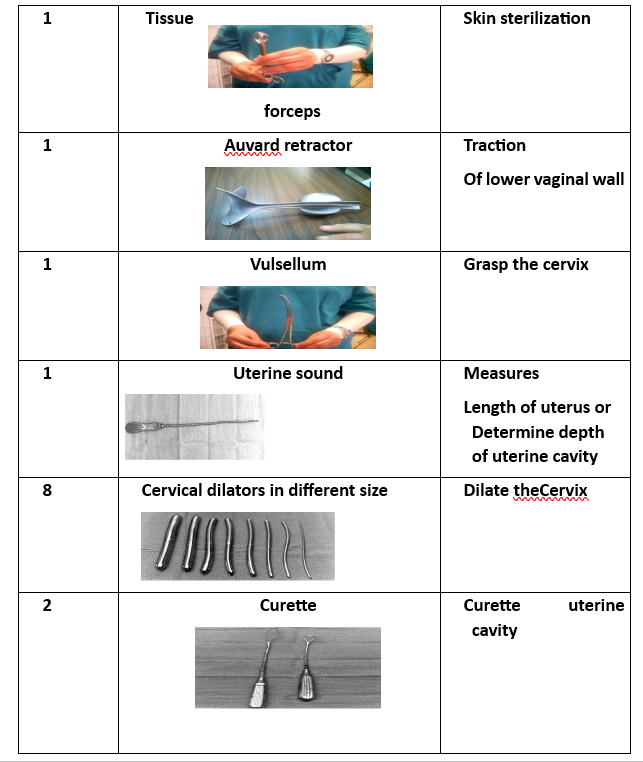
- Tissue Forceps.
- Auvard Speculum (self-retaining vaginal retractor).
- Cervical Tenaculum (Vulsellum Forceps).
- Uterine Sound (for measuring uterine depth).
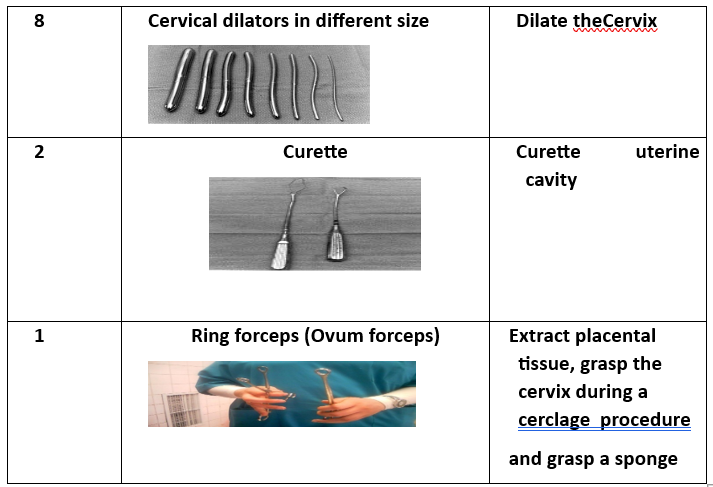
- 8 Cervical Dilators (various sizes).
- Curette (2 pieces) (for scraping uterine lining).
- Ovum Forceps (for grasping uterine contents).

D&C Procedure Steps
- Preparation of Surgical Supplies.
- Manual examination to assess the uterine condition.
- Bladder emptying using a metal catheter.
- Insertion of the Auvard speculum into the vagina.
- Identification of the cervix and securing it with a vertical tenaculum.
- Measurement of uterine cavity depth using a uterine sound.
- Cervical dilation if necessary, using dilators of varying sizes.
- Uterine curettage to remove its contents completely. The presence of air bubbles in vaginal blood is a positive sign indicating an empty uterus. Ovum forceps may also be used for uterine evacuation by grasping and rotating the tissue.
- Collection of endometrial tissue samples for biopsy analysis.
- Cleaning the perineal area with Betadine, placing a sanitary pad, and removing surgical instruments.
Common Complications
- Unusual pain.
- Fever.
- Secondary amenorrhea in reproductive years.
Rare Complications
- Infection or septicemia.
- Neurogenic shock.
- Uterine perforation (a tear in the uterine wall), which may occur during sound insertion, dilation, or curettage.
- Cervical rupture, potentially leading to cervicitis and hemorrhage.
- Asherman’s syndrome (intrauterine adhesions).
- Permanent amenorrhea due to excessive removal of the basal endometrial layer.
Nursing Care
Preoperative Preparation
1. Assessment:
- Obtain complete medical history and explain the procedure to the patient.
- Perform a physical examination.
- Conduct diagnostic tests, including CBC, blood type and Rh factor, urinalysis, and fluid balance evaluation.
2. Patient Preparation:
- Ensure the patient understands the procedure, risks, and benefits.
- The patient should fast for 6 hours before surgery.
- Remove jewelry and metallic objects.
- Bowel preparation via enema.
- Bladder preparation (catheterization if needed).
- Monitor vital signs.
Postoperative Nursing Care
- Hospital observation for 1 to 4 hours.
- Monitor vaginal bleeding.
- Assess consciousness level.
- Monitor vital signs and position.
- Administer oxytocin to ensure uterine contraction and minimize bleeding.
- Monitor intravenous fluids (type and rate).
- Assess pain and cramps and provide pain relief as prescribed.
- Administer antibiotics as needed.
- Blood transfusion may be required in cases of shock or anemia.
- If the patient is Rh-negative, administer Rh immunoglobulin (RhoGAM) within 72 hours post-miscarriage.
- Report persistent severe pain.
- Maintain perineal hygiene.
- Monitor the amount and color of vaginal bleeding.
Patient Education for Post-D&C Discharge
- Referral to professional support groups if needed.
- Advise the patient to report:
- Heavy, bright red, or foul-smelling bleeding.
- Slight, dark discharge may continue for up to two weeks.
- Instruct the patient to avoid inserting anything into the vagina (e.g., tampons, douching, sexual intercourse) until bleeding stops.
- Inform about possible mood swings and depression.
- Avoid pregnancy for at least one year after a D&C procedure.
- Seek medical help if experiencing:
- Fever, abdominal pain, heavy bleeding, or foul-smelling vaginal discharge.
Cervical Cerclage
Definition:
Cervical cerclage is a surgical procedure performed on pregnant women with an incompetent cervix to strengthen it using a suture (nylon tape).
Types of Cervical Cerclage Procedures:
- McDonald Technique – Performed on women with a normal cervix.
- Shirodkar Technique – Performed on women with a short cervix.
Timing of Cervical Cerclage:
- Before 12 weeks of pregnancy: Procedure is performed vaginally.
- After 12 weeks of pregnancy: Procedure is performed abdominally.
Cervical Cerclage Procedure Preparation
Required Supplies:
- Betadine solution.
- Sterile gauze.
- Nylon suture tape.
- Sterile gloves (various sizes).
- Sterile draping pack and surgical gown.
- Sterile instrument tray.
Surgical Instruments (16 Tools):
- Instrument tray.
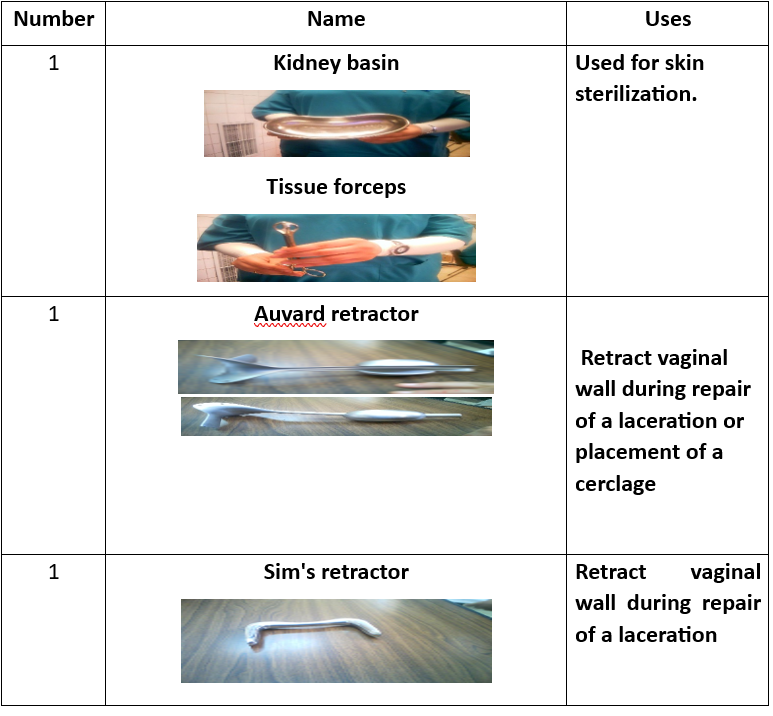
- Tissue forceps.
- Auvard speculum.
- Sims speculum.
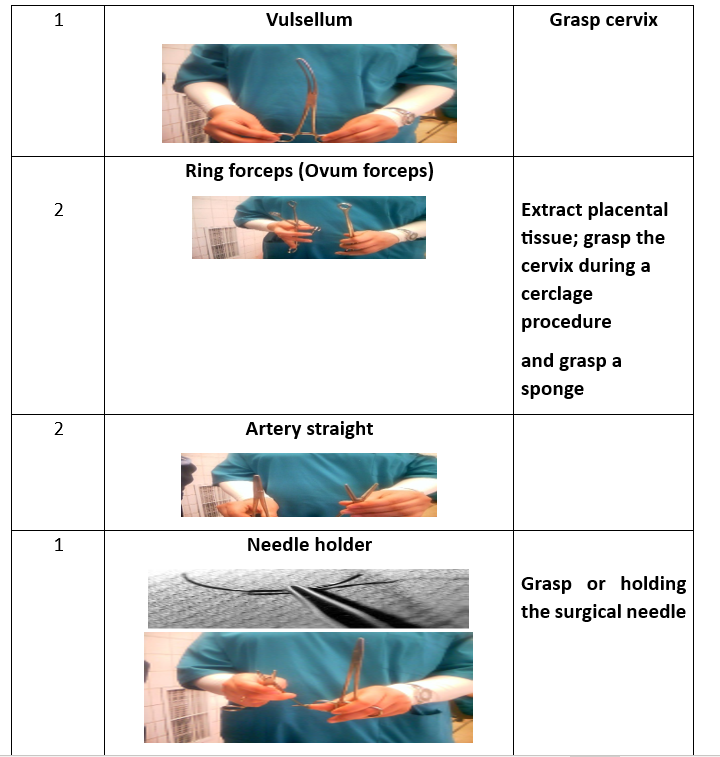
- Cervical tenaculum.
- Scissors.
- Needle holder.
- Scalpel blade.
- Toothed forceps.
- Dressing forceps.
- Ovum forceps.
- Metal catheter.
- Straight clamp.
- Allis clamp.


Shirodkar Technique for Cervical Cerclage
- Bladder emptying using a metal catheter.
- Insertion of an Auvard vaginal speculum.
- Identification of the cervix and securing it with a double-toothed ovum forceps from the front and back.
- Use of an angled vaginal speculum to improve visibility.
- Making a horizontal incision in the anterior cervical mucosa at the bladder reflection.
- Lubricating the suture and placing it at the level of the internal cervical os, tying it at the back to prevent erosion into the bladder, and closing it at the front.
McDonald Technique for Cervical Cerclage
- Similar steps to the Shirodkar technique.
- Cervical suturing is placed at the back, close to the uterine pelvic ligament, without passing into the pelvic cavity.
- Four to five purse-string sutures are placed, ensuring adequate connective tissue inclusion without entering the cervical canal.
- Sutures are left long to facilitate easy removal.
Transabdominal Cervical Cerclage Procedure
- Abdominal incision after the 12th week of pregnancy using a vertical incision in the abdominal and peritoneal layers.
- Bladder peritoneum incision using sharp scissors.
- Pushing the intestines upward and stabilizing the uterine fundus.
- Passing the needle with cervical-uterine sutures from front to back on both sides and tying it at the posterior peritoneal surface using a square knot.
- Inspecting for injuries or bleeding.
- Closing the abdominal incision.
Complications of Cervical Cerclage
- Cerclage failure.
- Infection, including chorioamnionitis.
- Cervical rupture.
- Premature rupture of membranes.
- Preterm labor.
Nursing Care
Preoperative Preparation
1. Assessment:
- Obtain complete medical history (patients with an incompetent cervix usually do not exhibit contractions or other labor symptoms).
- Physical examination.
- Urine test to detect cervical insufficiency and associated congenital anomalies (short cervix, double uterus, or uterine malformations).
- Diagnostic tests:
- Fetal well-being assessment.
- Blood, urine, and biochemical tests.
- Cervical smear to check for STIs or abnormalities.
- ECG and chest X-ray to evaluate heart and lung function.
2. Patient Preparation:
- Explain procedure risks, benefits, and expected outcomes.
- Advise avoiding sexual intercourse for at least 7 days before surgery.
- If cerclage is placed before week 12, it is done vaginally; after week 12, it is performed abdominally.
- Encourage rest and avoidance of strenuous activities.
- Fasting for at least 6 hours before surgery.
- Remove jewelry and metallic objects.
- Bowel preparation via enema.
- Bladder preparation (catheterization).
- Ultrasound scan to exclude fetal abnormalities.
- Monitor fetal heart rate and maternal vital signs.
- Observe for vaginal bleeding.
- Position the patient in the lithotomy position.
- Cleanse the surgical site with 10% Betadine.
- Drape the patient appropriately.
- Administer prophylactic antibiotics as prescribed.
Postoperative Nursing Care
- Monitor consciousness level.
- Observe vital signs and positioning.
- Administer analgesics and oxygen as needed.
- Monitor fluid intake and output.
- Assess vaginal bleeding.
- Evaluate fetal heart rate and tone.
Patient Education
- Advise immediate hospital visit if any of the following symptoms occur:
- Amniotic fluid leakage.
- Reduced fetal movement.
- Fever.
- Abnormal vaginal discharge (foul-smelling).
- Plan for cerclage removal at week 37 before labor.
- Nutritional guidance:
- Increase vegetable intake.
- Consume high-protein foods.
- Drink 1–2 liters of milk daily.
- Ensure adequate fluid intake.
- Hysterectomy (Uterus Removal Surgery)
Introduction
Hysterectomy is a surgical procedure to remove the uterus, making pregnancy impossible. It is a major operation with significant risks and benefits, affecting hormonal balance and long-term health. Therefore, it is considered a last resort for treating severe gynecological conditions.
- In 2012–2013, around 30,500 hysterectomies were performed in England.
- The procedure is most common in women in their 50s.
Definition
Hysterectomy is a surgical removal of the uterus through an abdominal or vaginal incision.
Epidemiology
- Second most common surgery among women in the U.S.
- 1 in 3 women in the U.S. undergoes a hysterectomy by age 60.
- Over 600,000 hysterectomies are performed annually.
- More than 90% are for benign (non-cancerous) conditions.
- Over 70% also involve ovary removal (oophorectomy).
Indications for Hysterectomy
Obstetric Indications:
- Uterine rupture.
- Uncontrollable postpartum hemorrhage.
- Placental abnormalities.
Gynecological Indications:
- Infections (e.g., some cases of genital tuberculosis).
- Tumors:
- Benign: Ovarian tumors, leiomyomas (fibroids).
- Malignant: Cervical, endometrial, or ovarian cancer.
- Pelvic organ prolapse: Some cases of chronic uterine prolapse.
- Severe dysfunctional uterine bleeding (DUB).
Types of Hysterectomy
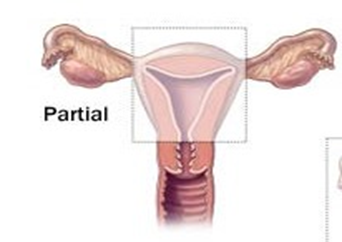
- Subtotal Hysterectomy (Partial Hysterectomy):
- Removes the uterine body while preserving the cervix.
- Commonly performed for postpartum hemorrhage and uterine rupture.
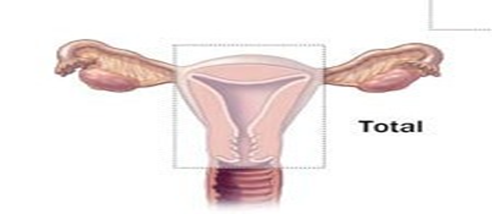
- Total Hysterectomy:
- Removes both the uterine body and cervix.
- Considered more effective than a subtotal hysterectomy.
- Pan-Hysterectomy (Total Abdominal Hysterectomy with Bilateral Salpingo-Oophorectomy - TAHBSO):
- Complete removal of the uterus, ovaries, and fallopian tubes.
- Performed for malignant conditions or severe gynecological disorders.
- Radical Hysterectomy:
- Specifically used for invasive gynecologic cancers.
- Involves the removal of the uterus, fallopian tubes, ovaries, upper two-thirds of the vagina, and pelvic & para-aortic lymph nodes.
Ultra-Radical Hysterectomy:
- Anterior Exenteration: Involves removal of the bladder along with the uterus.
- Posterior Exenteration: Involves removal of the bladder and intestines along with the uterus.
Differences Between Total and Subtotal Hysterectomy
Subtotal Hysterectomy (Partial):
- Removes the uterus but retains the cervix.
- Higher risk of cervical cancer.
- Increased risk of cervical and vaginal infections.
- Easier and shorter surgical procedure.
- Lower risk of bladder and ureteral injuries.
- Lower risk of pelvic organ prolapse.
- Lower risk of pelvic inflammatory disease.
- Reduced likelihood of pain during intercourse.
Total Hysterectomy:
- Removes both the uterus and cervix.
- No risk of cervical cancer.
- No risk of cervical or vaginal infections.
- More complex and longer procedure.
- Higher risk of bladder and ureteral injuries.
- Increased risk of pelvic organ prolapse.
- Higher risk of pelvic inflammatory disease.
- Greater likelihood of pain during intercourse.
Types of Hysterectomy Procedures:
- Abdominal Hysterectomy (AH).
- Vaginal Hysterectomy (VH).
- Laparoscopic Hysterectomy (LH).
Abdominal Hysterectomy:
- Involves an incision in the abdominal wall.
- Provides better visibility of the abdominal cavity.
- Higher risk of complications.
- Leaves a large scar after healing.
Factors Affecting the Choice of Abdominal Hysterectomy:
- Ovarian disease.
- Limited uterine mobility.
- Cancer.
- Large fibroids (leiomyomas).
- Lack of surgical expertise or confidence.
- Pelvic adhesions.
- Radical hysterectomy cases.
- Hysterectomy during pregnancy.
- Emergency cases.
- Chronic pelvic inflammatory disease.
- Multiple fibroids.
Abdominal Hysterectomy Technique:
- Patient is positioned on her back.
- General anesthesia is administered.
- Thorough abdominal and pelvic examination under anesthesia.
- Surgical Incision:
- Vertical Incision: Used in cases of morbid obesity, suspected endometriosis, or previous abdominal surgeries.
- Transverse Incision: Preferred for benign localized diseases.
- Examine the upper abdominal organs, especially the liver, spleen, and abdominal lymph nodes.
- Place surgical towels to elevate and secure abdominal organs.
- Clamp and ligate the round ligaments.
- Incise the peritoneum between the round ligaments and the bladder.
- Separate ovarian layers, identify the ureter, and ligate ovarian vessels if necessary.
- Incise the ovarian tissue toward the uterus, exposing the uterine vessels.
- Clamp and ligate the uterine vessels at the internal cervical level.
- Clamp and ligate the pelvic ligaments.
- Incise the peritoneum between the pelvic ligaments and the uterus.
- Detach the rectum from the posterior uterus.
- Remove the uterus completely through a vaginal incision below the cervix.
- Close the vaginal vault using absorbable sutures and secure pelvic and rectal ligaments to prevent pelvic organ prolapse.
These steps outline the surgical procedure for an abdominal hysterectomy, which must be performed by a specialized gynecologic surgeon.
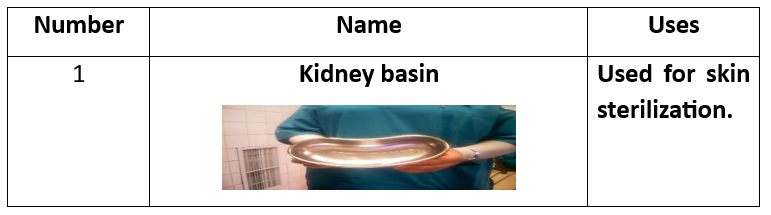
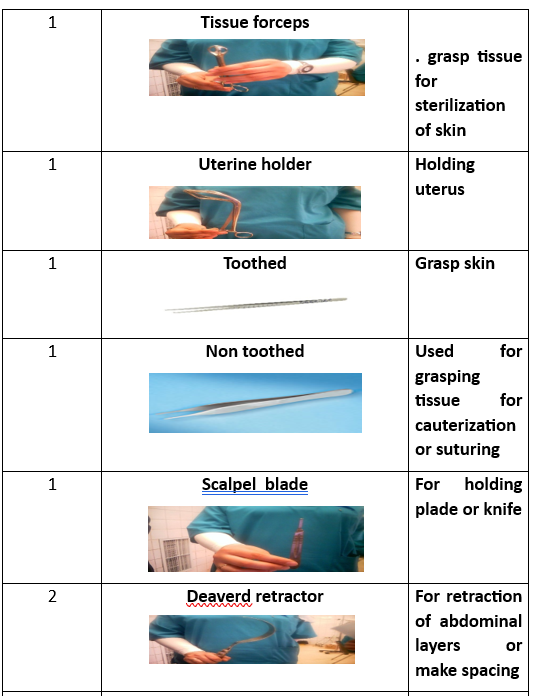
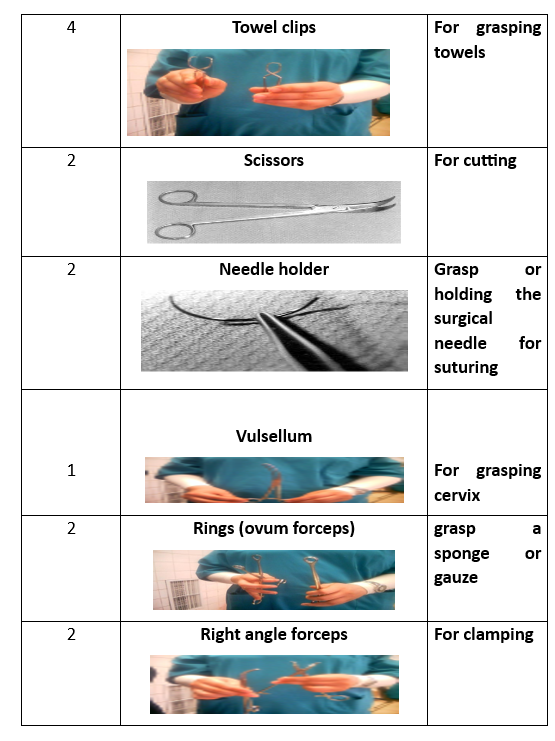
Abdominal Hysterectomy Technique
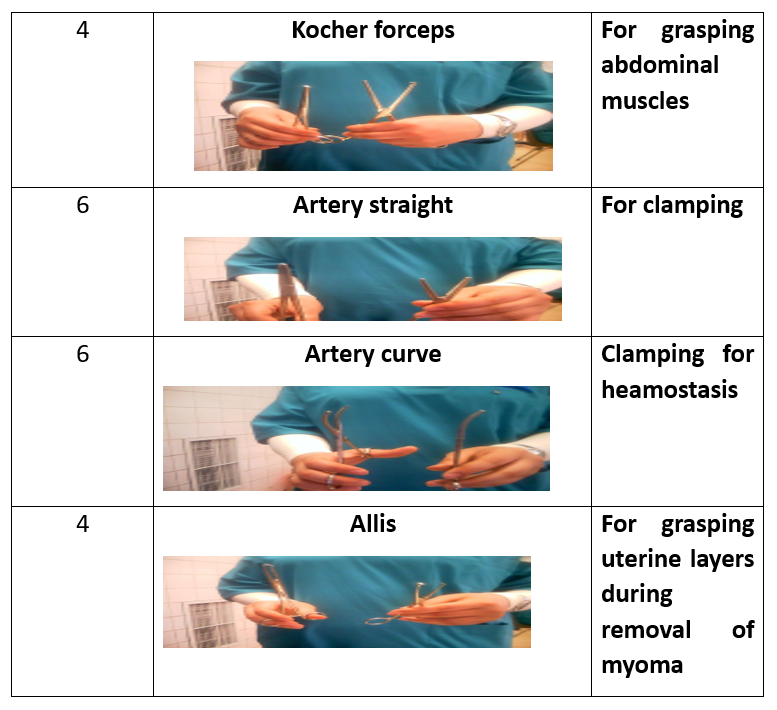
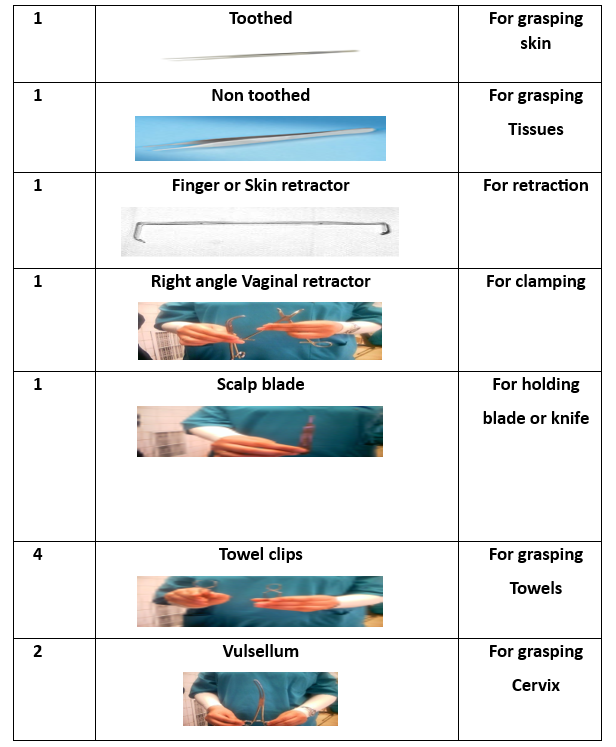
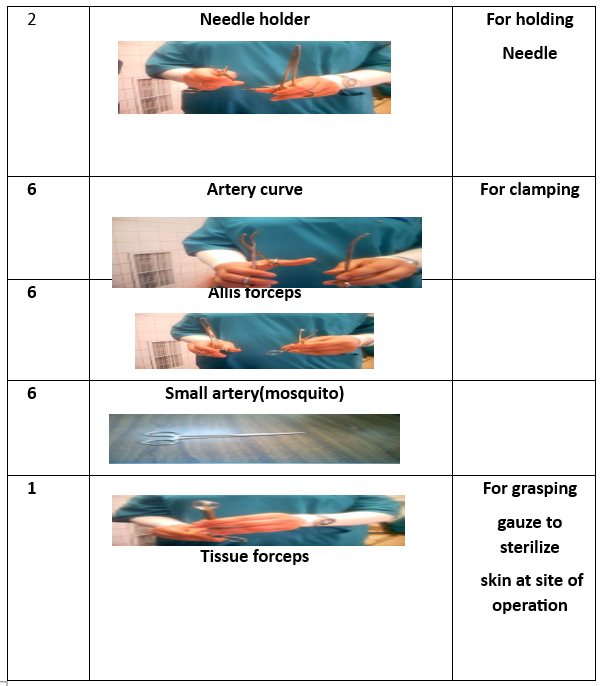
|
حوض لجمع الأدوات. ملقط الأنسجة. حامل الرحم. ملقط أسنان. ملقط غير أسنان. شفرة скаلب. مقص. مشبك. مشبك فولسيلوم. مقبض الإبرة. مشبك بويضة. ممد ديفير. مشبك كوكر. مشبك آليس. مشبك منحني. مشبك مستقيم. |
1 Kidney basin 1 Tissue forceps 1 Uterine holder 1Toothed 1 Non toothed 1 Scalp blade 1 Scissor 1 Dissector 1 Vulsellum 2 Needle holders 2Rings(Ovum-forceps) 2 Deaverd retractors 2 Right angle clamps 4 Towel clips 4 Kocher forceps 4 Allis 6 Clamps curved 6 Arteries straight 6 Arteries curved
|
Preparatory Equipment for Abdominal Hysterectomy
(List of preparatory equipment to be provided as needed.)
Steps of Abdominal Hysterectomy Procedure
- Prepare the patient.
- Administer general anesthesia.
- Perform abdominal and pelvic examination.
- Make a surgical incision (vertical or transverse).
- Open the fascia and create an abdominal plane.
- Make a vertical incision in the uterus and approximate its edges.
- Clamp and ligate the round and ovarian ligaments.
- Repeat the steps on the opposite side.
- Remove the uterus.
- Incise the cervix.
- Remove the cervix.
- Close the vaginal vault.
- Irrigate the surgical site.
- Close the pelvic and abdominal layers.
Vaginal Hysterectomy Procedure
Definition:
A surgical procedure in which the uterus is removed through the vaginal canal via an incision at the upper part of the vagina.
Indications:
- Certain cases of uterine prolapse.
- Some cases of dysfunctional uterine bleeding.
- Selected cases of endometrial cancer.


Advantages and Disadvantages of Different Hysterectomy Techniques
Abdominal Hysterectomy
✅ Advantages:
- No limitation on uterine size.
- Can be combined with reconstructive or additional surgeries.
- No increase in postoperative complications.
❌ Disadvantages:
- Longer recovery period.
- Higher risk of bleeding compared to other techniques.
- Vaginal or laparoscopic hysterectomy is preferred for obese patients.
Vaginal Hysterectomy
✅ Advantages:
- Shorter surgery time.
- Faster recovery.
- Less pain and lower cost.
❌ Disadvantages:
- Limited to smaller uterine sizes.
- Limited visualization of the ovaries and uterus.
- Cannot always be combined with other surgical procedures.
Subtotal Laparoscopic Hysterectomy
✅ Advantages:
- Faster recovery and return to normal activities.
- No proven impact on sexual function.
❌ Disadvantages:
- Requires regular cervical cancer screening.
- Possible periodic bleeding.
- No confirmed reduction in pelvic organ prolapse risk.
Laparoscopic-Assisted Vaginal Hysterectomy (LAVH)
✅ Advantages:
- Can be used for larger uteri.
- Can be combined with other surgeries.
❌ Disadvantages:
- Higher cost than vaginal hysterectomy.
- Not recommended for patients with heart or lung disease.
Total Laparoscopic Hysterectomy (TLH)
✅ Advantages:
- Shortest recovery time.
- Allows diagnosis and treatment of other pelvic conditions.
- Fast return to daily activities.
❌ Disadvantages:
- Longer surgical duration.
- Increased risk of ureter or bladder injury.
- Requires high surgical skill.
Single-Incision Laparoscopic Hysterectomy
✅ Advantages:
- Better cosmetic results.
❌ Disadvantages:
- No clinically significant improvements over traditional methods.
- Requires further research.
Robot-Assisted Hysterectomy
✅ Advantages:
- Similar complication rates to conventional laparoscopy.
- May lead to shorter recovery periods.
❌ Disadvantages:
- Longer surgery time.
- Higher costs.
- Requires further research.
Hysterectomy Complications
- Shock.
- Hemorrhage.
- Infection.
- Bowel complications (e.g., acute gastric dilation).
- Respiratory complications (e.g., pneumonia, atelectasis).
- Venous thromboembolism (DVT, SVT).
- Anesthesia-related complications.
- Late complications: Vaginal discharge, pelvic organ prolapse, back pain.
- Menopausal symptoms: Mood changes, irritability (especially in younger women).
Nursing Management for Hysterectomy Patients
Preoperative Care
- Assess the patient’s understanding of the procedure.
- Explain the procedure and provide emotional support.
- Clean the abdominal and pelvic area.
- Administer preoperative medications.
- Ensure informed consent is signed.
Postoperative Care
- Monitor for bleeding.
- Check vital signs.
- Assess vaginal discharge.
- Monitor surgical wounds and bowel sounds.
- Encourage early ambulation.
- Encourage fluid intake.
- Educate the patient on perineal hygiene.
- Restrict physical activity for 4-6 weeks.
- Explain symptoms that require medical attention.
- Provide information on hormone replacement therapy (if needed).
- Encourage routine gynecological check-ups.
- Pelvic Organ Prolapse
Introduction
Pelvic organ prolapse occurs when one or more pelvic organs slip from their normal position, leading to bulging into the vaginal canal. Affected organs include the uterus, vagina, bowel, and bladder, due to weakened muscles and supportive ligaments.
Definition
Pelvic Organ Prolapse (POP) is the downward displacement or protrusion of pelvic organs beyond their normal anatomical boundaries.
Factors Maintaining Organ Position
- Normal uterine position.
- Deep pelvic muscles.
- Supportive ligaments of the uterus, vagina, and ovaries.
Causes of Pelvic Organ Prolapse
1. Predisposing Factors:
- Congenital weakness.
- Birth-related injuries.
- Pelvic infections.
2. Triggering Factors:
- Increased pelvic pressure.
- Pelvic tumors.
- Obesity.
High-Risk Groups
1. Age:
- Younger than 18 years.
- Postmenopausal women.
- Pregnant women.
2. Medical Conditions:
- Chronic lung diseases.
- Jaundice.
- Chronic constipation.
3. Obstetric History:
- Multiple childbirths.
- Twin or multiple pregnancies.
Classification of Pelvic Organ Prolapse
- Vaginal Prolapse:
- Anterior Vaginal Wall Prolapse (Cystocele): Downward displacement of the bladder into the vaginal canal.
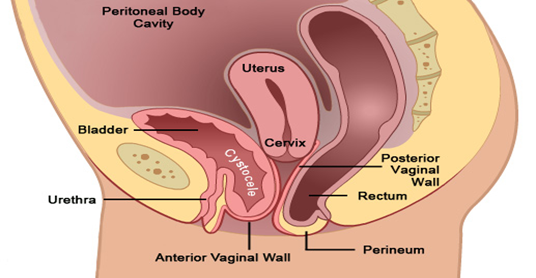
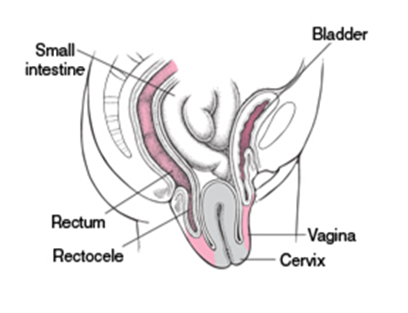
Posterior
Vaginal Wall Prolapse (Rectocele): Downward displacement of the rectum into the
vaginal canal
- Uterine Prolapse: Descent of the uterus from its normal position into the vaginal canal.
- Ovarian Prolapse: Descent of the ovaries from their normal position into the pelvic or vaginal area.
- Total Vaginal Prolapse: Complete prolapse of the vaginal walls, often occurring after a hysterectomy, where the top of the vagina collapses downward.
Symptoms
- Prolapse of pelvic organs.
- Pelvic pain.
- Difficulty urinating.
- Pain during intercourse.
Treatment
- Pelvic floor exercises.
- Support devices (Pessary).
- Surgery.
- Lifestyle changes.
Types of Pelvic Organ Prolapse
Anterior Vaginal Wall Prolapse
- Cystocele: Prolapse of the upper third of the anterior vaginal wall with the bladder.
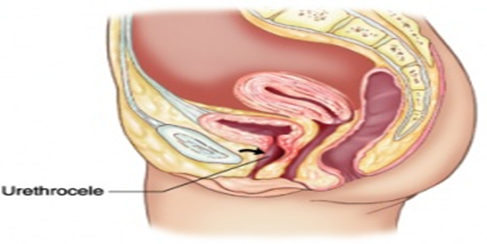
- Cystourethrocele: Complete prolapse of the anterior vaginal wall with the bladder and urethra.
- Urethrocele: Prolapse of the lower third of the anterior vaginal wall with the urethra.
Posterior Vaginal Wall Prolapse
- Rectocele: Prolapse of the anterior wall of the rectum with the middle third of the posterior vaginal wall.
- Enterocele: Prolapse of the upper third of the posterior vaginal wall with the peritoneum and bowel.
Combined Prolapse
- Cystorectocele: Prolapse of both the anterior and posterior vaginal walls.
Pelvic Prolapse After Hysterectomy
- Vaginal vault prolapse: Prolapse of the vaginal apex after hysterectomy.
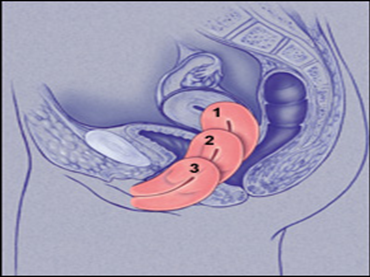
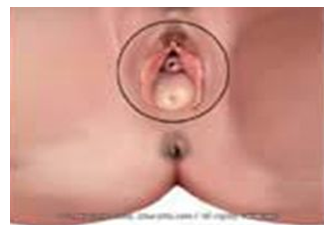
Uterine Prolapse
- First degree: Mild prolapse of the uterine cervix.
- Second degree: Prolapse with the cervix protruding from the vagina.
- Third degree: Complete uterine prolapse (Procidentia).
Combined Uterine and Vaginal Prolapse
- Uterine prolapse followed by vaginal prolapse.
- Vaginal prolapse followed by uterine prolapse.
Ovarian Prolapse
Clinical Symptoms
- A feeling of heaviness or pressure in the pelvis.
- Chronic pelvic, abdominal, and back pain.
- Pain during intercourse.
- Unusual vaginal discharge.
- Constipation.
- Frequent or urgent urination.
- A feeling of prolapse or bulging.
Medical Management
The optimal management of pelvic organ
prolapse depends on the following factors:
- Severity of clinical symptoms.
- Severity of prolapse.
- Patient’s age and health status.
- The patient's desire for fertility.
Conservative Management
- Pelvic floor exercises (Kegel exercises): Improve pelvic muscles and reduce prolapse.
- Support devices (Pessary):
• Made from plastic, rubber, or silicone.
• Used for temporary support of prolapsed tissues.
• Can be left in place for up to one year.
• The most common shape is a ring, available in various sizes and shapes.
Conservative Management Devices
- Colpexin Sphere: A vaginal device that supports pelvic muscles and improves exercises.
- Pessary devices:
• Indications: Pregnancy, trial of therapy, awaiting surgery.
• Contraindications: Acute pelvic infection, patient discomfort.
• Complications: Vaginal ulcers, pessary incarceration. - Vaginal estrogen creams:
• For mild prolapse, used for 4-6 weeks.
Surgical Management
- Anterior colporrhaphy.
- Burch colposuspension.
- Sling surgery.
- Vaginal hysterectomy.
- Sacrohysteropexy.
Midline Operations
- Uterine prolapse surgeries:
• Vaginal hysterectomy.
• Sacral fixation of the uterus. - Vaginal prolapse surgeries:
• Sacral fixation of the vagina.
Risks and Instructions
- Consult with a doctor.
- Regular follow-ups.
- Weight reduction.
- Perform pelvic exercises.
Posterior Operations
- Sacrocolpopexy (Vaginal vault fixation): Performed through open, robotic, or laparoscopic techniques.
- Sacrospinous fixation: Performed via vaginal and abdominal routes.
Treatments for Vault and Bowel Prolapse
- Sacral fixation of the vault.
- Sacrospinous ligament fixation of the vault.
- Iliococcygeus muscle fixation of the vault.
- McCall culdoplasty (muscle contraction fixation).
- Uterosacral ligament suspension.
Treatments for Vaginal Prolapse
- Iliococcygeus muscle fixation of the vagina.
- Pelvic muscle reconstruction (Perineorrhaphy).
- Obliterative vaginal operations.
Posterior Operations
- Repair of posterior wall prolapse.
- Repair of fascial defects.
- Placement of mesh in the posterior vaginal wall.
Traditional Treatments
- Repair of the anterior and posterior vaginal walls.
- Sacral fixation of the vaginal vault.
- Sacrospinous fixation of the vagina.
Classical Surgical Treatment Technique
Equipment and Supplies
- Betadine (disinfectant).
- Sterile towels.
- Sterile surgical gloves (various sizes and large quantities).
- Sterile bag for sterilization and draping.
- Sterile bag for surgical instruments.
- Surgical sutures and needles.
- Sterile towels for teaching.
Classic Repair Procedure
Surgical Instruments
- Instruments for vaginal hysterectomy (50 instruments).
- Additional instruments:
• 4 Breisky instruments for incision opening.
• Metallic catheter.
• Double-toothed forceps.
• Single-toothed forceps.
• Dissector scissors.
Steps for Procedure
A) Anterior Vaginal Wall Repair (Vaginal Approach):
- Empty the bladder using a metal catheter.
- Make a longitudinal incision in the anterior vaginal membrane.
- Separate the vaginal membrane from the pelvic muscles.
- Expose the bladder and urethra.
- Support the tissue around the bladder.
- Remove excess skin.
- Check for bleeding and remove instruments.
B) Posterior Vaginal Wall Repair (Vaginal Approach):
- Empty the bladder.
- Place Breisky instruments.
- Place forceps in the labia.
- Make a triangular incision in the skin.
- Separate the pelvic muscles from the posterior vaginal membrane.
- Extend the incision to the rectal margin.
- Suture the pelvic muscles.
- Close the incision.
- Strengthen pelvic muscles.
- Check for bleeding and remove instruments.
Surgical Complications in Pelvic Organ Prolapse Management
- Bladder prolapse under pressure (SUI).
- Pain during intercourse (Dyspareunia) or inability to have intercourse (Apareunia).
- Surgical failure due to:
• Poor surgical technique.
• Failure to recognize or treat bowel prolapse.
• Inadequate anterior vaginal wall repair.
• Pregnancy after surgery.
• Weak support due to infection or development.
Complications of Pelvic Organ Prolapse
- Keratin formation in the vagina.
- Pressure ulcers.
- Enlargement and elongation of the cervical neck.
- Inflammation and swelling of the cervical neck.
- Obstruction of urinary pathways (bladder pressure on the ureter, ureteral and kidney infection).
- Pessary incarceration.
- Cancer of the cervical or vaginal area.
Nursing Management for Pelvic Organ
Prolapse
Building a Positive Nurse-Patient Relationship
- Establish trust with the patient and family.
- Take patient history, perform physical examination, and review tests.
- Guide the patient to prevent pelvic organ prolapse.
Prevention Across Life Stages
- Childhood: Proper nutrition, avoiding constipation, healthcare.
- Adolescence: Maintain healthy pregnancy, avoid early pregnancy.
- Pregnancy: Prenatal care, avoid sexually transmitted diseases.
- Birth: Bladder and rectum care, breathing exercises.
- Postpartum: Perineal washing, proper nutrition, Kegel exercises.
- Menopause: Regular checkups, cervical screening, hormone therapy.
Patient Instructions on Pessary Use
- Avoid inserting anything into the vagina.
- Regular checkups to prevent inflammation and infection.
- Care for the pessary: Remove it for cleaning, consult with a doctor.
Patient Instructions on Hormonal Therapy
- Benefits and drawbacks of hormonal therapy.
- Importance of cell examination and imaging.
- Take the therapy regularly.
- Avoid abruptly stopping the therapy.
Lifestyle Changes
- Perform pelvic exercises regularly.
- Maintain a healthy weight.
- Eat fiber-rich foods.
- Avoid smoking and alcohol.
- Avoid activities that require heavy lifting.
Nursing Management for Surgical Patients
Before Surgery
- Assess the patient.
- Health education.
- Prepare the patient for surgery.
- Perform necessary tests.
After Surgery
- Monitor the patient.
- Health education.
- Wound care.
- Administer medications.
- Follow-up care.
Preventing Recurrence of Prolapse
- Delay pregnancy.
- Use contraception.
- Avoid increasing internal pressure.
- Perform pelvic exercises regularly.
- Maintain a healthy weight.
- Eat fiber-rich foods.
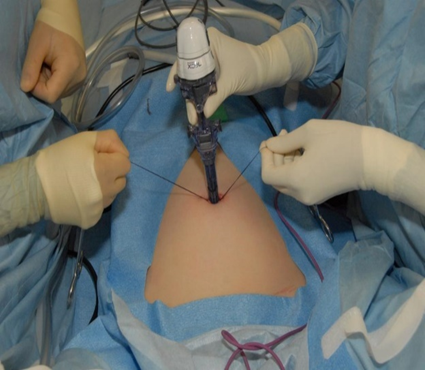
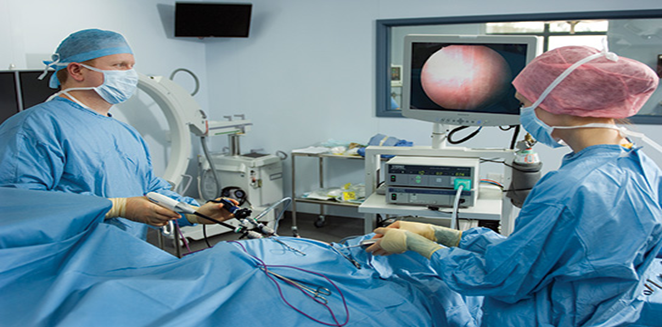
- Laparoscopic Gynecology (Laparoscopy in Gynecology)
Introduction
Laparoscopic gynecology is a minimally invasive surgical procedure considered
the gold standard for diagnosing and treating several gynecological conditions,
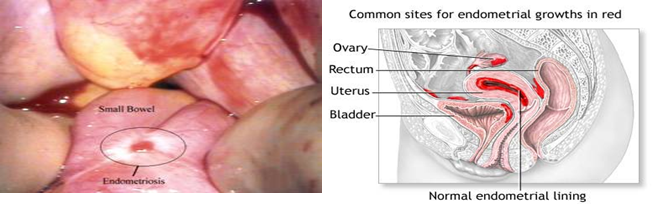
such as ovarian tumors, ectopic pregnancy, infertility, endometriosis,
fibroids, pelvic organ prolapse, and urinary incontinence. This procedure
provides a clear view of the pelvic and abdominal organs, reducing the risk of
injury and improving the quality of life for women.
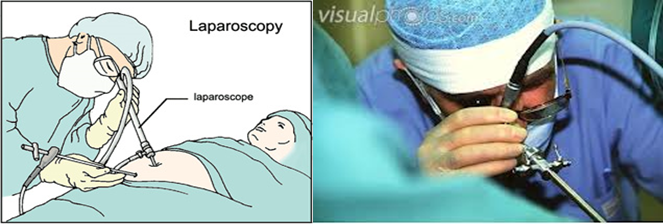
Definition of
Laparoscopic Gynecology
It is an internal technique that allows direct visualization and examination of
the pelvis and abdomen through small incisions in the navel and surrounding
areas.
Indications for Laparoscopic Gynecology
The indications for laparoscopic
gynecology are classified into diagnostic and therapeutic, according to the
objectives of the procedure. They include:
Diagnostic Indications
- Endometriosis.
- Adhesions in the pelvis and reproductive system.
- Ectopic pregnancy.
- Infertility.
- Leiomyomas.
- Early detection of gynecological cancer.
- Pelvic organ prolapse and urinary incontinence.
- Polycystic ovary syndrome (PCOS).
Therapeutic Indications for Gynecological Laparoscopy
- Ovarian tumor removal.
- Ectopic pregnancy treatment.
- Adhesion correction.
- Myomectomy.
- Treatment of pelvic organ prolapse.
- Treatment of urinary incontinence.
Therapeutic Laparoscopic Indications
- Treatment of endometriosis through surgical excision, cauterization, or laser technique.
- Adhesion treatment (Adhesiolysis).
- Fallopian tube surgery:
- Ectopic pregnancy treatment.
- Adhesion treatment.
- Fallopian tube removal.
- Fallopian tube repair.
- Laparoscopic myomectomy.
- Laparoscopic assistance in vaginal hysterectomy (LAVH).
- Treatment of pelvic disorders:
- Internal prolapse repair.
- Vaginal pelvic suspension.
- Treatment of urinary incontinence (SUI).
- Hysteropexy.
- Ovarian cyst drainage or excision through cauterization, coagulation, or removal.
Contraindications for Gynecological Laparoscopy
Absolute Contraindications:
- Bowel obstruction.
- Severe heart disease.
- Inexperienced surgeon.
- Diffuse peritonitis.
- Hypovolemic shock.
- Internal bleeding in the abdomen.
- Acute pelvic inflammatory disease.
- Displaced tuberculosis (extrapulmonary TB).
- Menstrual period.
- Coagulopathies.
- Increased intracranial pressure.
Relative Contraindications:
- Large mass in the pelvis or abdomen.
- Pregnancy after the 16th week.
- Previous abdominal surgery.
- Umbilical hernia.
- Chronic lung diseases.
- Severe adhesions.
- Severe obesity.
- Abdominal distension.
Types of Gynecological Laparoscopy
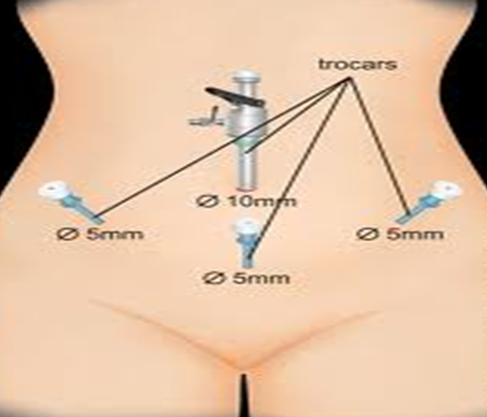
- Closed Technique: This involves inserting a needle into the umbilicus and insufflating the abdomen with carbon dioxide gas, followed by the insertion of a trocar and other instruments to achieve diagnostic and therapeutic goals.
- Laparoscopic Techniques
- Open Access: A method developed by Hasson, used in the following cases:
- Patients who have had previous abdominal surgeries.
- Identification of unknown sources of bleeding during surgery.
- Umbilical hernia.
- Adhesions around the umbilicus.
This technique involves a Palmer test to determine the entry point, followed by trocar and cannula insertion. - Blunt Trocar Laparoscopy: Used when there are no adhesions around the umbilicus.
3. Contact Laparoscopy: A less common technique that involves inserting a Veress needle to insufflate the pelvis with carbon dioxide gas, followed by the insertion of a trocar and cannula.
4. Panoramic Laparoscopy: A technique that provides a wide view during surgery, reducing the surgical time and helping to minimize bleeding. It also allows for surgical interventions to be performed at the time of diagnosis.
Laparoscopy Unit Contents
1- Camera and Monitor Unit:
a- Display Screen
b- Camera Unit
c- Recording Device
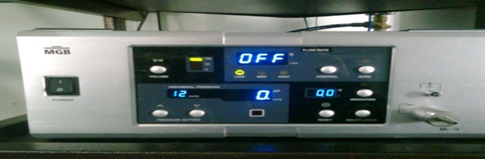
2- Air Pressure Device (Insufflator)
3- Light Source:
a- To improve visibility within the pelvic area
4- Cautery, Suction, and Irrigation Unit:
a- Cautery (Diathermy)
b- Suction Machine
c- Irrigation Machine
5- Anesthesia Equipment:
a- Anesthesia Machine
b- Device Supplies:
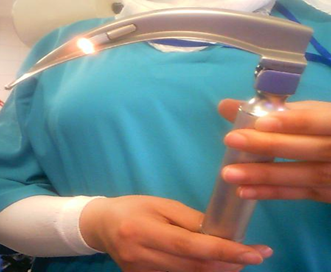
- Laryngoscope
- Suction Tubes
- Intravenous Cannulas
- Syringes of Various Sizes
- Air Tubes
- Electrocardiogram Electrodes
- Rubber Gloves
- KY Jelly for Improved Contact
- Adhesive Tape for Securing Cannulas and Tubes
6- Water Basin:
a- Two basins for sterilizing tools (using Cidex)
b- A basin for washing tools (using saline solution)
7- Protective Covers:
a- 3 covers for drapes
b- 6 Towels
c- 4 Surgical Gowns
d- Open Towel
e- Lens Support Tray
8- Video monitor camera unit

Includes:
A-Monitor (used with camera unit for reflect the image of intra-abdominal cavity)

B- Camera unit (for reflect the image of intra-abdominal cavity)

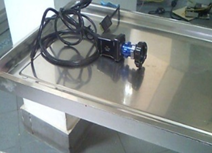
C-Vdeo (for record laparoscopy procedure)

2-Insufflators machine
3-Source of light
For good visualization of intra-abdominal cavity

a - Electro Cautery or diathermy


Suction and
Irrigation Device
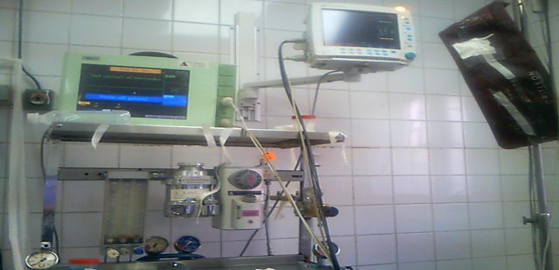
Anesthesia cart
Laparoscopic Instruments:
- Vaginal Table
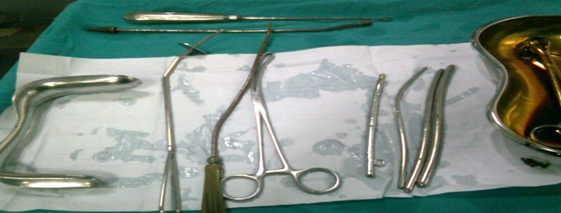
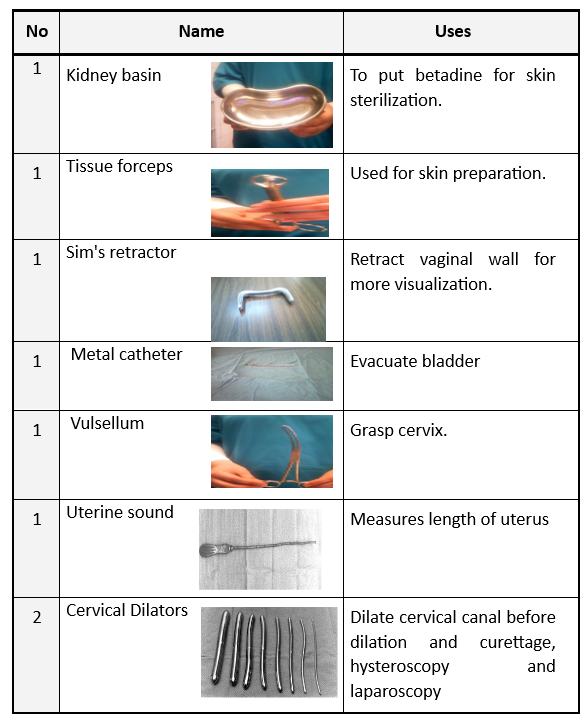
Vaginal Table Instruments
|
No. |
Name |
Usage |
|
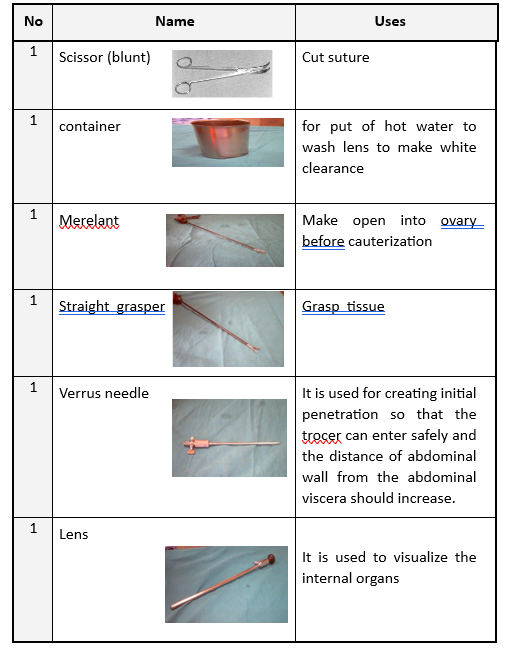
1 |
Kidney Basin |
To apply betadine for skin disinfection. |
|
2 |
Tissue Forceps |
For skin preparation. |
|
3 |
Sims Scapel |
To retract the vaginal wall for improved visibility. |
|
4 |
Metal Catheter |
To empty the bladder. |
|
5 |
Valsalva |
To grasp the cervix. |
|
6 |
Uterine Sound |
To measure the length of the uterus. |
|
7 |
Cervical Dilators |
To dilate the cervical canal. |
|
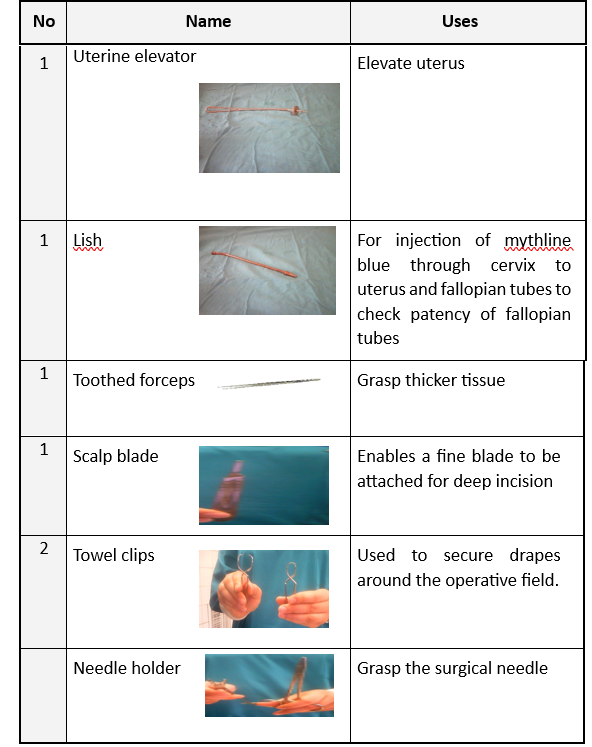
8 |
Uterine Manipulator |
To lift the uterus. |
|
9 |
Leech |
To inject blue dye into the cervix and fallopian tubes to check for patency. |
|
10 |
Serrated Forceps |
To grasp thick tissues. |
|
11 |
Scissors Blade |
To make deep incisions. |
|
12 |
Towel Clamps |
To secure drapes around the surgical area. |
|
13 |
Needle Holder |
To hold the surgical needle. |
|
14 |
Blunt Scissors |
To cut sutures. |
|
15 |
Container |
To place warm water for cleaning the lens. |
|
16 |
Meriland |
To open the ovary before cauterization. |
|
17 |
Straight Forceps |
To grasp tissues. |
|
18 |
Veress Needle |
To safely penetrate the abdomen. |
|
19 |
Lens |
For viewing internal organs. |
|
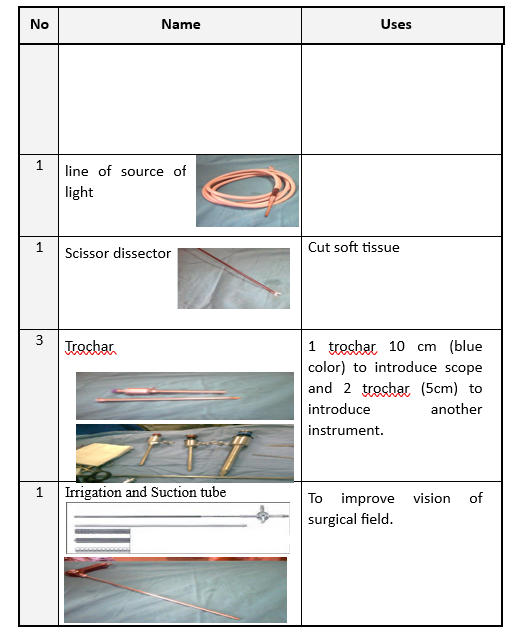
20 |
Light Source Cord |
To illuminate the surgical area. |
|
21 |
Dissector Scissors |
To cut soft tissues. |
|
22 |
Trocar |
To insert the cannula and trocar. |
|
23 |
Suction and Irrigation Tube |
To improve visibility of the surgical area. |
|
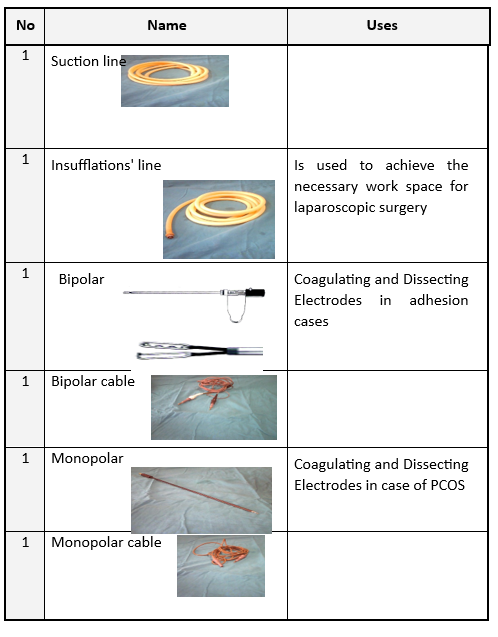
24 |
Suction Line |
|
|
25 |
Insufflation Line |
To provide necessary space for laparoscopic surgery. |
|
26 |
Bipolar Cautery |
To coagulate and divide tissues in cases of adhesions. |
|
27 |
Bipolar Cautery Cable |
|
|
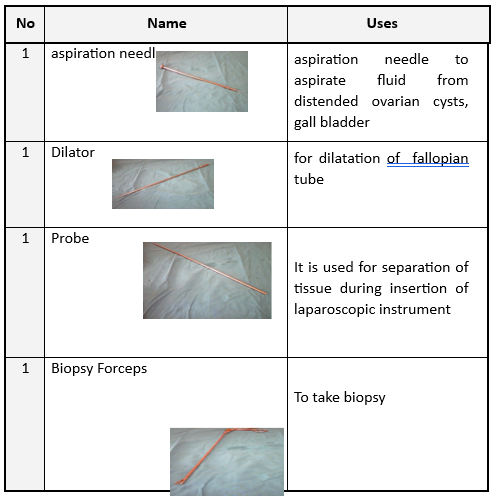
28 |
Aspiration Needle |
To aspirate fluid from ovarian cysts. |
|
29 |
Manipulator |
To dilate the fallopian tube. |
|
30 |
Probe |
To separate tissues when inserting laparoscopic instruments. |
|
31 |
Biopsy Forceps |
For obtaining a biopsy. |
Technique for Performing Laparoscopic Gynaecology
- Disinfect the skin with betadine in the lithotomy position.
- Cover the area.
- Place the Sims scapel.
- Empty the bladder using a metal catheter.
- Grasp the cervix with Valsalva.
- Measure the length of the uterus with a uterine sound.
- Dilate the cervix if necessary.
- Place the uterine manipulator and secure it with Valsalva.
- Change gloves and position the patient supine.
- Inject xylocaine and make an incision at the umbilicus.
- Perform an insufflation test and inflate the pelvis with carbon dioxide gas.
- Insert the trocar and cannula.
- Insert the second and third trocars.
- Test the blue dye, irrigation, and suction.
- Perform the surgery.
- Check for bleeding and remove the instruments.
- Close the incisions and clean them.
Advantages of Laparoscopic Gynaecology
- Rapid diagnosis of gynaecological conditions.
- Reduced complications.
- Smaller incisions.
- Less pain.
- Faster recovery.
Disadvantages of Laparoscopic Gynaecology
- Limited movement for the surgeon.
- Dependent on the surgeon’s expertise.
- High cost of instruments.
- Need for specialized training.
- Station-related complications.
Complications of Laparoscopic Gynaecology
Minor Complications:
- Nausea and vomiting.
- Mild infection.
- Mild bleeding.
- Chest and shoulder pain.
- Skin burns.
- Formation of painful cicatrix.
Major Complications:
- Vascular injury.
- Severe infection.
- Organ damage.
- Bowel injury.
- Gas explosion.
- Anesthesia complications.
- Nerve injury.
Nursing Management for Women Undergoing Laparoscopy
Preoperative Care:
- Assess the patient.
- Discontinue anticoagulant medications.
- Prepare the bowels.
- Prepare the bladder.
- Perform a preoperative shower.
- Provide patient education.
Caution When Handling Laparoscopic Instruments:
- Use the instruments only by trained nurses.
- Handle gently.
- Avoid stacking instruments.
- Clean the optical lenses.