
Book
The Procedural Work for Vital signs
- Vital Signs
Definition: Vital signs are essential indicators of human health, providing important information about the basic functions of the body. The main vital signs include heart rate, blood pressure, respiratory rate, and body temperature.
Temperature Measurement
A) Oral Temperature Measurement:
Definition: Body temperature is an indicator of internal body heat, measured using a thermometer.
Purpose: To monitor the vital signs of the patient.
Methods of Measurement: There are several methods to measure body temperature, each with its own advantages and limitations. Below are the most common methods:
- Oral Thermometer:
- Method:
- Place the thermometer under the tongue and close the mouth firmly.
- Leave the thermometer in place for 3 minutes.
- Advantages:
- Easy to use and widely available.
- Provides accurate readings for adults.
- Limitations:
- May be inaccurate if the person has recently consumed hot or cold food or beverages.
- Not recommended for young children or patients who cannot keep their mouth closed.
- Axillary Thermometer:
- Method:
- Place the thermometer in the armpit and gently press the arm to hold it in place.
- Leave the thermometer for about 5 minutes.
- Advantages:
- Suitable for infants and young children.
- Easy to use and does not require much cooperation from the patient.
- Limitations:
- Less accurate than other methods.
- Factors like hair density or humidity can affect the measurement.
- Rectal Thermometer:
- Method:
- Gently insert the thermometer about 2.5 cm (1 inch) into the rectum.
- Leave it in place for 1 minute.
- Advantages:
- Considered the most accurate method for measuring internal body temperature.
- Useful for infants or patients in special medical conditions requiring precise measurements.
- Limitations:
- May be uncomfortable for some people.
- Requires caution to avoid injury.
- Tympanic Thermometer:
- Method:
- Place the thermometer in the ear canal.
- Temperature is measured by detecting heat emitted from the eardrum.
- Advantages:
- Quick and easy to use.
- Suitable for both children and adults.
- Limitations:
- May be affected by earwax or dirt in the ear.
- Can be inaccurate if not placed properly in the ear.
- Forehead Thermometer (Infrared):
- Method:
- An infrared thermometer is passed over the forehead to measure temperature.
- Advantages:
- Non-contact, making it ideal for young children and patients with conditions that make direct measurement difficult.
- Quick and easy to use.
- Limitations:
- Can be affected by environmental factors like hot or cold weather.
- Needs to be calibrated properly for accurate results.
Normal Temperature Range: 36.4 – 37.4°C
What the Results Mean:
- Fever: Can indicate an infection or inflammation.
- Low Temperature: May suggest a disruption in thermal regulation or a medical emergency.
Personnel Involved: Nursing Team
Tools: Mercury thermometer, alcohol, gauze pad, stopwatch.
Steps:
- Identify the patient (Name and ID bracelet).
- Explain the procedure to the patient.
- Wash hands.
- Prepare the tools.
- Maintain patient privacy.
- Adjust the thermometer and move it vigorously to set the mercury line at 35°C (starting point).
- Clean the thermometer from the mercury part, top to bottom, with alcohol.
- Ensure the thermometer is at eye level to verify the starting point.
- Place the thermometer under the tongue and leave it for 3 minutes.
- Remove the thermometer from the mouth.
- Clean the thermometer with a dry gauze pad, top to bottom.
- Record the temperature reading on the designated form.
- Move the thermometer vigorously to lower the mercury level.
- Clean the thermometer with soap, water, and alcohol, then dry it.
- Place the thermometer in its designated holder.
- Wash hands.
- Reassure the patient.
- Record any emergency signs.
B) Axillary Temperature Measurement:
Normal Range: 36.4 – 37.4°C, plus an additional half a degree from the standard reading.
Personnel Involved: Nursing Team
Tools: Mercury thermometer, alcohol, gauze, stopwatch.
Steps:
- Identify the patient (Name and ID bracelet).
- Explain the procedure to the patient.
- Wash hands.
- Prepare the tools.
- Maintain patient privacy.
- Adjust the thermometer and move it vigorously to set the mercury line at 35°C.
- Clean the thermometer with alcohol from the mercury part, top to bottom.
- Ensure the thermometer is at eye level for verification.
- Place the thermometer in the armpit for 5 minutes.
- Remove the thermometer from the armpit.
- Clean the thermometer with a dry gauze pad from bottom to top.
- Record the temperature, adding half a degree if needed.
- Move the thermometer to lower the mercury level.
- Clean the thermometer with soap, water, and alcohol, then dry it.
- Place the thermometer in its holder.
- Wash hands.
- Reassure the patient.
- Record any emergency signs.
C) Rectal Temperature Measurement:
Normal Range: 36.4 – 37.4°C minus half a degree.
Personnel Involved: Nursing Team
Tools: Mercury thermometer, alcohol, gauze pad, stopwatch.
Steps:
- Identify the patient (Name and ID bracelet).
- Explain the procedure to the patient.
- Wash hands.
- Prepare the tools.
- Maintain patient privacy.
- Adjust the thermometer and move it vigorously to set the mercury line at 35°C (starting point).
- Clean the thermometer with alcohol from top to bottom.
- Verify the thermometer is at eye level for starting point.
- Apply gel to the thermometer and insert it gently into the rectum, ensuring the patient is on their side.
- Remove the thermometer after 1 minute.
- Clean the thermometer from bottom to top with a dry gauze pad.
- Record the temperature reading, deducting half a degree.
- Move the thermometer to lower the mercury level.
- Clean the thermometer with soap, water, and alcohol, then dry it.
- Place the thermometer in its designated holder.
- Wash hands.
- Reassure the patient.
- Record any emergency signs.
Note: Rectal measurements are used for infants and burn patients.
Pulse Measurement
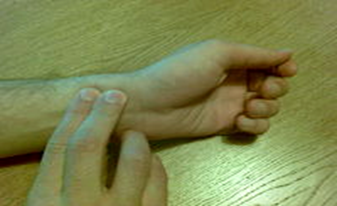
Definition: Pulse is the wave generated in the arteries due to the contraction of the heart. It can be felt by palpating the major arteries in the body, such as the carotid artery in the neck and the radial artery in the wrist.
Purpose: To monitor the vital signs of the patient.
How to Measure:
- Location: The pulse rate can be measured at the wrist (radial artery) or the neck (carotid artery).
- Method: Use your fingers to locate the pulse and apply gentle pressure. Count the number of pulses for 60 seconds, or for 30 seconds and multiply the result by 2.
Normal Pulse Rates:
- Adults: 60-100 beats per minute.
- Children: 70-120 beats per minute.
- Infants: 100-160 beats per minute.
What the Results Mean:
- Elevated Pulse Rate: May indicate stress, anxiety, or heart problems.
- Low Pulse Rate: Could suggest hypothyroidism or heart issues.
Personnel Involved: Nursing Team
Tools: Stopwatch
Steps:
- Identify the patient (Name and ID bracelet).
- Explain the procedure to the patient.
- Wash hands.
- Prepare the tools.
- Ensure the patient is in a comfortable position.
- Place the pads of two fingers (index and middle) on the artery (radial, carotid, or femoral).
- Use a clock or watch with a second hand for timing.
- Count the pulse for a full minute.
- Record the pulse on the vital signs observation form and report if the pulse is (rapid, slow, strong, weak, or irregular).
- Reassure the patient.
- Wash hands.
Respiratory Rate Measurement
Definition: It is the process of evaluating the rate and regularity of breathing, which is essential for obtaining oxygen through respiration and removing carbon dioxide.
Purpose: To monitor the vital signs of the patient.
How to Measure:
- Method: Observe the movement of the chest or abdomen for a full minute, and count the number of breaths.
Normal Respiratory Rates:
- Adults: 12-20 breaths per minute.
- Children: 20-30 breaths per minute.
- Infants: 30-60 breaths per minute.
What the Results Mean:
- Elevated Respiratory Rate: May indicate respiratory problems or anxiety.
- Decreased Respiratory Rate: Could suggest lung issues or neurological problems.
Personnel Involved: Nursing Team
Tools: Stopwatch
Steps:
- Identify the patient (Name and ID bracelet).
- Explain the procedure to the patient.
- Prepare the tools.
- Ensure the respiratory rate is measured before any physical activity.
- Position the patient comfortably, preferably semi-sitting.
- Make sure the chest movement is visible.
- Observe the rising and falling of the patient's chest.
- Count each inhalation and exhalation as one full breath for one minute.
- Note any abnormal signs in the breathing pattern.
- Observe the patient's skin color, especially around the lips and nails.
- Record the respiratory rate in the patient's form.
- Report any abnormal signs to the doctor.
Blood Pressure Measurement
Definition: It evaluates the circulation of blood by assessing the blood volume, the return of blood to the heart, the resistance of peripheral blood vessels, and the elasticity of arteries.
Purpose: To monitor the vital signs of the patient.
How to Measure:
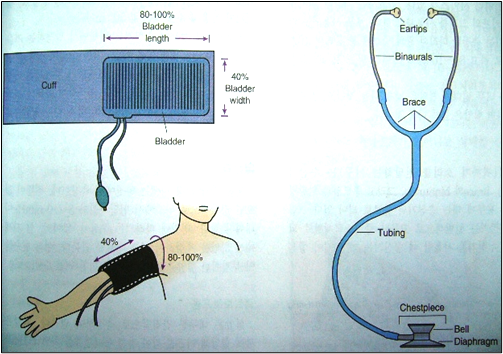
- Tools: Use a blood pressure cuff (either automatic or manual) to determine the readings.
- Method: Sit the patient comfortably and place the cuff around their arm. Follow the instructions on the device to measure the blood pressure.
Normal Blood Pressure Readings:
- Normal blood pressure: Less than 120/80 mmHg.
- Hypertension: 140/90 mmHg or higher.
What the Results Mean:
- High Blood Pressure: May indicate increased risks of heart disease or stroke.
- Low Blood Pressure: Could be a result of dehydration or heart problems.
Personnel Involved: Nursing Team
Tools: Blood pressure cuff and stethoscope.
Steps:
- Identify the patient (Name and ID bracelet).
- Explain the procedure to the patient.
- Prepare the tools.
- Ensure the blood pressure is measured before any physical activity.
- Position the patient comfortably.
- Maintain patient privacy.
- Measure blood pressure before and after administering antihypertensive medications.
- Record the blood pressure measurement immediately in the designated form.
- Determine the patient's dietary habits (low salt and fat).
- Observe for any complications that may occur, such as nosebleeds.
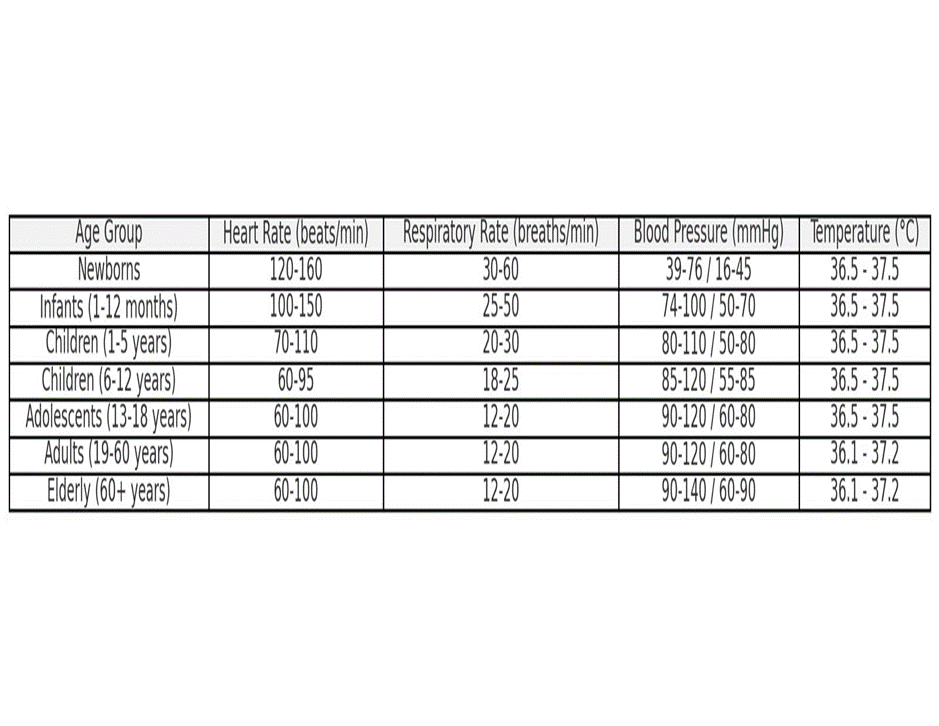
11. Normal Vital Signs by Age Group
12. Here’s a table that outlines the normal ranges for vital signs—such as blood pressure, heart rate, respiratory rate, and temperature—according to different age groups:
13. These ranges provide an overview of what is considered normal for different age groups, helping healthcare providers assess the general health status of their patients.
Notes:
- Heart Rate: Can be higher in children and infants, decreasing with age.
- Respiratory Rate: Higher in infants and young children, gradually decreasing as they age.
- Blood Pressure: Increases progressively with age and varies according to gender and overall health.
- Temperature: Typically ranges from 36.1°C to 37.2°C in adults, with slight variations depending on the time of day and physical activity.
It’s important to note that these values are general ranges and may vary slightly from individual to individual. For an accurate assessment of health status, it is always best to consult with a doctor or healthcare provider.