Mechanical ventilation involves connecting the neonate to a
ventilator via an endotracheal tube. The ventilator delivers a mixture of
oxygen and compressed air at controlled flow rates and pressures for a
specified duration to ensure effective gas exchange.
Indications for Mechanical
Ventilation in Neonates
- Severe respiratory dysfunction:
- Partial pressure of arterial
oxygen (PaO₂) < 50 mmHg despite oxygen therapy at 80–100%.
- Partial pressure of arterial
carbon dioxide (PaCO₂) > 60–65 mmHg.
- Arterial pH < 7.35
(acidosis).
- Severe respiratory distress:
- Chest retractions and signs of
impending respiratory failure, as assessed by the physician.
- Apnea:
- Prolonged apnea or increasing
frequency of apnea episodes.
Mechanical Ventilation Systems
|
Ventilation Mode
|
Mechanism / How it
Works
|
|
Controlled
Mandatory Ventilation (CMV)
|
The
ventilator performs all breaths, with no spontaneous effort from the
neonate. The neonate must remain calm and sedated to prevent asynchrony.
|
|
Intermittent
Mandatory Ventilation (IMV)
|
Provides mandatory
breaths at set intervals per minute, but not synchronized with the
neonate’s spontaneous breaths. This may lead to overlap or asynchrony between
ventilator and spontaneous breaths.
|
|
Synchronized
Intermittent Mandatory Ventilation (SIMV)
|
Similar to
IMV, but the ventilator cycles are synchronized with the neonate’s
spontaneous breathing, improving comfort and efficiency.
|
|
Continuous
Positive Airway Pressure (CPAP)
|
Delivers a
continuous positive pressure to the airways, keeping alveoli open
during exhalation and preventing collapse. Often used before extubating
from mechanical ventilation.
|
|
High-Frequency
Ventilation (HFV)
|
Uses small
tidal volumes at very high rates via the endotracheal tube to restore
lung function in severe respiratory failure. Provides effective oxygenation
and ventilation while minimizing alveolar injury compared to
conventional modes.
|
Nurse’s Role in Mechanical
Ventilation
1. Monitoring and Recording Ventilator Settings and Readings
|
Abbreviation
|
Definition
|
Recommended Setting
|
|
PIP (Peak Inspiratory Pressure)
|
The
maximum airway pressure reached during inhalation.
|
18–25 cm
H₂O
|
|
PEEP (Positive End-Expiratory Pressure)
|
Positive
pressure maintained in the lungs at the end of exhalation; equivalent
to CPAP.
|
4–5 cm H₂O
|
|
Rate
/ Frequency
|
Number of
breaths delivered per minute as set on the ventilator.
|
20–40
breaths/min
|
|
FiO₂ (Fraction of Inspired Oxygen)
|
The percentage
of oxygen in the inhaled gas mixture.
|
21–100%
|
|
Flow
|
The flow
rate of inspired gas, measured in liters per minute.
|
8–10 L/min
|
2Assisting with Endotracheal Tube (ET Tube) Insertion –
Nursing Role
The nurse plays a crucial role in assisting the physician
during endotracheal intubation and monitoring the tube after placement.
This includes knowing how to select the appropriate tube size,
determining the insertion depth, and ensuring proper care.
Nurse’s Responsibilities Before ET
Tube Insertion
1. Determining the Appropriate ET Tube Size:
- The tube size is selected based
on the neonate’s birth weight and gestational age.
|
ET Tube Size (mm ID)
|
Birth Weight (g)
|
Gestational Age
(weeks)
|
|
2.5
|
<1000
|
<28
|
|
3.0
|
1000–2000
|
28–34
|
|
3.5
|
2000–3000
|
34–38
|
|
3.5–4.0
|
>3000
|
>38
|
2Preparation of Equipment for Endotracheal Tube (ET Tube)
Insertion
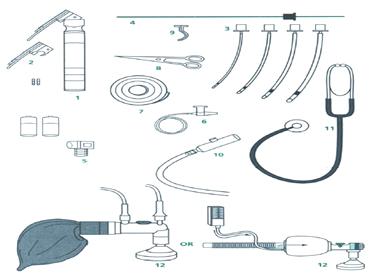
1. Required Equipment:
- Laryngoscope – fully functional, with extra battery available.
- Laryngoscope blades – straight and curved, sizes 0 and 1.
- Endotracheal tubes – sizes 2.5, 3.0, 3.5, and 4.0 mm.
- Suction device.
- Suction catheters – sizes 5, 6, 8, 10 Fr.
- Adhesive tape (plaster).
- Scissors.
- Stethoscope.
- Resuscitation bag (Ambu bag) with appropriate mask.
- Oxygen source.
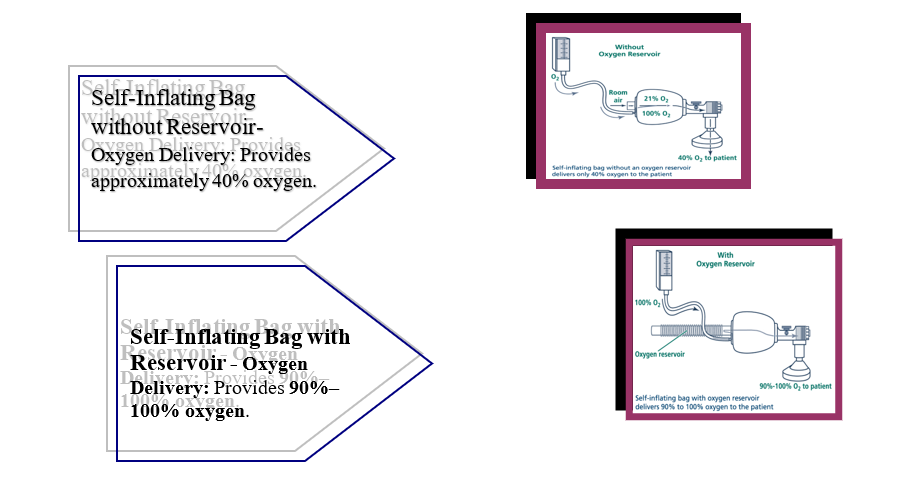
2. Types of Resuscitation Bags (Ambu Bags) and Masks for
Neonates:
General Characteristics:
- Bag volume: 200–750 mL.
- Oxygen delivery capability:
90%–100%.
- Equipped with a pressure relief
mechanism to prevent overinflation.
- Mask: appropriately sized,
cushioned, and suitable for the neonate’s birth weight and gestational
age.
3. Determining the Endotracheal Tube
Insertion Depth
Appropriate Depth (cm)=6+Infant’s weight (kg)\text{Appropriate
Depth (cm)} = 6 + \text{Infant's weight
(kg)}Appropriate Depth (cm)=6+Infant’s weight (kg)
Appropriate Depth (cm)=8+Infant’s weight (kg)\text{Appropriate
Depth (cm)} = 8 + \text{Infant's weight
(kg)}Appropriate Depth (cm)=8+Infant’s weight (kg)
Nurse’s Role During Endotracheal
Tube Placement
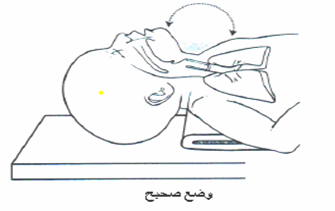
- Positioning the Infant:
- Place the infant on their back
(sniffing position).
- Place a folded towel under the
shoulders and slightly extend the neck to open the airway.
- Suctioning:
- Suction the mouth and nose to remove
accumulated mucus, ensuring clear visualization for tube insertion.
- Monitoring Vital Signs:
- Observe and document:
- Skin color
- Respiratory rate
- Oxygen saturation (SpO₂)
- Heart rate
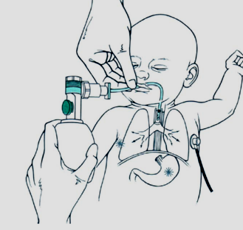
- Preparing the Resuscitation Bag
(Ambu Bag):
- Connect to an oxygen source.
- Place an appropriately sized
mask over the infant’s chin, mouth, and nose.
- Secure the mask:
- Thumb and index finger on the
mask
- Middle finger supporting the
lower jaw
- Slightly extend the chin to
maintain airway patency
- Bag Ventilation:
- Hold the Ambu bag with the
right hand.
- Squeeze using thumb, index,
and middle fingers at a rate of 60 breaths per minute.
- Adjust the squeeze force
according to the infant’s size and condition.
- Chest Movement Observation:
- Ensure adequate chest rise
with each ventilation and adjust squeeze force as needed.
- Intubation Timing:
- Insert the endotracheal tube
once the infant’s color improves and SpO₂ stabilizes.
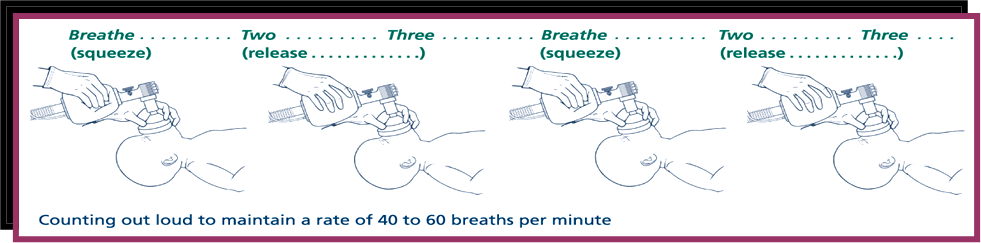
Ventilation Rate During Endotracheal
Tube Placement
- Bag Ventilation:
- Use the Ambu bag to provide approximately
60 breaths per minute.
- Adjust the squeeze strength to
achieve adequate chest rise.
Steps for Endotracheal Tube
Insertion
- Open the laryngoscope and hand
it to the physician.
- Slightly extend the infant’s
neck to open the airway.
- Hand the endotracheal tube to
the physician.
- If needed, gently apply
pressure on the larynx to facilitate tube passage.
- Be prepared to suction if
secretions obstruct the view.
- Time the intubation attempt
carefully to minimize apnea duration.
Nurse’s Role After Tube Placement
-
Connect the Ambu bag to the
endotracheal tube and provide manual ventilation.
- Listen for bilateral breath
sounds to confirm proper placement.
- Insert a nasogastric (Ryle)
tube and decompress the stomach.
- Continuously monitor vital
signs and SpO₂.
- Secure the tube at the
calculated insertion depth.
- Prepare and connect the
mechanical ventilator, verifying all settings with the physician.
- Airway Suctioning: Remove mucus secretions to prevent airway obstruction
and ensure effective mechanical ventilation.
- Chest X-ray:Perform radiographic imaging as per physician’s
instructions to confirm tube placement and assess lung condition.
- Documentation in the Infant’s
Record:
- Time of endotracheal tube
insertion and the size used.
- Method of insertion (oral or
nasal).
- Depth of tube placement in
centimeters.
- Observations during insertion,
including any medications administered.
- Signs of the infant’s response
to mechanical ventilation, such as skin color, respiratory rate, and chest
movement.
Complications
of Endotracheal Tube Insertion and Prevention Strategies
|
Complication
|
Causes
|
Prevention
|
|
Hypoxemia
(low blood oxygen)
|
-
Prolonged intubation attempts- Incorrect tube placement
|
-
Pre-oxygenate using ambu-bag before intubation- Limit each intubation attempt
to ≤20 seconds- Reattempt only if tube position is incorrect
|
|
Bradycardia
or apnea
|
-
Stimulation of the vagus nerve during suctioning or laryngoscope insertion
|
- Provide
oxygen via ambu-bag before and after intubation
|
|
Pneumothorax
/ Emphysema
|
-
Overinflation of lung due to tube placed in right bronchus
|
- Confirm
correct tube placement- Apply appropriate pressure when squeezing ambu-bag
|
|
Injuries
to tongue, gums, or airway
|
- Forceful
insertion or removal of laryngoscope- Using inappropriate size blade
|
- Use
proper technique with the laryngoscope- Select blade size appropriate for
infant’s weight and gestational age
|
|
Tube
obstruction
|
- Tube
bending or blockage
|
- Suction
the tube regularly- Replace tube if necessary
|
|
Infection
|
-
Contaminated equipment or hands
|
- Strict
infection control measures (hand hygiene, sterile equipment)
|
Routine Nursing Care for a Neonate
on Mechanical Ventilation
1. Ventilator Monitoring:
- Verify that the ventilator
settings match the orders recorded in the infant’s chart.
- Check that all connections are
secure.
- Ensure tubing is free from
condensed water; drain if necessary.
- Respond promptly to ventilator
alarms and notify the physician immediately.
Types of Ventilator
Alarms and Actions:
|
Alarm Type
|
Action to Take
|
|
High
Inspiratory Pressure
|
- Check
that all tubing connections are free from kinks or obstruction. - Ensure the
endotracheal tube is patent and not blocked by secretions or bent.
|
|
Low
Inspiratory Pressure
|
- Verify
that all connections are secure with no leaks. - Inspect tubing for defects
or disconnections.
|
|
Low
PEEP/CPAP
|
- Assess
the neonate’s respiratory status. - Observe for increased spontaneous
respiratory rate due to crying, resisting the ventilator, or waking.
|
|
Low
Air Pressure
|
- Check
hospital central air supply pressure. - Ensure the ventilator’s air inlet is
properly connected.
|
|
Insufficient
Expiratory Time
|
- Evaluate
the neonate’s respiratory condition. - Observe for increased spontaneous
breathing rate or resistance t
|
1. Arterial Blood Gas (ABG) Sampling
Neonates on mechanical ventilation require continuous
monitoring of their overall condition and respiratory function. This is
achieved by analyzing arterial blood gases (ABG), which provide information
about:
- Oxygenation status (PaO₂)
- Carbon dioxide levels (PaCO₂)
- Acid-base balance (pH)
These results are compared with normal reference values to
guide adjustments in ventilator settings according to the neonate’s needs.
Normal Blood Gas
Values in Neonates
|
Blood Gas Parameter
|
Acceptable Range
|
|
pH
(Blood Reaction)
|
7.35 –
7.45
|
|
PaO₂
(Partial Pressure of Oxygen in Arterial Blood)
|
50 – 70
mmHg
|
|
PaCO₂
(Partial Pressure of Carbon Dioxide in Arterial Blood)
|
45 – 50
mmHg
|
|
HCO₃⁻
(Sodium Bicarbonate)
|
22 – 28
mEq/L
|
|
SaO₂
(Oxygen Saturation)
|
89 – 93 %
|
Blood Gas Sampling in Neonates on
Mechanical Ventilation
- Timing of Sampling:
- A blood gas sample should be
obtained and analyzed within 10–15 minutes of starting mechanical
ventilation.
- Routine blood gas analysis is
performed every 6 hours or as per physician instructions, unless there is
a sudden change in the neonate’s condition.
- Blood gas should be analyzed
every 10–15 minutes whenever ventilator settings or positions are
adjusted.
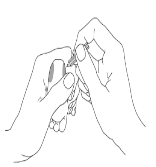
Method for Obtaining a Blood Gas
Sample from the Heel
Heel sampling can be used as an alternative to arterial
blood gas. The following precautions must be observed to ensure accurate
results:
- Warm the Site: Wrap a cotton pad soaked in warm water (~42°C) around
the heel for 5 minutes before sampling.
- Avoid Over-Milking: Do not excessively squeeze the heel to prevent
contamination of the sample.
- Disinfect: Clean the sampling site with alcohol and allow it to dry
completely.
- Puncture Site: Prick one side of the heel, avoiding the center.
- Discard First Drop: Remove the first drop of blood to avoid tissue fluid
contamination.
- Fill the Capillary Tube: Collect the sample without introducing air bubbles.
- Send Immediately: Send the sample to the laboratory immediately after
collection.
- Apply Pressure: Press on the puncture site after sampling to prevent
bleeding.
Care for Neonates on Mechanical
Ventilation and Nasal CPAP
1. Endotracheal Tube (ETT) Care
- Ensure the tube is securely
fixed with minimal tape, without pulling or stretching the lips or nose.
- Inspect the skin around the
lips and nose for irritation or wounds.
- Change the fixation site daily
from right to left to prevent skin breakdown.
- Check that the tube is not
blocked due to kinking or thick secretions.
- Suction the ETT every 3–4 hours
or as needed.
- Auscultate breath sounds
bilaterally every 2–4 hours.
- Watch for signs of accidental
tube dislodgement: cyanosis, decreased oxygen saturation, sudden
deterioration, abdominal distension, audible crying, reduced chest
movement, or bradycardia.
2. Monitoring Vital Signs
- Connect the neonate to
cardiorespiratory monitoring.
- Record vital signs every 3
hours, focusing on respiratory effort and blood pressure.
- Observe skin color and oxygen
saturation.
3. Chest Physiotherapy and
Suctioning
- Perform chest physiotherapy as
indicated.
- Suction as needed to maintain
airway patency.
4. Nutrition
- Neonates may receive nutrition
via an orogastric or nasogastric tube as per physician instructions.
5. Repositioning
- Reposition the neonate every 2
hours (side, back, or prone) to prevent secretion accumulation while
ensuring proper tube fixation.
Weaning from Mechanical Ventilation
- Gradually reduce ventilator
settings (pressure, oxygen concentration, respiratory rate) to encourage
spontaneous breathing before extubation.
Extubation Procedure
- Stop tube feeding 2 hours
before extubation.
- Perform chest physiotherapy and
suction immediately prior to tube removal.
- Remove the ETT during
inhalation.
- Closely monitor breathing after
extubation.
- Perform a blood gas analysis 30
minutes after extubation.
- Notify the physician of any
complications.
Potential Complications of
Mechanical Ventilation
- ETT obstruction due to secretions
or kinking.
- Accidental extubation.
- Pneumothorax or emphysema from
excessive pressure.
- Reduced cardiac output due to
high intrathoracic pressure.