
Book
Guidelines for infection control in operations
- Equipment Processing Cycle (Decontamination Steps)
There are two steps for processing equipment used in clinical and surgical procedures. The first and most crucial step is cleaning, followed by either disinfection or sterilization. Afterward, the sterilized items must be used immediately or stored properly.

Risks of Infection Transmission from Medical Equipment
The risk of infection transmission from medical equipment is classified into three categories. Categorizing tools and equipment into one of these categories helps determine the necessary level of cleaning, disinfection, or sterilization to protect patients and healthcare workers.
Low-Risk Instruments/Tools
Cleaning and drying are sufficient for instruments that come into contact with intact skin (e.g., stethoscopes or blood pressure cuffs). However, disinfection may be required if these items are used for immunocompromised patients, highly contagious patients, or if contaminated with blood or body fluids.
Intermediate-Risk Instruments/Tools
These are instruments/tools
that come into contact with mucous membranes or non-intact skin but do not
penetrate the skin or mucosa or reach sterile body parts. These instruments
should be cleaned and then disinfected with a high-level disinfectant.
Examples include ventilators, certain endoscopes, laryngoscopes, endotracheal
tubes, thermometers, and similar equipment.
High-Risk Instruments/Tools
These are instruments that
penetrate the skin or sterile tissues, including body cavities and the
circulatory system. These tools pose a high risk of infection transmission if
contaminated with microbes before penetrating tissue. Therefore, they must be
cleaned first and then sterilized.
Examples include surgical instruments.
The structure and design of the instrument determine the appropriate
sterilization or disinfection method (chemical or thermal).
Single-Use Instruments
These are instruments
designed for one-time use, subjected to a controlled level of disinfection or
sterilization during manufacturing. After a single use, they must be disposed
of.
Examples include gloves, needles, and syringes.
Cleaning
Cleaning is the process of removing all residual materials (organic and inorganic debris) from the surface of instruments that require reprocessing. There are two main components of cleaning: scrubbing to facilitate debris removal and thorough rinsing with running water to eliminate residual substances.
Cleaning should ideally begin immediately after use or, alternatively, instruments should be soaked in a cleaning solution (water and liquid detergent or an enzymatic agent) as an initial step until actual cleaning starts.
Since most microbes on surfaces are eliminated through cleaning, it must be performed before disinfection or sterilization. If instruments are not properly cleaned, disinfection or sterilization may be ineffective, as organic and inorganic residues can harbor microbes that survive the process.
Cleaning is typically
performed using running water with liquid detergents or enzymatic
cleaners, which are essential for removing proteins and lipids from
instruments after use.
Cleaning can be manual or automated, using ultrasonic waves or
washer-disinfectors, which enhance cleaning and disinfection efficiency,
especially for complex instruments with lumens, hinges, joints, or
intricate structures, ensuring they are safe to handle or ready for
sterilization.
In many cases, the cleaning solution used is pre-saturated with enzymatic agents that dissolve organic materials. Alternatively, surfactant-based detergents may be used to reduce surface tension, facilitating the removal of debris and oils from instrument surfaces.
Pre-soaking instruments before cleaning may improve cleaning efficiency. A deep container filled with water and a cleaning or enzymatic solution can be used for soaking, containing a wire-mesh basket to hold instruments. The entire container can then be transferred to the central sterilization department, where instruments are separated, inspected, and prepared for further processing.
Manual Cleaning
- Disassemble all instruments (if applicable) before cleaning.
- Use lukewarm water as it helps remove most protein-based contaminants (e.g., blood, mucus), preventing coagulation, which can make removal more difficult.
- The most effective technique involves scrubbing the instrument with a soft brush while keeping it submerged in water to prevent aerosolization.
- Finally, rinse instruments under running water and dry them. Brushes used for cleaning must be cleaned, disinfected, and dried after use.
After cleaning:
- Low-risk instruments are ready for use.
- Intermediate-risk instruments are ready for disinfection.
- High-risk instruments are ready for sterilization.
Cleaning Tools
- Use non-abrasive cleaning tools to prevent scratching instruments, as scratches and crevices can harbor microbes and contribute to instrument degradation.
- Utilize various brushes of different shapes and sizes to suit all instrument types.
- Preferably use pressurized water, detergent, and air guns to assist in cleaning instruments with lumens or complex structures.
Advantages of Manual Cleaning
- Lower cost.
- Ability to access complex areas (e.g., hinges and cavities).
- Possibility of inspecting instruments during the cleaning process.
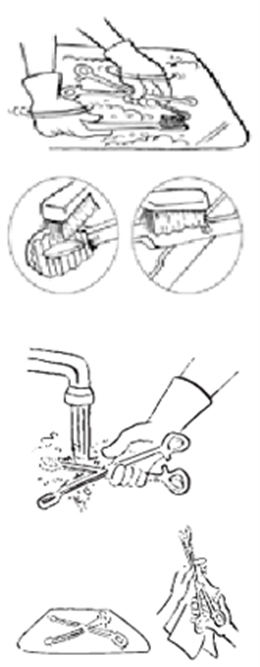
Steps for Manual Instrument Cleaning
1. Wear heavy-duty rubber gloves, a plastic apron, eye protection, a surgical mask, and foot protection during the cleaning process.
2. Immerse the instruments in lukewarm water containing a foaming detergent.
3. Scrub the instruments thoroughly using a soft brush, water, and detergent while keeping them submerged to prevent aerosolization. Ensure the removal of organic residues from crevices, tips, and hinges. Flush water and detergent into internal cavities using specialized tools (e.g., pressure gun).
4. Rinse inside the cavities with irrigation water.
5. Thoroughly rinse the instruments under clean running water to remove any detergent residues (as residual detergents may interfere with disinfection or sterilization). Place the instruments on a tray.
6. Inspect instruments carefully to ensure cleanliness.
7. Dry the instruments with a clean cloth to avoid dilution of disinfection or sterilization solutions.
Automated Cleaning
Most modern cleaning units operate automatically, minimizing direct handling of equipment by staff.
Types of Automated Cleaning Machines:
- Washer Machines: These follow a cycle where instruments are first washed with lukewarm water, then cleaned with hot water at 71°C for a few minutes, followed by a hot rinse at 80-90°C for 10-20 seconds. Drying is achieved using a fan-assisted heater at 50-75°C.
- Washer-Disinfectors: These specialized machines clean and disinfect certain medical instruments. They operate for 45 minutes, followed by a two-minute cleaning cycle using water heated to 80-100°C and a detergent solution.
Advantages of Automated Cleaning:
- Fully automated process.
- Use of stronger detergents that are not suitable for manual cleaning.
- Capability for thermal disinfection and drying of medical instruments.
- Effective in reprocessing respiratory circuit connectors, anesthesia masks, and endotracheal tubes.
Disadvantages of Automated Cleaning:
- High cost.
- Requires regular maintenance to ensure cleaning and thermal disinfection efficiency.
- If protein residues are not removed during washing, they can become fixed onto the surface of medical instruments during thermal disinfection.
Ultrasonic Cleaning Device
This device consists of a water tank connected to an ultrasonic generator operating at 45,000 Hz. The high-frequency vibrations generate microscopic air bubbles that expand and collapse in the liquid, effectively removing organic contaminants from instrument surfaces.
Advantages:
- Provides a high level of cleanliness.
- Can be used alongside other cleaning methods (either before or after them).
Disadvantages:
- Expensive.
- Requires costly regular maintenance to ensure optimal cleaning performance.
Cleaning Indicators
- Use cleaning indicators such as Residual Protein Detection Kits to test for protein contaminants on instrument surfaces.
- Use cleaning indicators for ultrasonic washers, such as the aluminum foil test (Foil Test) to evaluate cleaning efficiency.
Important Notes:
- Do not use bar soap for cleaning instruments as it leaves residues on surfaces.
- Always wear gloves, a surgical mask, and eye protection when handling contaminated instruments.
- Automated washers with rinsing and drying cycles are preferable to manual cleaning.
Disinfection
Disinfection can be achieved through heat or chemical agents. Whenever possible, thermal disinfection is preferred because it:
- Is more reliable than chemical methods.
- Saves time and costs.
- Leaves no residues.
- Is easier to control and non-toxic.
For heat-sensitive
instruments, chemical disinfection is necessary.
Organic residues (e.g., blood and body fluids) reduce
the effectiveness of disinfection. Additionally, higher
microbial loads require longer disinfection times, making thorough pre-cleaning
essential before disinfection.
High-Level Disinfection (For Intermediate-Risk Instruments)
- Boiling.
- Chemical disinfection.
Note:
High-level disinfection is the
only acceptable alternative to sterilization for intermediate-risk
instruments when sterilization is not feasible.
Boiling and flame exposure are high-level disinfection methods but do
not achieve sterilization.
High-Level Disinfection by Boiling
Boiling is a high-level disinfection method used for heat-resistant intermediate-risk instruments. It effectively eliminates microorganisms except for spores.
- Instruments must be submerged for at least 10 minutes from the start of boiling.
High-Level Disinfection Using Chemical Disinfectants
Before using a chemical
disinfectant, it is essential to consider alternative disinfection
methods if available.
Chemical disinfection is primarily used for heat-sensitive equipment,
such as endoscopes.
A limited number of disinfectants can be used for this purpose, including:
- Glutaraldehyde (≥2%) for 20-90 minutes.
- Hydrogen peroxide (7.5%) for 30 minutes.
- Peracetic acid and hydrogen peroxide (0.23-3.5%) for 15 minutes.
- Ortho-phthalaldehyde (OPA) for 5 minutes (automated use) or 12 minutes (manual use).
Post-Disinfection Rinse:
- Instruments must be thoroughly rinsed with sterile water after disinfection.
- If sterile water is unavailable, freshly boiled water can be used for 5-10 minutes.
Steps for Disinfection Using Glutaraldehyde
Glutaraldehyde solution does not corrode metals and is resistant to organic matter contamination.
- Activated glutaraldehyde solutions remain effective for up to two weeks.
- Once activated, the solution should be stored in a clean, sealed container.
- The disinfectant must be discarded after 28 disinfection cycles or two weeks—whichever comes first—or immediately if its properties change.
- A test strip must be used daily to verify the solution's effectiveness before use.
Preparation and Labeling:
- If using a pre-prepared solution, confirm its efficacy using a test strip.
- If preparing a new solution, store it in a clean, sealed container and clearly label it with:
- Date of preparation
- Expiration date
Procedure for Disinfecting Instruments with Glutaraldehyde
1. Disassemble all hinged or sliding instruments to ensure the disinfectant reaches all surfaces.
2. Fully immerse the instruments in the solution. Containers should be placed upright, not inverted, to ensure complete exposure to the disinfectant.
3. Seal the container and let the instruments soak for 20-90 minutes.
o No instruments should be added or removed during this period.
o The soaking time must be carefully monitored.
4. Remove the instruments using sterilized forceps or forceps disinfected with a high-level disinfectant.
5. Thoroughly rinse instruments with sterile water or freshly boiled water for 5-10 minutes to remove all traces of the chemical disinfectant.
o Residual chemicals can be toxic to skin and tissues.
6. Use disinfected instruments immediately or store them and re-disinfect before use (as required for flexible endoscopes).
|
Disinfectant |
Hydrogen Peroxide (7.5%) |
Peracetic Acid (0.2%) |
Glutaraldehyde (≥2%) |
Orthophthaldehyde (0.55%) |
Hydrogen Peroxide & Peracetic Acid (0.23 - 7.35%) |
|
High-Level Disinfection Time |
30 min |
NA |
20-90 min |
5 min for machine – 12 min for manual use |
15 min |
|
Effectiveness Against Bacterial Spores (Mycobacteria/Tuberculosis Bacilli) |
6 hrs |
12 min |
10-12 hrs |
- |
3 hrs |
|
Activation Required |
No |
On |
According to product type |
No |
No |
|
Reuse Period |
21 days |
24 after preparation and used for only one cycle |
14 days for basic preparation, 30 days for acidic preparation and is used for 28 cyles |
14 days |
14 days |
|
Shelf Life |
2 yrs |
6 months |
2 yrs |
2 yrs |
2 yrs |
|
Regulations for Disposal of Used Chemical Solutions |
No precautions |
No precautions |
Determined at the local level |
Determined at the local level |
No precautions |
|
Compatibility with Materials to be Disinfected |
Good |
Suitable |
Excellent |
Excellent |
No enough data |
|
Minimum Effective Concentration |
6% |
No |
1.5% or more |
0.3% |
No |
|
Hazards to Handlers & Users |
Eye hazards |
Eye and skin hazards |
Eye, skin and respiratory hazards |
Eye hazards and skin discoloration |
Eye hazards |
|
Handling Requirements |
Manual or Auto |
Auto |
Manual or Auto |
Manual or Auto |
Manual |
|
Compatibility with Instrument Materials |
Yes |
Yes |
Yes |
Yes |
Yes |
It is essential to confirm the concentration of the disinfectants used for chemical disinfection and sterilization, as well as the required contact times, since these may vary depending on the manufacturer. Therefore, always follow the manufacturer's instructions before using a disinfectant.
Sterilization
Sterilization is the process of eliminating all forms of microbial life, including bacterial spores. The main sterilization methods can be categorized as follows:
First: Heat Sterilization
- Moist Heat Sterilization: Using pressurized steam in an autoclave.
- Dry Heat Sterilization: Using dry heat in an electric sterilization oven.
Second: Low-Temperature Sterilization
- Using ethylene oxide gas sterilizers, plasma gas sterilization with hydrogen peroxide, or formaldehyde vapor sterilization, while ensuring safety precautions for each method.
- Chemical liquid sterilization (chemical sterilization): Using solutions such as activated glutaraldehyde (≥2%) or hydrogen peroxide & peracetic acid (0.23% - 7.35%), ensuring proper contact time.
Third: Other Sterilization Methods
- Gamma Radiation Sterilization: One of the most important methods for sterilizing medical supplies such as syringes and gloves.
- Filtration (Sterilization by Filtration): Used for purifying pharmaceutical preparations from bacteria that cannot be removed by other means except through fine-pore filters (e.g., 0.22-micrometer filters, which are smaller than bacteria).
First: Heat Sterilization
A. Steam Sterilization (Autoclave)
Steam sterilization is one of the best methods for sterilizing instruments that penetrate the skin or mucous membranes, provided they can withstand heat.
Advantages of Steam Sterilization:
- Highly reliable in eliminating microorganisms.
- Eco-friendly and safe for public health.
- Can rapidly reach high temperatures.
- Effectively penetrates porous materials.
Types of Steam Sterilizers:
1. Gravity Displacement Steam Sterilizers
- Steam is introduced into the sterilizer, forcing air downward and out through a drain valve using gravity.
- Small table-top sterilizers:
- Used in medical and dental clinics.
- Similar in operation to pressure cookers.
- Recommended sterilization times for unwrapped instruments:
- 121°C (20 minutes)
- 132°C (4 minutes)
- Large steam sterilizers:
- Larger than small models.
- Fully automatic operation available.
2. Pre-Vacuum Sterilizers (High-Speed Sterilization by Air Removal)
- Uses a vacuum pump to remove air before introducing steam, creating a negative pressure inside the sterilization chamber.
- Advantages:
- Shortens the time needed for steam to penetrate wrapped instruments, fabrics, and porous materials.
- Ideal for sterilizing wrapped instruments and porous materials (e.g., surgical tools with cavities).
3. Immediate-Use (Flash) Autoclaves
- These sterilizers operate either by gravity displacement or pre-vacuum methods.
- Not used routinely but placed in operating rooms for the rapid sterilization of unwrapped instruments.
- Biological indicators with fast results (1 to 3 hours) can be used to confirm sterilization.
- Sterilization cycle:
- 132°C for 4 minutes.
Table No. (13): Required Steam Sterilization Times
|
Type of Autoclave |
Instruments & Supplies |
Sterilization Time at 121°C |
Sterilization Time at 132°C |
Drying Time |
|
Gravity Displacement |
Wrapped instruments |
30 minutes |
15 minutes |
15-30 minutes |
|
Textiles |
30 minutes |
25 minutes |
15 minutes |
|
|
Pre-Vacuum (Pressure Reduction) |
Wrapped instruments |
— |
4 minutes |
20-30 minutes |
|
Textiles |
— |
4 minutes |
5-20 minutes |
Important Note:
- The sterilization time does not include the time required to reach the necessary temperature or pressure levels, nor does it include the time for venting or drying. Therefore, the sterilization time is shorter than the total cycle time.
Key Considerations for Steam Sterilization Under Pressure
1. Ensure that all instruments are cleaned and dried before sterilization. New surgical instruments must be cleaned and dried before their first sterilization to remove wax coatings.
2. Do not sterilize rusted surgical instruments—they should be discarded.
3. Open and disassemble all hinged or multi-component instruments before sterilization.
4. Wrap instruments before steam sterilization to maintain sterility until use.
5. Use sterilization rolls (paper-plastic pouches) or double-layered crepe paper wraps for packaging. In resource-limited settings, double-layered cotton fabric may be used, but thick cotton or linen fabrics should be avoided as they hinder steam penetration.
6. Arrange items in the autoclave properly to ensure adequate steam circulation. Do not stack packages on top of each other.
7. Label sterilized containers with contents, processing date, and expiration date, and store them in a designated storage area.
8. Follow the manufacturer's instructions for operating the autoclave.
Manual Autoclave Operation Guidelines:
- Use a timer to ensure proper sterilization duration. The countdown should begin only after the autoclave reaches the required temperature and pressure. If the timer was not started at the correct time, restart the cycle.
- Turn off the power after the sterilization time is complete, release steam using the vent valve, and only open the autoclave once the pressure gauge reads zero.
Storage of Sterilized Instruments
Storage Area Conditions:
- Store sterilized instruments in a clean, dry, well-ventilated area.
- Keep items on shelves, away from the floor and walls.
Factors Affecting Sterile Shelf Life:
- Type of packaging material.
- Integrity of the packaging (no tears, moisture exposure).
- Frequency of handling before use.
- Open or closed storage cabinets.
- Storage environment conditions (humidity, ventilation).
Storage Duration Based on Packaging Type:
|
Packaging Type |
Storage Duration |
|
Sterilization rolls (pouches) |
1 month |
|
Crepe paper (double layer) |
1 month |
|
Crepe paper (single layer) |
1 week |
|
Fabric wraps (cotton) |
3 days |
|
Sterilization containers |
24 hours |
Note:
- Unwrapped instruments must be used immediately after removal from the autoclave or stored in a sterile, dry, sealed container for up to 8 hours.
- A package is considered sterile as long as the wrapping is intact and dry. If sterility is in doubt, treat the package as contaminated and reprocess it from the cleaning step.
Advantages and Disadvantages of Steam Sterilization
✅ Advantages:
- Highly effective in eliminating microbes.
- Rapid heating and deep penetration into instruments.
- Non-toxic and environmentally friendly.
❌ Disadvantages:
- Instruments must be heat and moisture-resistant.
- Not suitable for powders, ointments, or oils.
Dry Heat Sterilization (Hot Air Oven)
Key Considerations for Dry Heat Sterilization:
- Requires a continuous power supply.
- Ideal for glassware, solid metal instruments, oils, ointments, and powders.
- Not suitable for materials prone to burning or melting, such as surgical sutures or textiles.
- Fan-equipped ovens are preferred to ensure even heat distribution.
Procedure for Dry Heat Sterilization:
1. Clean and dry all equipment before sterilization.
2. Wrap equipment in aluminum foil or place it on trays/metal containers, ensuring air circulation.
3. Heat the oven to the required temperature.
4. Allow the equipment to cool to room temperature before removal—do not use running water to cool items.
5. Use sterile forceps to remove items if they are unwrapped. Wrapped items can be stored for up to 8 hours in a sealed, sterile, dry container.
Storage of Dry Heat Sterilized Equipment:
- Use items immediately after removal from the oven or store them in a sealed, sterile container for up to 8 hours.
- Store in a closed, dry, and temperature-controlled cabinet to minimize contamination.
Additional Notes:
- The oven must have a temperature gauge to verify the required heat level.
- Sterilization time should begin only after reaching the target temperature.
- Do not use the oven as a storage space for sterile instruments.
Advantages and Disadvantages of Dry Heat Sterilization
✅ Advantages:
- Suitable for glassware, powders, and anhydrous oils.
- Can sterilize non-disassemblable instruments.
- Prevents rusting or corrosion of metal instruments.
- Low-cost method.
❌ Disadvantages:
- Requires longer exposure times to high heat.
- Can damage rubber materials and some fibers.
- Limited to a narrow range of materials.
Maintenance of Dry Heat Sterilization Ovens
Dry heat sterilization ovens must be inspected to ensure proper performance. The working staff should adhere to the following:
- Maintain the cleanliness of the ovens.
- Ensure that the temperature gauge is functioning correctly through regular checks, preferably every few weeks. This is done by inserting a thermal probe inside the oven and comparing its recorded temperature with the reading from the oven’s built-in gauge.
Sterilization at Low Temperatures
A. Sterilization Using Ethylene Oxide Gas
This method is used to sterilize instruments and tools that cannot withstand high temperatures and humidity. The following conditions and requirements must be met:
- The gas concentration should be between 450-1200 mg/L.
- The temperature range should be between 37-63°C.
- The humidity level should be between 40%-80%.
- The exposure time to the gas should be between 1 to 6 hours.
Preparation for Ethylene Oxide Sterilization
1. Ensure the cleanliness of the instruments and tools to be sterilized.
2. Disassemble, clean, and dry the instruments before packaging.
3. Open any instruments with cavities on both ends.
4. Ensure all instruments and tools are free of water droplets.
5. Maintain humidity levels between 35%-70%, and temperatures between 18-22°C during the sterilization process.
6. Do not overcrowd the instruments inside the sterilization chamber.
Factors Affecting Ethylene Oxide Sterilization
1. Temperature
2. Humidity
3. Packaging
4. Exposure time (1-6 hours)
Aeration Process
1. Post-sterilization aeration is required to remove ethylene oxide gas to a safe level.
2. This can be done either passively, using ventilation pipes in the sterilization chamber, or mechanically, by actively displacing the gas.
Side Effects of Ethylene Oxide Sterilization
1. Formation of toxic ethylene glycol when combined with water.
2. Repeated exposure to the gas may affect some instrument properties.
3. Liquid ethylene oxide can cause burns.
4. Health risks for staff exposed to the gas (acute exposure):
o Respiratory complications
o Eye irritation
o Nausea, vomiting, and diarrhea
o Drowsiness and general weakness
o Agitation and respiratory paralysis
o Seizures
Long-term exposure risks to Ethylene Oxide:
- Corneal burns
- Neuropathy
- Cataracts (clouding of the eye lens)
- Anemia
Advantages of Ethylene Oxide Sterilization
1. Effective against all microorganisms.
2. Minimal damage to instruments and tools.
3. Allows sterilization of packaged instruments, unlike some other sterilization methods.
Disadvantages of Ethylene Oxide Sterilization
1. Risk of fire or explosion.
2. Long sterilization cycle (up to 14 hours).
3. High cost.
4. Requires biological indicators for monitoring.
Ethylene Oxide Sterilization Cycle (Five Steps)
1. Preparation & Humidification
2. Gas Introduction
3. Exposure (1-6 hours)
4. Evacuation
5. Aeration
Types of Ethylene Oxide Gas
1. 100% Ethylene Oxide
2. Mixtures with other gases:
o 96.4% Hydrochlorofluorocarbon - 8.6% Ethylene Oxide
o 90% Hydrochlorofluorocarbon - 10% Ethylene Oxide
o 91.5% Carbon Dioxide - 8.5% Ethylene Oxide
B. Sterilization Using Plasma Technology
Plasma is the fourth state of matter, distinct from solid, liquid, and gas. It is generated in a sealed chamber under vacuum conditions using short-wave electromagnetic energy to excite gas molecules, producing charged free radicals.
How Plasma Sterilization Works
Plasma sterilization works by generating free radicals within the plasma field. These radicals interact with essential microbial components, such as enzymes and nucleic acids, disrupting their metabolism and rendering the microorganisms inactive.
Advantages of Plasma Sterilization
1. Safe and non-toxic
2. Time-efficient (about 1 hour)
3. Produces only water and oxygen as byproducts, eliminating the need for ventilation since these are harmless substances.
Disadvantages of Plasma Sterilization
- Not suitable for cellulose-based products (e.g., cotton, paper).
- Ineffective for instruments with blocked cavities, powders, or liquids.
Biological Indicators for Quality Control
The biological indicator used is Bacillus atrophaeus spores.
C. Sterilization Using Formaldehyde Gas
Hospital Applications of Formaldehyde
Formaldehyde solution is widely used in anatomy labs, pathology departments, and surgeries. It is also used in limited cases in dermatology and radiology and primarily for tissue fixation in hospitals.
Low-Temperature Steam Formaldehyde (LTSF) Sterilization
- LTSF replaces dry heat with a mixture of steam and formaldehyde gas.
- The process operates at temperatures of 50, 55, 60, or 65°C.
- The presence of steam allows formaldehyde to penetrate and kill microorganisms effectively.
LTSF Process (Four Stages)
1. Pre-Treatment
o Repeated vacuuming and steam injection.
2. Formaldehyde Injection
o Formalin solution is injected from a sealed bottle.
o The formalin evaporates and enters the chamber as a gas.
o Vacuuming helps the gas spread.
o Steam is added to maintain a predefined temperature level.
o The process is repeated multiple times for deep penetration.
3. Sterilization Phase
o The chamber is maintained at a constant temperature, gas concentration, pressure, and humidity.
4. Post-Sterilization Treatment
o After the exposure period, formaldehyde is effectively removed from sterilized instruments through multiple vacuum cycles.
o The process ends with pressure evacuation, followed by multiple air purges using HEPA-filtered air to remove any residual formaldehyde.
Validation of LTSF Sterilization
- Chemical Indicators: Color change indicates sufficient exposure to formaldehyde gas.
- Biological Indicators: The Geobacillus stearothermophilus spores are used as a biological indicator.