
Book
Guidelines for infection control in operations
- Characteristics of chemical sterilization
Since chemical sterilization requires complete immersion of instruments for long periods, it is recommended to avoid this method whenever possible, especially when other sterilization options exist.
Considerations Before Using Chemical Sterilization
- Chemical sterilization should be a last resort when no heat-based sterilization is available.
- It is used for heat-sensitive instruments when alternative low-temperature sterilization methods (such as gas sterilization) are not available.
- Instruments are immersed in a chemical solution for a specific period to ensure complete bacterial spore destruction.
- A major challenge is keeping the instruments sterile after chemical immersion, as they cannot be packaged like steam-sterilized instruments.
- Unlike steam sterilization, biological indicators are not suitable for most chemical sterilants.
Considering these limitations, chemical sterilization should be restricted to high-level disinfection purposes only.
Types of Chemical Agents Used in Sterilization
Glutaraldehydes are among the most common sterilization solutions. Some chemical agents can be obtained locally, such as peracetic acid (0.2% - 0.35%), hydrogen peroxide (7.5%), or a mixture of hydrogen peroxide and peracetic acid (7.35% - 0.23%). Formaldehyde solution is not used for sterilizing or disinfecting tools and instruments due to its toxicity.
1. Glutaraldehyde
Uses:
- A glutaraldehyde solution (above 2%) can be used for sterilizing heat-sensitive instruments by immersing them for 10-12 hours.
- Glutaraldehydes are known irritants that can affect the skin, eyes, and respiratory system.
- They are available in an inactive acidic form and require an alkaline activator. Once activated, they remain effective for up to two weeks.
Precautions:
- As previously mentioned, glutaraldehydes can irritate the eyes, nose, and respiratory system, potentially causing allergic reactions.
- Avoid using them in closed or poorly ventilated areas.
- When preparing or disposing of glutaraldehyde solutions, or during sterilization, wear protective gear including:
- Eye protection
- Disposable plastic aprons
- Gloves (Latex gloves for short contact periods, i.e., under 5 minutes, and nitrile gloves for prolonged exposure).
- Storage:
- Store in sealed containers in well-ventilated areas, away from heat sources.
- Replace solutions immediately if they become cloudy or show any changes in properties.
2. Peracetic Acid
Uses:
- Peracetic acid (0.2% - 0.35%) can sterilize heat-sensitive tools (e.g., flexible endoscopes) within 15 minutes.
- It is highly effective even in the presence of organic material and can eliminate bacterial spores at low temperatures.
- Byproducts are non-toxic and leave minimal residues.
Disadvantages:
- Corrosive to red and yellow copper, bronze, standard steel, and galvanized metal.
- Unstable when diluted, though certain additives can reduce its corrosive effects.
Comparison with Glutaraldehyde:
- Peracetic acid has superior penetration through organic material.
- However, its corrosive nature limits its use unless corrosion inhibitors are added.
NeocideX:
- A peracetic acid solution with an added corrosion inhibitor.
- Manufacturers recommend discarding the solution within 24 hours of use.
Sterilization Using Peracetic Acid:
- Often performed using an automatic reprocessing machine, which dilutes the acid from 0.35% to 0.2%, making it safe for use.
- This method is suitable only for instruments that can be fully immersed in liquid.
Chemical Sterilization Requirements:
✔ Wear appropriate personal
protective equipment (PPE).
✔ Thoroughly clean and dry
instruments before sterilization.
✔ Follow manufacturer
recommendations when preparing chemical sterilants.
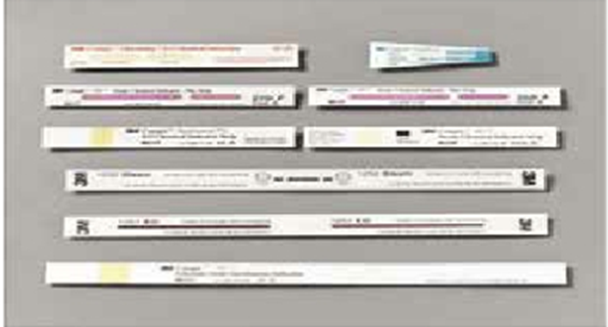
✔ Use a test strip (indicator)
to verify solution effectiveness if reusing a prepared solution.
✔ Prepare fresh solutions in
clean, sealed containers, labeling them with the preparation
and expiration dates.
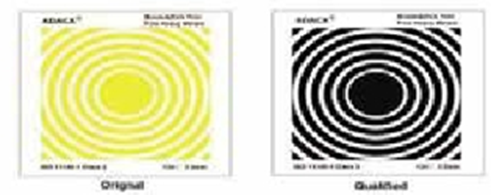
Chemical Indicators:
- Easy-to-use and fast-reacting test strips are used alongside biological indicators to confirm sterilization effectiveness, especially at low temperatures.
Chemical Indicators Classification (6 Categories):
Category 1:
- External indicators placed outside the sterilization package.
- A color change confirms exposure to certain sterilization conditions.
- External indicators are not a substitute for internal indicators.
Category 2:
- Indicators used only to test the efficiency of air removal in pressure filtration systems, such as:
1. Bowie-Dick Test
2. Helix Test
Bowie-Dick Test:
- Conducted at the start of the day before loading the sterilizer in a dedicated cycle.
- Also performed when testing a sterilizer for the first time or after maintenance.
- Test placement:
- The test pack is placed in the center of a stack of towels.
- This stack is then positioned on the lower shelf of the sterilizer, directly above the air extraction port.
Sterilization Guidelines:
✔ Ensure all hinged instruments
are fully opened.
✔ Disassemble sliding or
multi-part instruments to allow the sterilant to reach all components.
✔ Completely submerge
instruments in the solution.
✔ Containers should remain
upright (not inverted) to fill properly with the sterilant.
✔ Seal the container properly
and follow the manufacturer’s instructions regarding sterilization duration.
✔ Do not add or remove
instruments during the sterilization process.
✔ Record the sterilization time
in a logbook for tracking and review.
✔ Use opaque, large covers when
removing sterilized instruments from the container.
✔ Rinse sterilized instruments
thoroughly with sterile water to remove chemical residues.
✔ Use the sterilized
instruments immediately after reprocessing—storage is not
permitted.
Sterilization Effectiveness Monitoring:
1. Mechanical Indicators:
- These are built-in recorders within sterilization devices (autoclaves or hot air ovens).
- They monitor and record sterilization parameters:
- Time
- Temperature
- Pressure
2. Chemical Indicators:
Helix Test:
- Used to ensure steam penetration into hollow instruments and devices.
Chemical Indicator Categories:
Category 3:
- Internal indicators placed inside each sterilization package.
- Measure a single variable (e.g., temperature) as per the manufacturer's instructions.
- Commonly used in low-temperature sterilization methods.
Category 4:
- Internal indicators placed inside each sterilization package.
- Measure two or more parameters simultaneously (e.g., temperature, steam saturation, time) according to manufacturer instructions.
Category 5:
- Internal indicators placed in each sterilization cycle or package.
- Measure all critical sterilization parameters simultaneously (temperature, steam saturation, time).
- Designed to simulate biological indicators, but they do not replace them.
Category 6:
- Internal indicators used in specific sterilization cycles.
- Measure all parameters simultaneously and are classified based on the temperature and duration of the sterilization cycle.
- These are the most advanced indicators, but they do not replace biological indicators.
Note:
- Categories 4, 5, and 6 are called integrating indicators because they measure multiple parameters at the same time.
Biological Indicators:
- Utilize highly resistant bacterial spores to verify sterilization effectiveness.
Process:
1. The biological test is placed on the lower shelf of the sterilization chamber, near the air extraction port.
2. Successful sterilization is confirmed when all bacterial spores are eradicated in the test capsules.
3. Test capsules are placed inside the sterilizer during operation.
4. After sterilization, test strips are incubated in a bacterial culture medium at the following temperatures:
- Geobacillus stearothermophilus → 55-60°C
- Bacillus atrophaeus → 35-37°C
5. Incubation period: 48 hours
- No bacterial growth indicates successful sterilization.
- Bacterial growth indicates sterilization failure.
Advantages & Limitations:
✅ Provides direct confirmation
of sterilization efficacy.
❌ Not an immediate result—requires
bacterial culture incubation, unlike mechanical and chemical indicators.
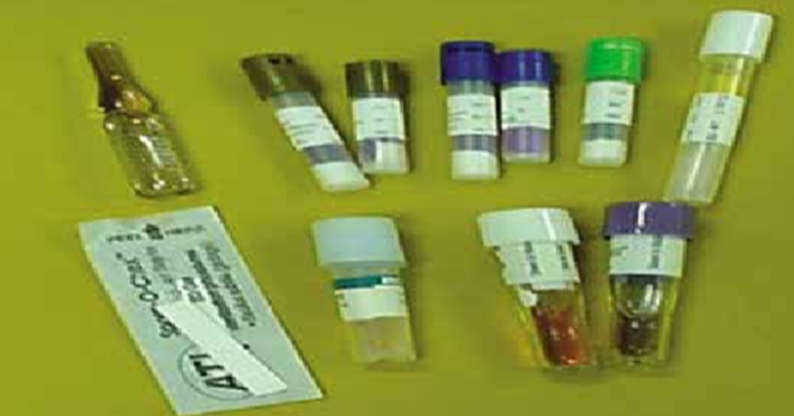
Figure 27
Biological indicators
- • If the biological test result is positive (bacterial growth detected) while the chemical and physical indicators show acceptable results, the biological test should be repeated.
- If the biological test remains positive, the sterilizer should be taken out of service, and the engineering/maintenance department must be informed for necessary repairs.
- Sterilized packages containing implantable devices should be recalled.
Biological Indicator Testing Requirements:
Biological indicator tests should be conducted:
- Upon initial operation of the sterilizer for the first time.
- Weekly as part of routine monitoring.
- After any sterilizer malfunction or maintenance service.
- For cycles containing implantable medical devices (implants).
Monitoring & Documentation System:
The following documentation procedures must be followed:
- The autoclave's recording chart (if available) should be reviewed after every sterilization cycle.
- If a recording chart is unavailable, temperature, time, and pressure readings should be manually recorded in a logbook for future reference.
- For dry heat sterilization, temperature and time readings must be logged after each cycle.
- A temperature probe should be placed in the most thermally resistant area of the load to ensure proper heat penetration.